Introduction
Packing for a trip in a backpack means taking only what you need, keeping the load easy to carry, and placing each item where you can reach it. For most U.S. trips, a 30- to 40-liter backpack works well for a short trip. A 40- to 50-liter pack may suit longer trips, cold weather, or outdoor travel.
The best method is simple: plan by activity, check the weather, limit clothing, and pack heavy items close to your back. Then test the full pack before you leave.
This guide covers air travel in the United States, road trips, city breaks, and light hiking. Airline rules can differ, so check your airline’s current baggage limits before you pack.
Choose the Right Backpack
Start with the trip, not the bag. A backpack should match the length, setting, and type of travel.
Backpack size guide
| Trip type | Useful backpack size | Best for |
|---|---|---|
| One-day trip | 15–25 liters | Basic clothes, water, snacks |
| Weekend trip | 25–35 liters | Light clothing and toiletries |
| Three to five days | 30–45 liters | City travel and warm weather |
| One week or more | 40–55 liters | More clothing, gear, or cold weather |
| Backpacking or camping | 50–70 liters | Tent, sleeping bag, food, and outdoor gear |
These sizes are general guides. Your clothing, climate, and gear matter more than the number of days alone.
A smaller bag helps control weight. It also makes it easier to use public transit, walk through airports, and store your bag in a hotel room. A larger bag gives more space but often leads to overpacking.
Carry-on or personal item?
For flights within or from the United States, confirm three limits before packing:
- The airline’s carry-on size limit
- The airline’s carry-on weight limit, if one applies
- The size limit for a personal item under the seat
A backpack may count as a carry-on, a personal item, or either one. The answer depends on its size and the airline’s rules.
If you want to avoid checked baggage, choose a backpack that fits your airline’s published carry-on measurements when full. Do not rely only on the bag’s empty size. Overstuffed pockets can make a legal bag too large.
Plan Before You Pack
Good packing starts with a short plan. Make the plan at least a day before departure so you have time to wash clothes, charge devices, or replace missing items.
Write down:
- Where you will go
- How many nights you will stay
- The forecast for each location
- Your planned activities
- Whether you will do laundry
- Whether you will fly or check a bag
Then divide your items into four groups:
- Wear: clothes and shoes used during travel
- Pack: items that stay in the backpack
- Buy there: low-cost items that take up space
- Leave home: duplicate or rarely used items
This step prevents a common mistake: packing for every possible event instead of the trip you actually planned.
Use a simple clothing formula
For a warm-weather trip, start with:
- Two or three shirts
- One or two pairs of pants or shorts
- Four or five pairs of underwear
– Three or four pairs of socks - One sleep outfit
- One light jacket or sweater
- One pair of walking shoes
- Optional sandals
For a seven-day trip, you do not need seven full outfits if you can wash clothes. A small amount of laundry often saves more space than a larger backpack.
For cold weather, wear your bulkiest items during travel. A coat, boots, and thick sweater take much more room inside a backpack than on your body.
Check the forecast close to departure. Weather forecasts can change, especially in mountain areas and during storm season. Pack one layer for a change in temperature, but do not pack several “just in case” outfits.

Pack by Weight and Access
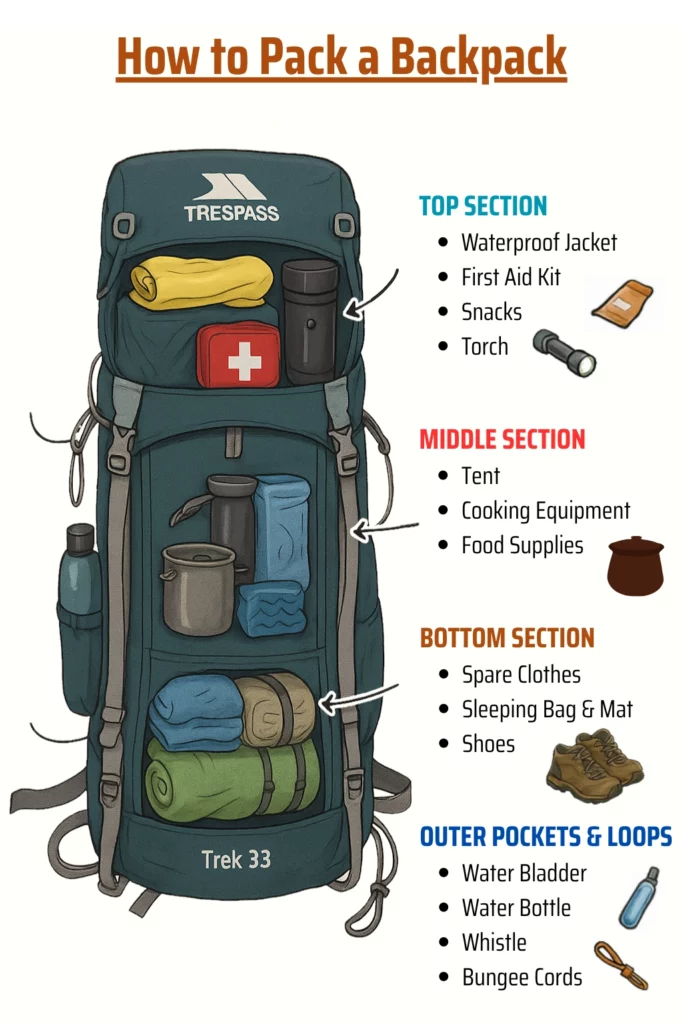
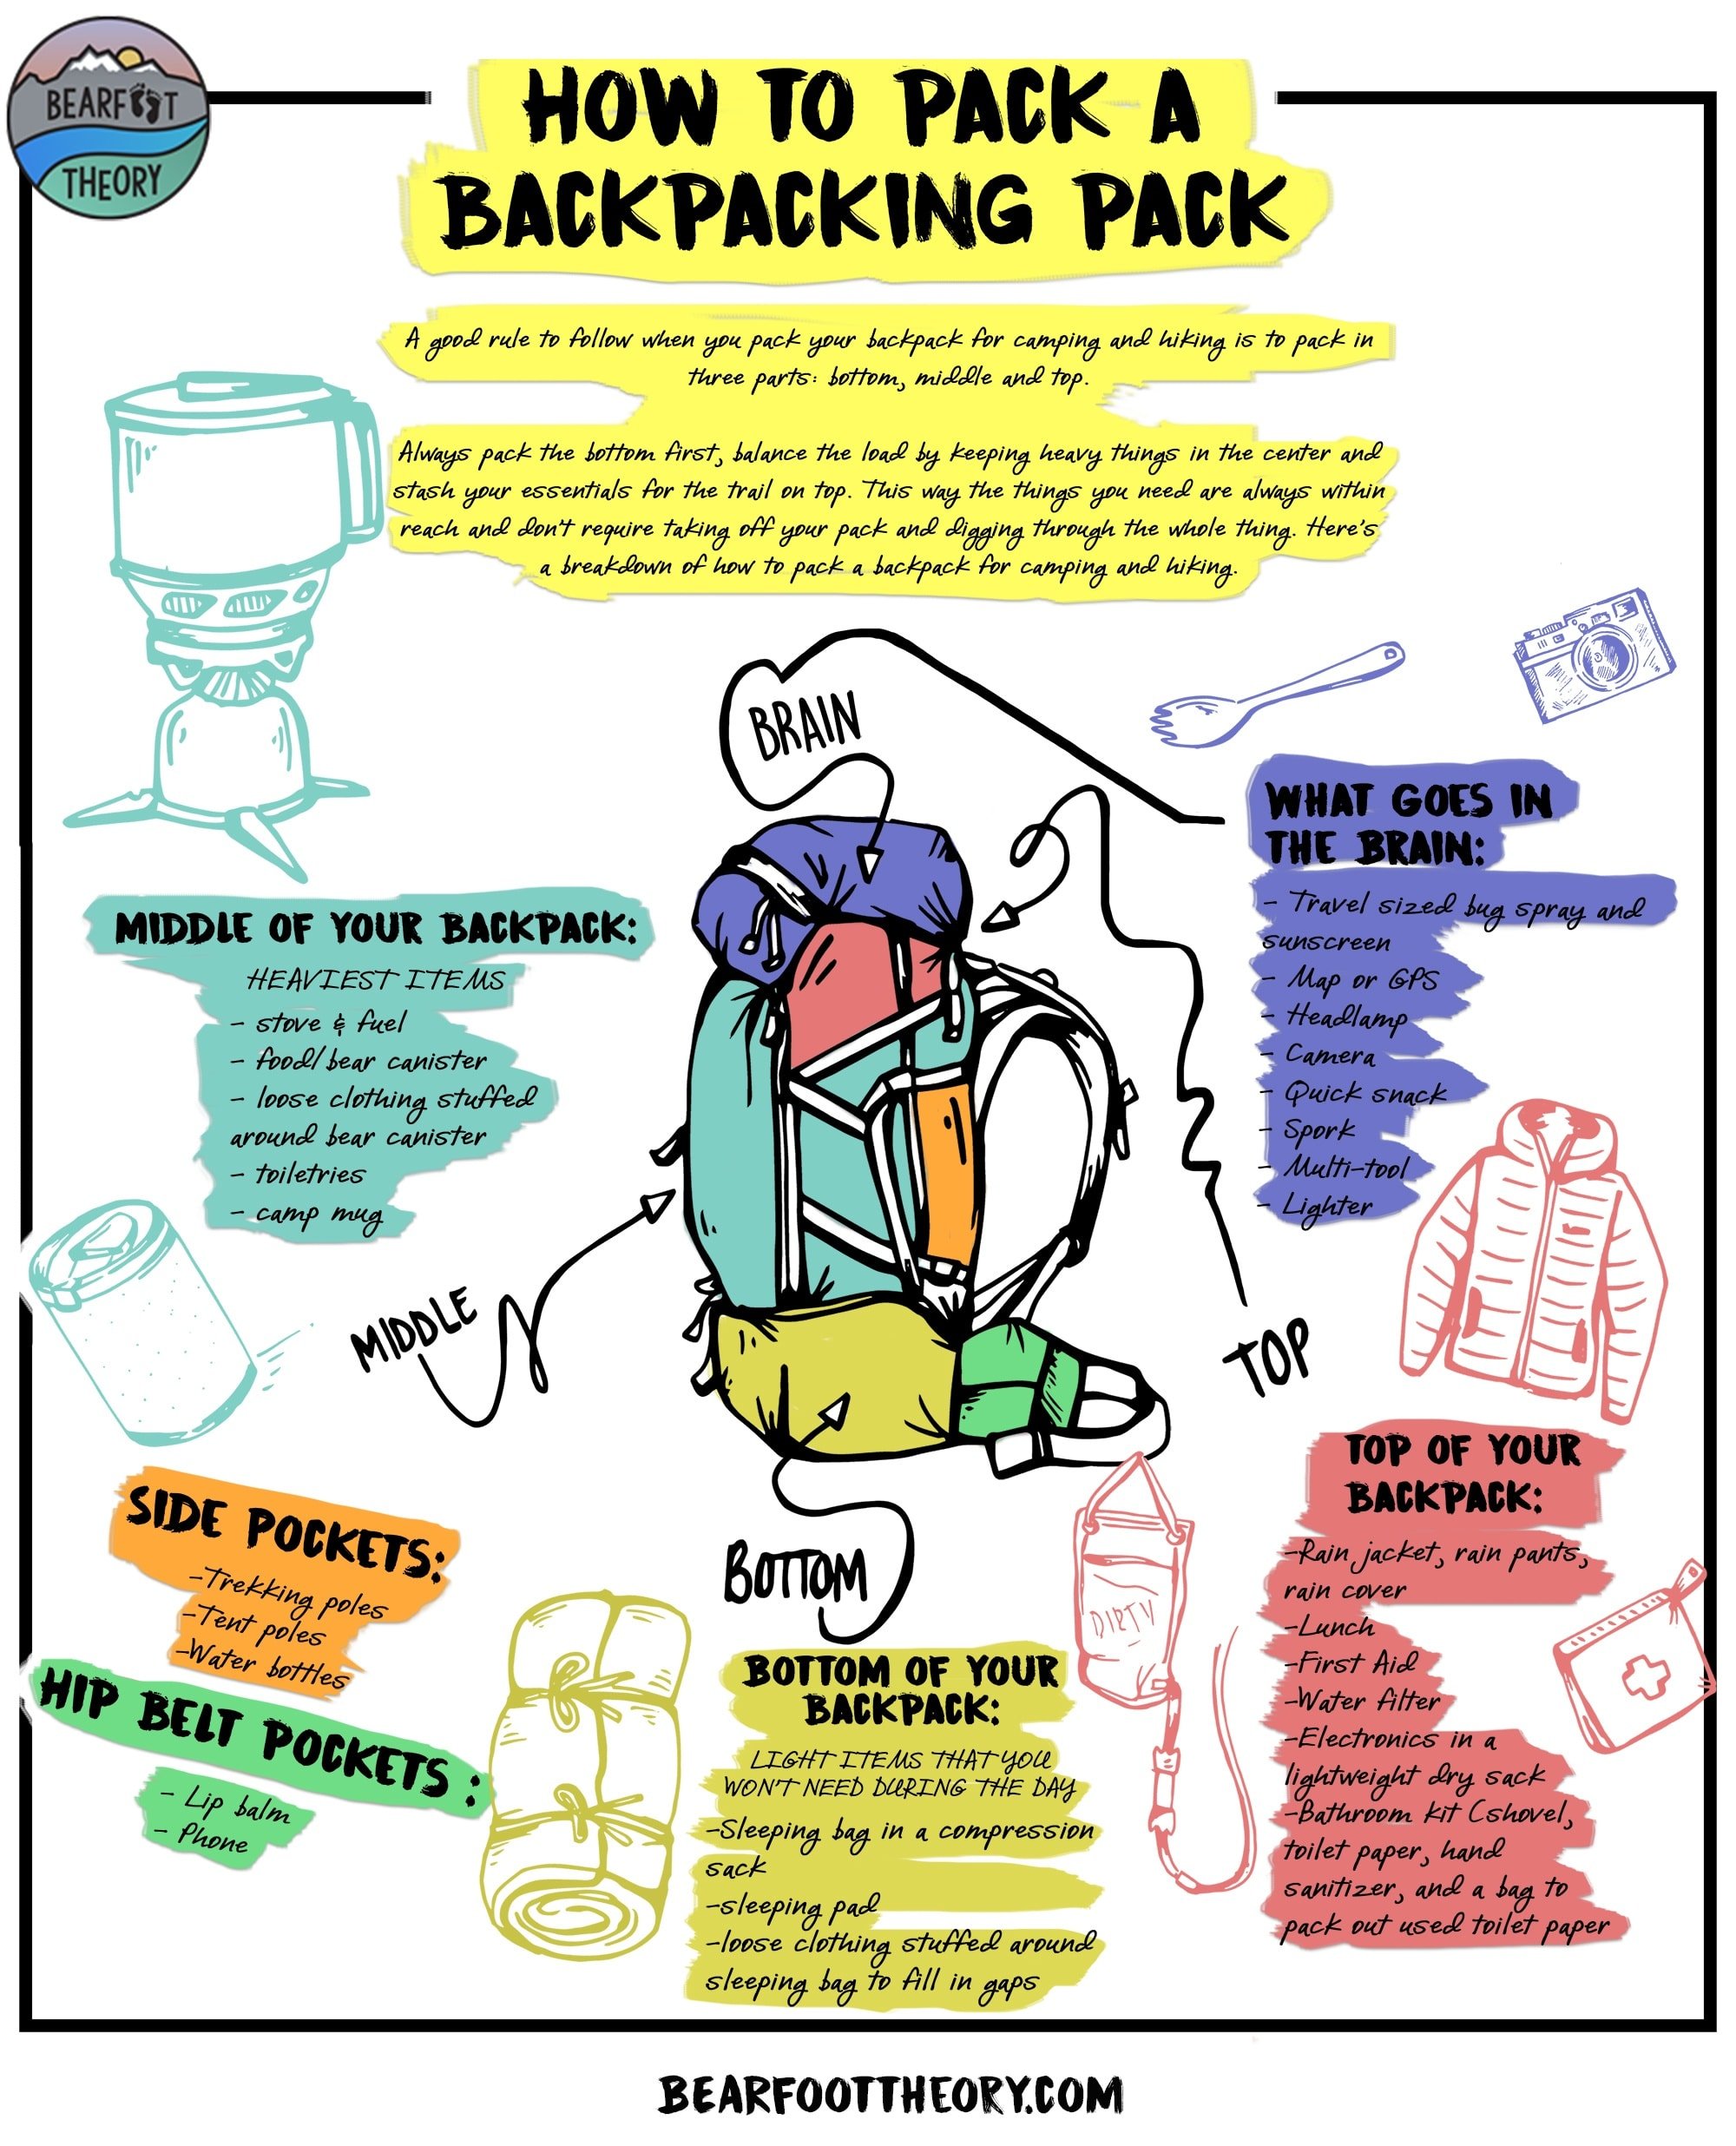
Place heavy items near the middle of your back. Keep items you may need soon near the top or in outer pockets.
A useful order is:
- Light items at the bottom
- Medium-weight clothing in the middle
- Heavy items close to your back
- Frequently used items near the top
- Small items in pockets or pouches
What goes where?
| Backpack area | Good items |
|---|---|
| Bottom | Sleepwear, soft clothes, spare shoes |
| Center near your back | Shoes, food, camera, dense gear |
| Top | Jacket, travel documents, snacks |
| Outer pockets | Water bottle, tissues, sunglasses |
| Small pouch | Chargers, medicine, pen, earplugs |
Avoid placing hard items against your spine. A charger, shoe, or water bottle can create pressure and make the bag uncomfortable.
Keep your passport, identification, wallet, medication, and keys in one secure place. For U.S. flights, keep identification easy to reach at airport checkpoints. Do not bury it under clothing.
Use packing cubes with care
Packing cubes can help you group clothing and find items quickly. They do not reduce the weight of your gear. They may also use more space than loose clothing.
Use one cube for tops, one for underwear and socks, and one for sleepwear if that system helps you. A small laundry bag keeps worn clothes apart from clean clothes.
Roll soft clothes if it helps you use narrow spaces. Fold stiff items, such as button-down shirts, to reduce deep creases. The best method is the one that lets you find items without emptying the entire bag.
Pack Toiletries and Liquids for U.S. Air Travel
For flights screened by the Transportation Security Administration, liquid, gel, and aerosol containers in carry-on baggage generally must follow the 3-1-1 rule:
- Containers must hold 3.4 ounces (100 milliliters) or less
- All containers must fit in one quart-size bag
- Each traveler may carry one quart-size bag
The TSA allows some exceptions, including medically necessary liquids and certain infant and child items. These may need extra screening. Review the current rules at TSA.gov.
Pack only the amount you need. Travel-size containers are often enough for a short trip. Solid toiletries can save space and reduce liquid limits. Examples include:
- Bar soap
- Solid shampoo
- Toothpaste tablets
- Solid deodorant
- Powder sunscreen
Do not move a product into a container unless you can identify it. Clear labels help during security checks and prevent mix-ups.
Keep medication in your carry-on, not in checked luggage. If you use prescription medicine, keep it in its original labeled container when practical. Bring enough for the trip and a small extra supply if your clinician or pharmacist advises it.
For air-safety rules on medicines and medical items, check the TSA guidance and ask your airline about special equipment.
Create a Backpack Packing List
A useful packing list should cover needs without filling every pocket. Use this basic list as a starting point.
Clothing
- Two to four shirts
- One or two bottoms
- Underwear
- Socks
- Sleepwear
- Light jacket or warm layer
- Rain shell, if the forecast calls for rain
- Comfortable walking shoes
- Optional sandals or a second pair of shoes
Shoes are heavy and take up space. Bring a second pair only when it serves a clear purpose, such as hiking, formal events, water use, or foot comfort.
Toiletries
- Toothbrush and toothpaste
- Deodorant
- Soap or body wash
- Shampoo
- Skin care items
- Sunscreen
- Small first-aid items
- Personal medication
- Razor, if needed
Electronics
- Phone
- Charging cable
- Wall charger
- Power bank, if needed
- Headphones
- E-reader or camera, if useful
The Federal Aviation Administration advises passengers to carry spare lithium batteries and power banks in carry-on baggage rather than checked baggage. Read the current guidance at FAA.gov.
Unplug chargers before packing them. Wrap cables loosely or place them in a small pouch. Leave devices you will not use at home.
Travel documents and money
- Driver’s license or passport
- Travel confirmation
- Health insurance information
- Credit or debit card
- Small amount of cash
- Emergency contact details
Keep digital copies of key documents in a secure account. A paper backup can help if your phone loses power or service.
Small comfort items
- Water bottle
- Sunglasses
- Earplugs
- Sleep mask
- Small towel
- Reusable shopping bag
- Snacks
- Pen
Do not add an item just because it is small. Small items can still create clutter.
Pack for Different Types of Trips
The best backpack packing list changes with the trip.
City trip
For a city trip, focus on walking, weather changes, and access to shops. Bring comfortable shoes, a light layer, a small day bag if needed, and secure storage for your phone and wallet.
You may not need a full rain jacket if the forecast is dry and stores are close. However, a compact rain shell can help in places with frequent showers.
Business trip
Use one pair of shoes that works with most outfits. Pack clothing that matches in color and fabric. A wrinkle-resistant shirt and a small stain remover may be more useful than several extra outfits.
Keep work items in a separate sleeve or pouch. This makes it easier to find a laptop, charger, notebook, or document at the airport.
Beach trip
Bring swimwear, sunscreen, sunglasses, a hat, and a lightweight cover-up. A quick-dry towel can help, but check whether your hotel or rental provides one.
Protect electronics from sand and water. A simple dry bag or sealed pouch can help, but no pouch replaces care around water.
Hiking or camping trip
Outdoor travel needs more planning. Check the trail length, weather, water access, and rules before you leave.
For a day hike, bring water, food, a map or offline navigation, sun protection, rain protection, a small first-aid kit, and a way to contact help. For overnight camping, you may also need a shelter, sleeping system, cooking gear, and a plan for waste.
Do not use a city backpack for a long hike if it lacks a comfortable hip belt or proper support. A poorly fitted pack can cause pain even when the load is light. For remote routes, check guidance from the National Park Service or the land manager for that location.

Keep the Backpack Comfortable
A packed backpack should feel stable, not loose or pulled backward.
Adjust it in this order:
- Loosen all straps.
- Put the pack on.
- Tighten the hip belt over the hip bones.
- Pull the shoulder straps until the bag sits close to your body.
- Tighten the load lifters if the pack has them.
- Adjust the sternum strap so the shoulder straps stay in place.
The hip belt should carry much of the load on a larger hiking pack. A small daypack may not have a hip belt, so keep that bag lighter.
Walk with the full pack before your trip. Test stairs, public transit, and a short outdoor walk. This reveals problems that a bedroom test may miss.
If your shoulders hurt, check the fit and weight balance first. If numbness, sharp pain, or lasting pain develops, stop using the pack and seek qualified medical advice.
How much should a backpack weigh?
There is no single safe weight for every traveler. Fitness, pack design, body size, health, terrain, and distance all matter.
Use this practical rule:
- Weigh the full bag.
- Remove items you can replace, share, or leave behind.
- Keep dense items close to your back.
- Test the pack before departure.
- Reduce the load if walking feels strained.
For children, older adults, people with back or joint problems, or anyone with a medical condition, ask a health professional for personal guidance.
Weigh, Test, and Edit the Pack
Finish packing with a short inspection.
The 10-minute packing test
- Put every planned item on the floor.
- Remove duplicate items.
- Pack the bag.
- Weigh it with a luggage scale.
- Walk for 10 to 15 minutes.
- Take out anything you did not need during the test.
- Check all zippers and straps.
- Confirm that important items are easy to reach.
Try to leave a little empty space. That space can hold snacks, a jacket, or items you buy during the trip. A completely full backpack is hard to close and easy to overfill.