
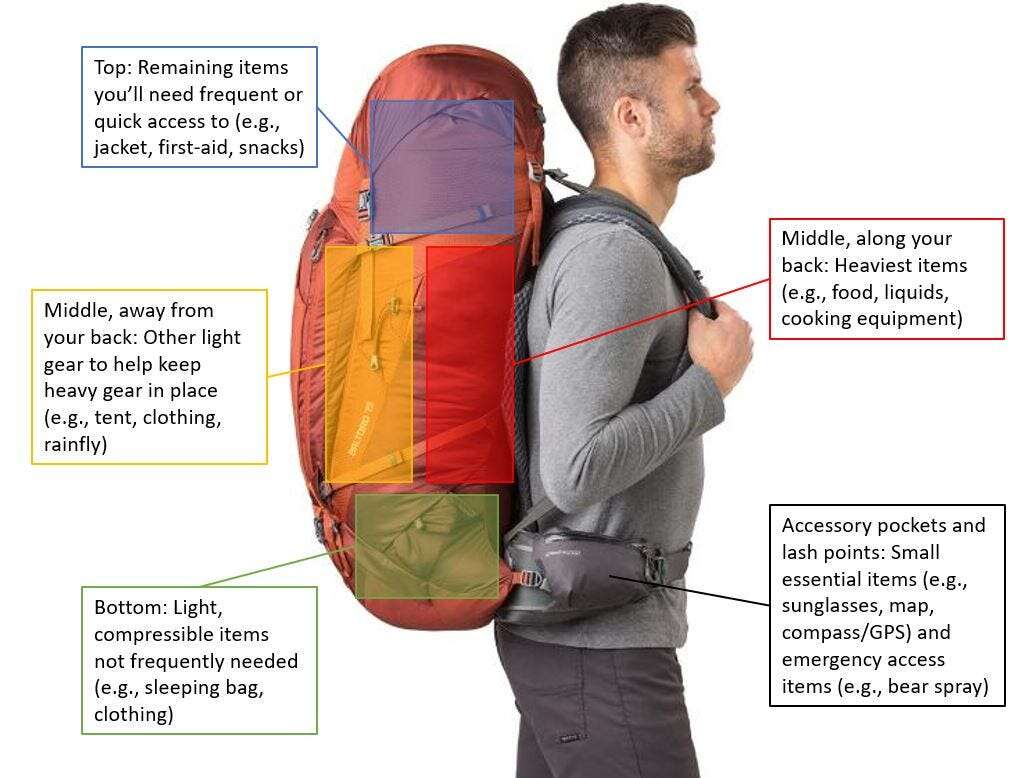
Pack a camping backpack by placing heavy gear near your back, soft items around it, and daily needs within easy reach.
Learning how to pack a camping backpack can make a long trail feel shorter, safer, and far more comfortable. After years of adjusting pack loads, testing gear, and fixing common packing mistakes on the trail, I have found that good organization matters as much as the backpack itself. This guide explains how to balance weight, protect your gear, save space, and build a system that works in real outdoor conditions.
Start With the Right Gear List
Before learning how to pack a camping backpack, make a complete gear list. Packing without a list often leads to two problems: carrying too much or forgetting something important.
Your list should match the trip. A warm summer weekend needs less clothing and insulation than a cold mountain hike. A trail with water sources may require less water weight than a dry desert route.
Organize your camping gear into these groups:
• Shelter: Tent, poles, stakes, and footprint
• Sleep system: Sleeping bag or quilt, sleeping pad, and pillow
• Cooking: Stove, fuel, pot, lighter, food, and utensils
• Clothing: Base layers, rain gear, warm layers, socks, and gloves
• Safety: First aid kit, headlamp, map, compass, whistle, and emergency items
• Water: Bottles, hydration bladder, filter, purification tablets, or treatment drops
• Personal items: Toiletries, medications, sunscreen, insect repellent, and phone
Check the weather, trail rules, water sources, and camping regulations before you pack. Conditions can change quickly, so keep a small safety margin instead of planning for perfect weather.
A useful rule is to pack only what you will use, need, or rely on for safety. Many new backpackers carry several “just in case” items that never leave the pack. One extra layer can help, but five extra items can turn a manageable load into a burden.

Choose a Backpack That Fits
A properly fitted backpack is the foundation of comfortable hiking. Even a light load can feel painful if the pack is too long, too short, or poorly adjusted.
Most backpacking packs are measured by torso length, not height. Measure from the top of your hip bones to the prominent bone at the base of your neck, or ask an outdoor store to help you find the right size.
Look for these features:
• A padded hip belt that rests on your hip bones
• Shoulder straps that follow your body without gaps
• A sternum strap that keeps the shoulder straps stable
• Load lifter straps that pull the pack closer to your upper back
• Enough capacity for your shelter, sleep system, food, and water
For a weekend trip, a 40 to 60 liter pack often works well. A minimalist summer trip may need less, while a winter trip usually needs more space for bulky insulation and technical gear.
Pack size is not the same as carrying capacity. A large pack can encourage overpacking. The best backpack is often the smallest one that safely holds your complete gear list.
To adjust your backpack:
-
Loosen every strap before putting it on.
-
Place the hip belt over your hip bones and tighten it first.
-
Pull the shoulder straps until they are snug.
-
Adjust the load lifters so the top of the pack sits close to your shoulders.
-
Fasten the sternum strap without pulling it too tightly.
-
Walk with the loaded pack and make small adjustments.
Understand Backpack Weight Distribution
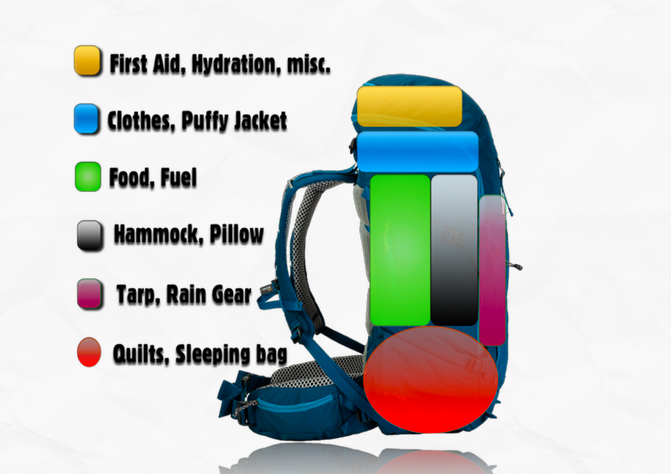
The main goal of how to pack a camping backpack is to keep the load balanced and close to your body. Think of your backpack as a stable tower. Heavy items belong near the middle of your back, not at the bottom or far from your spine.
Place items in four main zones:
• Bottom zone: Lightweight and soft items
• Middle zone: Dense, heavy items near your back
• Top zone: Light or medium items you may need during the day
• Outer pockets: Small items needed often
Keep the center of gravity close to your back. A heavy water bottle placed in an outer pocket can pull your body sideways. A cooking pot at the bottom can make the pack feel heavier and less stable.
A useful target is to carry heavier items around the middle of the pack, slightly above your hips. This position supports balance while still allowing your legs and hips to do most of the work.
Pack both sides evenly. If one side holds your tent and the other side holds only snacks, the pack may lean and cause shoulder or back strain.
Try to keep the total load as light as practical. There is no single safe weight for every person, but many backpackers aim for a base weight of about 10 to 20 pounds before food and water. Fitness, body size, terrain, weather, and pack fit all affect what feels comfortable.

How to Pack a Camping Backpack Step by Step
Use this order when learning how to pack a camping backpack. It creates a balanced load and keeps important gear easy to reach.
1. Line the pack
Use a waterproof pack liner or a strong trash-compactor bag inside the backpack. Pack covers protect the outside from rain, but water can still enter through the back panel, seams, or pockets.
Place your sleeping bag and clothing inside the liner. Twist or fold the top closed after loading the main compartment. Keep small electronics, maps, and medications in sealed bags as extra protection.
2. Pack the sleeping bag first
Put your sleeping bag or quilt at the bottom. It is light, soft, and usually not needed until camp.
Do not compress it tightly for the entire trip if you can avoid it. Long-term compression can reduce loft in some sleeping bags, especially down models. A loose stuff sack or pack liner often works well.
Add sleep clothes, camp shoes, or other soft items around the sleeping bag. These items fill empty spaces and create padding.
3. Add the sleeping pad
Place an inflatable sleeping pad inside the main compartment, along the back panel, or outside the pack if the design allows it. Keep it protected from sharp tent stakes and cooking tools.
Some hikers use a foam pad as a frame or strap it to the outside. This can save space, but exposed gear may catch on branches or become wet. Test the setup before a long trip.
4. Place heavy gear near your back
Put dense items above the sleeping bag and close to the back panel. Good examples include:
• Food bag
• Cooking pot
• Stove and fuel
• Water filter
• Bear canister, when required
• Dense clothing or shelter parts


