To put on backpack straps, loosen them first, center the pack, then tighten each strap for a snug, balanced fit.
Knowing how to put on backpack straps can make a major difference in comfort, posture, and balance. The right method keeps the pack close to your body, spreads weight across your hips and shoulders, and helps prevent sore muscles. This guide explains how to put on backpack straps for school bags, hiking packs, travel backpacks, and everyday carry.

Why Proper Backpack Strap Placement Matters
Backpack straps do more than hold a bag on your shoulders. They guide the pack’s weight across your body. When the straps fit well, your shoulders stay relaxed and the bag feels stable.
Poor strap placement can make a light backpack feel heavy. It may also cause neck pain, shoulder pressure, lower back strain, or numb hands. A pack that hangs too low can pull your body backward with each step.
A good fit should feel like the backpack is part of your body. It should sit close to your back without squeezing your chest or limiting your arm movement.
Proper strap adjustment can help you:
• Keep the backpack centered
• Reduce pressure on your shoulders
• Improve walking balance
• Limit pack movement while running or hiking
• Keep heavy items closer to your spine
• Support better posture
For children, fit matters even more. A backpack should not hang far below the waist or weigh more than recommended by a school, medical, or safety professional. A practical rule is to keep the load light and remove items that are not needed.

Understand the Main Backpack Straps
Before learning how to put on backpack straps, identify each strap on your bag. Different packs use different systems, but most have the same basic parts.
Shoulder straps
These are the two padded straps that rest over your shoulders. They support much of the pack’s upper weight and connect the bag to your torso.
Sternum strap
The sternum strap clips across your chest. It keeps the shoulder straps from sliding outward. It should sit across the upper chest, not against your throat.
Hip belt
A hip belt wraps around your waist or hips. On hiking and travel packs, it transfers weight from your shoulders to your pelvis.
Load lifter straps
These small straps sit near the top of some hiking packs. They connect the shoulder straps to the upper pack and pull the load closer to your back.
Stabilizer straps
Stabilizer straps are often found near the bottom of a hip belt. They reduce side-to-side movement and help secure the lower part of the pack.
Adjustment sliders
These are the plastic or metal pieces that let you lengthen or shorten each strap. Learn which direction loosens and tightens the strap before putting on the pack.

How to Put on Backpack Straps Step by Step
The best way to learn how to put on backpack straps is to follow the same order every time. This creates a balanced fit and prevents you from over-tightening one side.
1. Place the backpack on a stable surface
Set the backpack upright on a chair, bench, or table. Check that the straps are not twisted or trapped under the bag.
If the pack is on the floor, bend your knees and lift it with both hands. Avoid swinging a loaded backpack onto one shoulder. That motion can strain your back and shoulder.
2. Loosen the shoulder straps
Pull the shoulder straps loose before putting the backpack on. This gives your shoulders enough room to enter without forcing the bag into place.
Do not loosen them so much that the pack falls away from your body. You only need enough space to slide your arms through easily.
3. Lift the backpack with both hands
Hold the backpack by its top handle or side handles. Keep the back panel facing your body.
If the bag is heavy, place it on a raised surface first. Lifting from a low floor can place extra stress on your lower back.
4. Put on both shoulder straps
Slide one arm through a shoulder strap, then slide the other arm through the second strap. Do not carry a fully loaded backpack on one shoulder unless you are moving it for only a moment.
Stand tall after both straps are on. Let the bag settle naturally before making adjustments.
5. Center the backpack
The backpack should sit in the middle of your back. Its weight should feel even on both sides.
The bottom of a daily backpack should usually rest near your waist or slightly above it. A hiking pack should sit so that the hip belt can cover the upper hip bones.
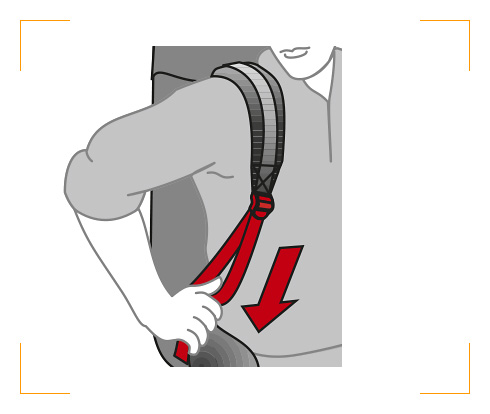
6. Tighten the shoulder straps
Pull down and back on the loose ends of both shoulder straps. Adjust them one at a time, using small and equal pulls.
The straps should be snug but not tight. You should be able to slide a couple of fingers between the strap and your shoulder. If your shoulders rise toward your ears, the straps are too tight.
7. Fasten and adjust the sternum strap
Clip the chest strap and move it to a comfortable height. It often works best a few inches below the collarbone.
Tighten it until the shoulder straps stay in place. Do not pull it so hard that breathing feels restricted.
8. Fasten the hip belt
If your backpack has a hip belt, place it around your hips. For many hiking packs, the belt should rest over the upper part of the hip bones.
Tighten the belt until it feels secure but comfortable. The belt should carry weight without pressing painfully into your stomach.
9. Adjust load lifters and stabilizers
If your pack has load lifter straps, pull them gently toward your body. This brings the upper part of the pack closer to your back.
Next, adjust the lower stabilizer straps if the pack feels loose at the bottom. Use light tension. Over-tightening can make the pack feel rigid and uncomfortable.
10. Walk and test the fit
Walk for a minute. Turn your body, bend forward, and raise your arms. The pack should move with you without swinging.
If one shoulder feels heavier, stop and even out the straps. Learning how to put on backpack straps is not only about getting them on; it is about checking the fit while you move.

How to Adjust Backpack Straps for Different Activities
The correct strap setup depends on how you use the backpack. A school bag does not need the same adjustment as a large hiking pack.
School and everyday backpacks
Keep the bag high and close to your back. Tighten both shoulder straps evenly and use the sternum strap if the bag has one.
Pack books and electronics close to your spine. Put light items in the outer pockets. This arrangement reduces the pulling effect of heavy objects.
Hiking backpacks
Start with the hip belt. It should carry much of the pack’s weight. Then tighten the shoulder straps until they touch your shoulders without pressing hard.
Use the sternum strap to control movement. Adjust the load lifters so the upper pack rests close to your body, but do not pull them too tightly.
Travel backpacks
Travel packs often carry more weight than daily bags. Pack heavy items in the center and close to your back.
Before walking through an airport or city, check every buckle. A loose hip belt or twisted shoulder strap can become uncomfortable after several hours.
Cycling and running backpacks
A cycling or running pack should sit close to your upper back. Tighten the sternum and waist straps enough to prevent bouncing.
Keep the load light. Even a well-adjusted pack can feel unstable if it is overfilled or packed with loose objects.
Camera and work backpacks
Protective inserts and laptops can create uneven weight. Place the heaviest item in the compartment closest to your back.
After learning how to put on backpack straps, test the bag while standing, sitting, and reaching. A comfortable fit in one position may feel tight in another.
Common Mistakes to Avoid
Small mistakes can quickly make a backpack uncomfortable. These are the problems I see most often when helping people adjust packs.
Wearing the backpack on one shoulder
This puts uneven stress on your neck and upper back. It may look convenient, but it is not a good long-term carrying method.
Use both shoulder straps whenever possible. If you need to carry the bag by one strap, do so only for a short distance.
Letting the backpack hang too low
A low backpack pulls backward and can make you lean forward. It may also strike your lower back while you walk.
Raise the bag until it sits close to your torso. The exact height depends on the pack and your body, but it should not rest near the back of your knees.
Tightening the shoulder straps first
Many people pull the shoulder straps as hard as possible and ignore the hip belt. This can overload the shoulders.
For larger packs, secure the hip belt before fine-tuning the shoulder straps. The belt should support the lower part of the load.
Over-tightening every strap
More tension does not always mean more support. Tight straps can restrict breathing, create pressure points, and cause numbness.
Adjust each strap until it controls movement without digging into your body. Comfort is a useful sign that the fit is close.
Ignoring twisted straps
A twisted strap can rub your neck or distribute weight unevenly. Before putting on the pack, run your fingers along each strap and straighten it.
This simple check often saves a long walk from becoming painful.
Carrying too much weight
Strap adjustment cannot fix an overloaded backpack. Remove extra items before changing the fit.
If the pack still causes pain, stop carrying it and reassess the weight, design, and size. Persistent pain deserves attention from a qualified health professional.
A Simple Backpack Strap Fit Test
Use this short test after learning how to put on backpack straps.
-
Stand upright with both feet flat.
-
Check that the backpack is centered.
-
Look for even tension on both shoulder straps.
-
Confirm that the bottom of the bag is not pulling away from your back.
-
Take several steps and turn from side to side.
-
Raise your arms and take a deep breath.
-
Check for rubbing, numbness, sharp pressure, or restricted movement.
A properly fitted pack should feel stable when you move. It should not bounce, slide, or force your shoulders forward.
A useful personal lesson is to test a backpack with the same load you plan to carry. An empty bag can feel perfect in a store, yet a full bag may pull in a different direction.
How to Put on Backpack Straps Without Hurting Your Back
The lifting motion matters as much as the final fit. A heavy backpack can strain your back when you lift it from the floor.
Use these steps:
• Face the backpack before lifting it.
• Bend your knees instead of rounding your back.
• Hold the pack with both hands.
• Lift it close to your body.
• Place it on a chair or table when possible.
• Put on both shoulder straps before walking.
• Avoid twisting while lifting.
If you feel a sharp pain, tingling, or weakness, stop. Do not try to solve serious symptoms by simply tightening the straps. A medical professional can help identify the cause.
How to Pack a Backpack for Better Strap Fit
Backpack comfort begins inside the bag. Smart packing keeps the load stable and reduces strain.
Place heavy items close to the back panel. Put medium-weight items around them, and place light items in outer pockets.
For a hiking backpack, keep dense items near the middle of your back. Avoid placing hard objects where they press directly against your spine.
For a school backpack, use separate compartments to prevent books and devices from shifting. A laptop sleeve can also keep a heavy computer close to your body.
Before leaving, shake the pack gently. If the contents move loudly or slide from side to side, reorganize them. A stable load makes it easier to put on backpack straps and keep the fit comfortable.
Frequently Asked Questions About How to Put on Backpack Straps
How tight should backpack shoulder straps be?
Backpack shoulder straps should be snug but not painful. You should be able to fit a couple of fingers between the strap and your shoulder without feeling numbness or pressure.
Where should a backpack sit on your back?
A daily backpack should sit close to your back, with the bottom near your waist or slightly above it. A hiking pack should sit so the hip belt can rest securely over the upper hip bones.
Should the sternum strap be high or low?
The sternum strap usually works best across the upper chest, a few inches below the collarbone. It should keep the shoulder straps in place without pressing on your throat or limiting your breathing.
Should a backpack hip belt sit on the waist or hips?
On larger hiking packs, the hip belt should rest over the upper hip bones rather than high on the soft area of your stomach. This position helps transfer weight to your pelvis.
Why does my backpack hurt one shoulder?
One shoulder may hurt because the straps are uneven, the backpack is off-center, or the load is packed to one side. Loosen both straps, center the pack, and retighten them with equal tension.
How do I put on a heavy backpack safely?
Place the backpack on a raised surface when possible, then use both hands to lift it. Put on both shoulder straps and avoid twisting your back while lifting.
Can backpack straps affect posture?
Yes, a low or uneven backpack can encourage you to lean forward or lift one shoulder. A centered pack with even strap tension can help you maintain a more natural posture.
Conclusion
Learning how to put on backpack straps is simple, but the small details matter. Loosen the straps first, use both shoulders, center the pack, adjust the hip belt when available, and test the fit while walking.
A comfortable backpack should stay close to your body without squeezing your shoulders or limiting your movement. Try these steps with your usual load, then share your best backpack-fitting tip or explore more guides on safe and comfortable carrying.

Zayden Halbrook is a travel enthusiast and gear researcher passionate about making every journey smoother and more enjoyable. With a keen eye for practical travel essentials and real-world tips, he helps readers choose the right gear and travel smarter. When he’s not testing travel kits or exploring new destinations, Zayden shares simple, reliable advice to make every trip stress-free.