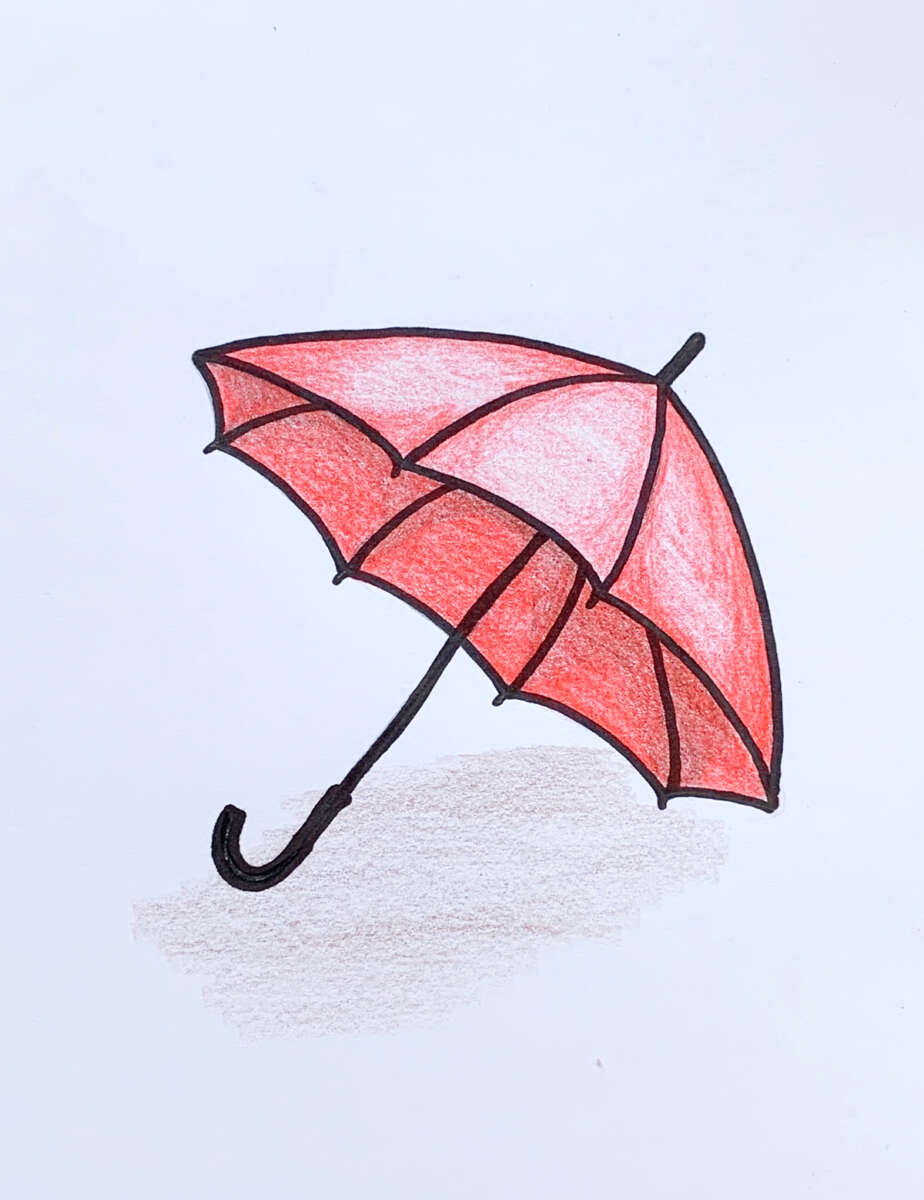
To draw an umbrella, sketch its canopy, add a curved handle, then shade folds and depth.
Learning how to draw an umbrella is easier when you treat it as a few simple shapes instead of one complex object. The canopy is a rounded dome, the ribs are clean lines, and the handle adds a small curved detail. This guide walks you through each step, from a basic cartoon umbrella to a more realistic sketch, with clear tips for shape, perspective, shading, and color.
What You Need to Draw an Umbrella
You do not need costly art supplies to start. A pencil and a sheet of paper are enough for a clean umbrella drawing.
Useful supplies include:
• A pencil, such as an HB or 2B
• An eraser for light corrections
• Smooth drawing paper
• A black pen for final lines
• Colored pencils, markers, or watercolor
• A ruler for checking straight ribs
• A blending stump or tissue for soft shading
Start with a light pencil. Early lines help you plan the form, so they should be easy to erase. Darken only the lines that you want to keep.
A light source also helps. Decide whether light comes from the left, right, or above. This choice will guide your shadows and make the umbrella look solid.
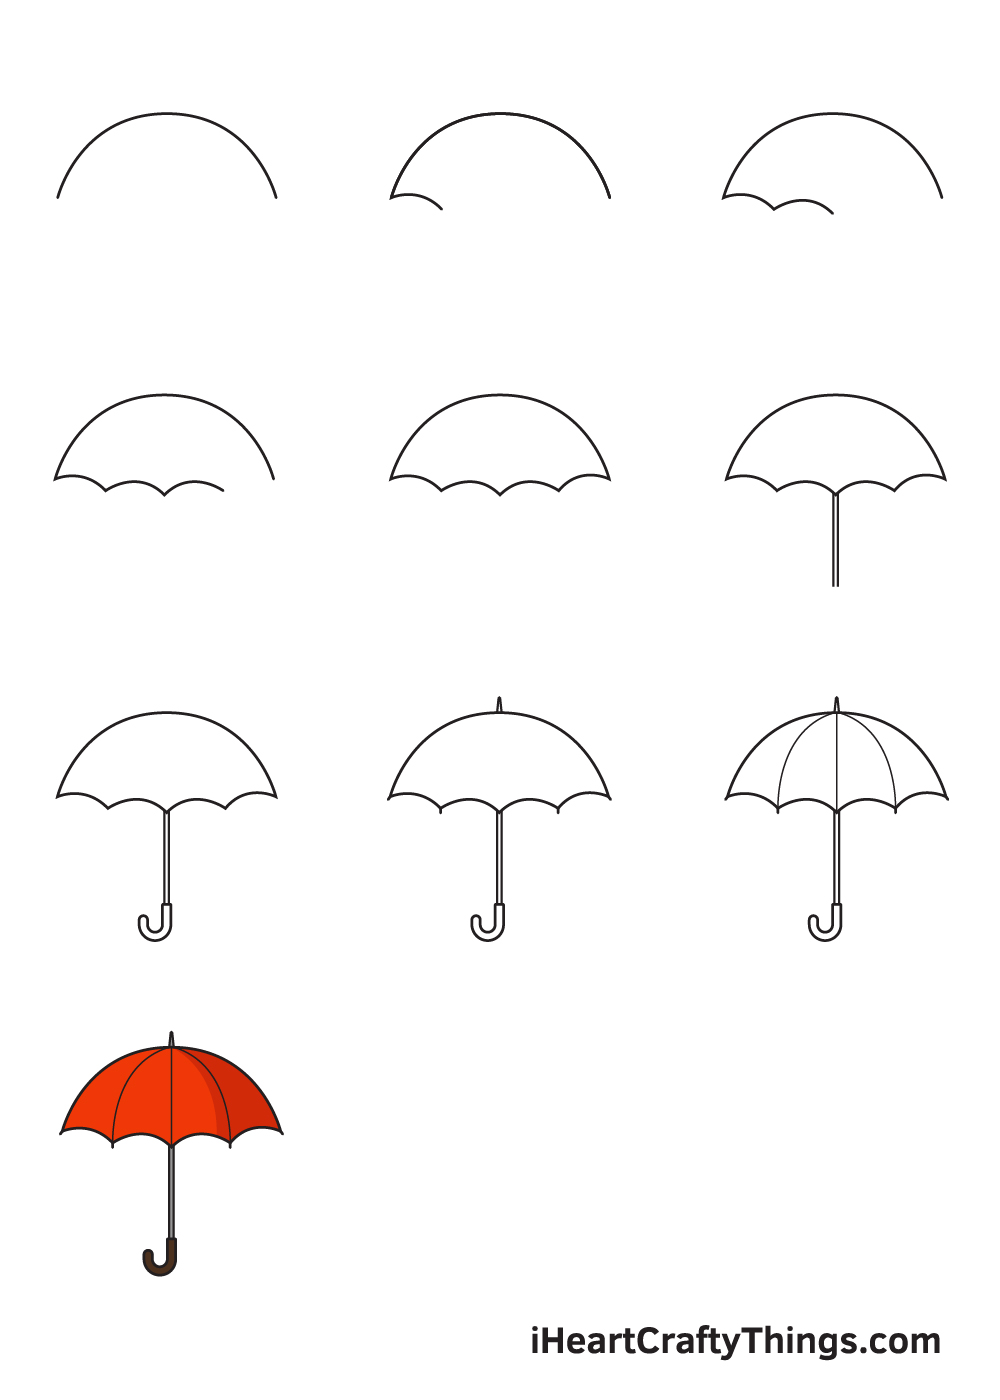
How to Draw an Umbrella Step by Step
Follow these steps to create a simple umbrella drawing. Do not press hard at the start. A soft sketch gives you room to fix the size and shape.
1. Draw the center line
Begin with a vertical line. This line marks the umbrella’s pole and helps you keep the drawing balanced.
The line does not need to be perfectly straight if you want a loose, hand-drawn style. For a neat technical sketch, use a ruler or draw it slowly in short strokes.
2. Add the main canopy shape
At the top of the center line, draw a wide, shallow dome. Think of the canopy as half of a soft oval.
The top should be smooth and rounded. Keep the bottom edge open for now because the canopy will later gain its curved, folded edge.
3. Create the scalloped lower edge
Umbrella fabric often falls in soft sections. Draw several shallow curves along the lower edge of the canopy.
Each curve should meet at a low point before rising again. These points show where the umbrella ribs end. Keep the curves even, but do not make them too stiff.
4. Add the umbrella ribs
Draw lines from the top center toward each low point on the canopy. These lines should follow the shape of the fabric.
Avoid making every rib the same length. The center rib may look longer, while side ribs may appear shorter because of the viewing angle. This small change adds depth.
5. Draw the pole
Extend the center line down from the canopy. Keep it narrow and slightly darker than the first construction line.
If you are drawing a closed umbrella, the pole may be mostly hidden. If you are drawing an open umbrella, let it continue toward the handle.
6. Add the handle
For a classic umbrella, draw a curved J-shaped handle at the bottom. Start with a narrow curve and connect it smoothly to the pole.
For a modern umbrella, use a short hook, a straight grip, or a rounded plastic handle. The handle should be smaller than the canopy, but it should still be easy to see.
7. Clean the outline
Erase extra guide lines inside the canopy. Keep the ribs, pole, and handle clear.
Do not erase every slight pencil mark. A few soft construction lines can give a sketch a natural feel, especially in a loose illustration.

How to Make an Umbrella Look Three-Dimensional
A flat umbrella drawing becomes more realistic when the viewer can sense its curve. You can create that effect with line direction, value, and overlap.
Use these methods:
• Curve the ribs slightly instead of drawing them as stiff straight lines.
• Make the center of the canopy a little brighter.
• Add darker values beneath the folds.
• Let the outer edges curve downward.
• Use overlapping lines where fabric sections meet.
• Keep the pole aligned with the center of the canopy.
Imagine the canopy as a shallow bowl. The fabric turns away from the light near the folds, so those areas should be darker.
One mistake I often see in beginner sketches is a perfectly flat lower edge. That edge makes the umbrella look like a hat or a table. A series of gentle curves gives the canopy its soft, flexible structure.

How to Draw a Realistic Umbrella
A realistic umbrella requires more attention to perspective and fabric. You do not need to add every tiny detail. Instead, focus on the parts that affect the form most.
Use perspective
If you view the umbrella from below, you will see more of the underside. The canopy may look like a wide, curved bowl.
If you view it from the side, the canopy becomes narrower. The ribs may overlap, and the handle may appear directly below the center.
Keep the center line connected to the highest point of the dome. If the pole leans away from that point, the umbrella may look bent.
Show fabric tension
The fabric is stretched over ribs. This creates gentle slopes between each rib.
Draw lighter curves between the main ribs to suggest fabric tension. Use only a few. Too many lines can make the canopy look busy.
Add natural irregularity
Real umbrellas are rarely perfect. One fold may be deeper than another, and one edge may sit slightly lower.
Small changes make your drawing feel more natural. Keep the main structure balanced, but allow a little variation in the fabric.
Use soft shadows
Place the darkest shadow under the canopy and near the folds. The upper surface can stay lighter if your light source is above.
A shadow beneath the umbrella can also show where it sits in space. Use a soft oval or irregular patch below the handle and pole.

How to Draw a Cartoon Umbrella
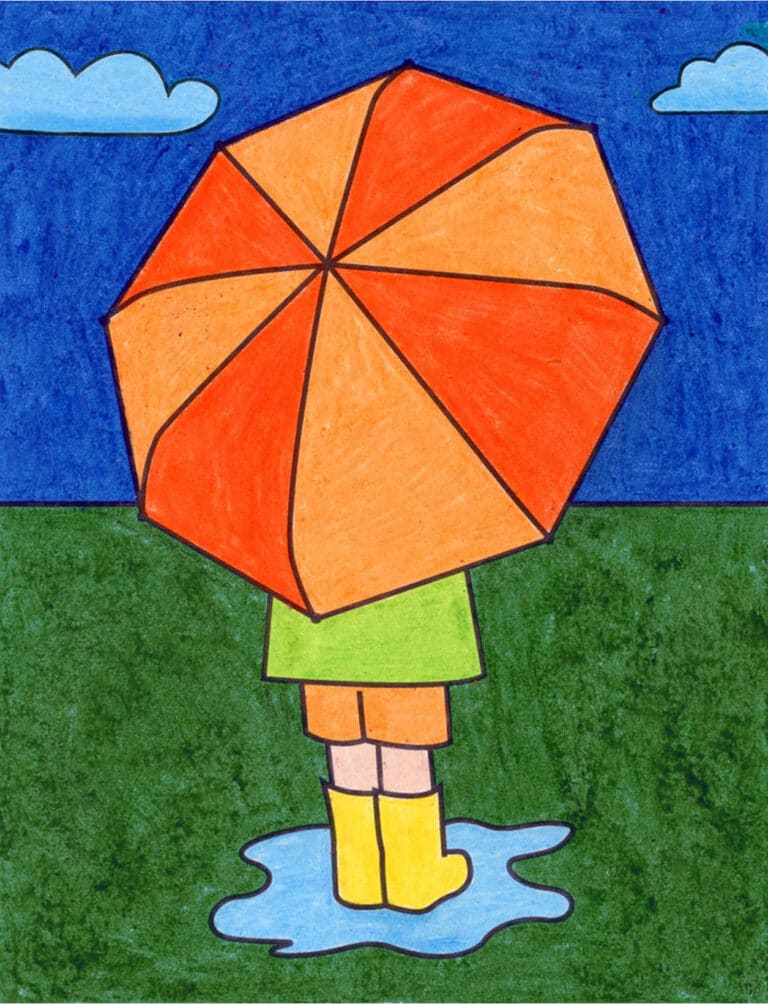
A cartoon umbrella can use bold shapes and simple details. This style is ideal for beginners, children, greeting cards, and digital illustrations.
Start with a wide dome and a scalloped bottom. Make the handle large enough to show its hook clearly. Use thick outlines and bright colors.
You can add personality with:
• Large, curved ribs
• A striped canopy
• A smiling face
• Raindrops around the umbrella
• Boots or a small character underneath
• A wind-blown tilt
• A bright rainbow color scheme
For a cute style, make the canopy slightly wider than normal. Use round curves rather than sharp points. Simple shapes often communicate emotion better than detailed realism.
A useful drawing lesson is to exaggerate one feature at a time. A large handle, bright panels, or a tilted canopy can make the umbrella more memorable without making the drawing hard to read.
How to Draw an Open Umbrella From Different Angles
The viewing angle changes the shape of the canopy. This is one of the most important ideas when learning how to draw an umbrella.
Front view
A front view shows a balanced dome. The center rib sits in the middle, and the side sections appear similar in size.
This is the easiest angle for beginners because the design is symmetrical.
Side view
A side view makes the canopy look narrow. You may see only a few ribs, and the handle lines up beneath the canopy.
Use a long, shallow curve for the top. Avoid drawing a full half-circle because it can make the umbrella look too round.
Three-quarter view
A three-quarter view shows both the front and side. One side of the canopy appears larger than the other.
Place the center line slightly off-center. Make the nearer ribs darker and larger, while the far ribs are lighter and shorter.
View from below
For an underside view, draw the canopy as a wide bowl or shallow oval. Show the ribs spreading from the center.
The underside can be darker than the top, especially on a cloudy day. This view is useful for dramatic illustrations and rainy street scenes.

How to Shade and Color an Umbrella
Shading gives your umbrella volume. Begin with one base color, then add darker and lighter areas.
For pencil shading, use light strokes that follow the direction of the fabric. Shade the underside of each fold with short, curved marks. Blend gently, but keep some pencil texture visible.
For color, choose a simple light and dark system:
• Light red with deep red in the folds
• Sky blue with navy beneath the canopy
• Yellow with orange along the rib lines
• Green with a darker forest green at the edge
• Purple with violet in the shadow areas
Do not shade every section equally. The side facing the light should be lighter. The opposite side should be darker.
If you use markers, place the dark color carefully because marker ink can be hard to remove. If you use watercolor, let each layer dry before adding a deeper shadow. This prevents muddy colors.

Common Mistakes When Drawing an Umbrella
Small errors can change the whole shape. Watch for these common problems:
• A flat canopy: Use a dome or bowl shape instead of a straight line.
• Uneven ribs: Space the ribs around the center point.
• A misplaced pole: Connect the pole to the canopy’s true center.
• A tiny handle: Make the grip large enough to support the design.
• Heavy outlines everywhere: Use darker lines only where forms overlap or turn away from light.
• Too many folds: Add only the folds that help explain the structure.
• No ground shadow: A soft shadow can anchor the umbrella to the scene.
• Pressing too hard too soon: Keep early construction lines light.
My most useful lesson from repeated umbrella sketches is to fix the canopy before adding detail. If the main dome is too flat or too wide, beautiful shading will not repair the structure. Shape comes first, detail comes second.
Easy Umbrella Drawing Practice Exercises
Practice makes the basic shapes feel natural. Try these short exercises before drawing a finished umbrella.
Exercise 1: Draw ten canopy shapes
Draw ten domes with different widths and heights. Add a curved lower edge to each one.
This builds control and helps you see how small changes affect the umbrella’s style.
Exercise 2: Practice ribs
Draw a center point and connect it to several curved edges. Try the same exercise from a front view, side view, and three-quarter view.
Focus on smooth movement rather than perfect lines.
Exercise 3: Add light and shadow
Draw three simple umbrellas. Place the light on the left in one, on the right in another, and above in the last.
Shade the folds based on the light source. This teaches you to make lighting choices instead of shading at random.
Exercise 4: Draw from observation
Place a real umbrella on a table and sketch it for five minutes. Look at the shape more than the page.
This practice improves proportion because you are studying a real object rather than relying only on memory.

How to Draw a Closed Umbrella
A closed umbrella has a different structure from an open one. It looks more like a long, narrow bundle than a dome.
Start with two long, slightly curved lines for the folded fabric. Add a pointed or rounded tip at the top. Then draw the strap around the middle.
Finish with the pole and handle. The handle may be curved, straight, or hooked.
To show folded fabric, add a few long lines that run from the tip toward the handle. Keep them uneven and soft. Too many straight lines can make the umbrella look like a stick.
You can also draw a wet closed umbrella by adding small drops, a darkened fabric edge, and a puddle beneath it.
Digital Tips for Drawing an Umbrella
The same drawing principles work in digital art. Use separate layers for the sketch, line art, color, and shadow.
A helpful layer order is:
- Sketch layer
- Clean outline layer
- Base color layer
- Shadow layer
- Highlight layer
- Background and rain effects
Use a low-opacity brush for the first sketch. A stabilizer can help you create smooth ribs and a clean handle.
Do not rely only on digital effects. A soft shadow layer will not fix a weak canopy shape. Use the same process as traditional drawing: build the form first, then refine it.
Frequently Asked Questions About How to Draw an Umbrella
What is the easiest way to draw an umbrella?
Start with a shallow dome, then add a scalloped lower edge, a center pole, and a curved handle. Keep the first lines light so you can adjust the proportions.
How do you draw an umbrella for kids?
Use simple curves and large shapes. Draw a wide dome, add three or four ribs, and finish with a J-shaped handle before coloring the panels.
How do you draw an umbrella from the side?
Use a narrow, shallow canopy instead of a wide dome. Show fewer ribs, keep the pole below the main center point, and make the handle visible at the bottom.
How do you add realistic shading to an umbrella?
Choose a clear light source first. Keep the lit areas bright, then add darker values beneath the canopy, along the folds, and near the ribs.
How do you draw a closed umbrella?
Draw a long, narrow shape with a pointed or rounded top. Add folded fabric lines, a strap, a pole, and a curved or straight handle.
Why does my umbrella drawing look flat?
A flat canopy, straight lower edge, or missing shadow can cause this problem. Curve the fabric, vary the rib lengths, and add darker values beneath the folds.
Conclusion
Learning how to draw an umbrella starts with three simple ideas: build the canopy, place the ribs, and shape the handle. From there, perspective, light, color, and small fabric details can make the drawing feel realistic or playful.
Begin with a light sketch and focus on the main form before adding detail. Try several views, practice curved lines, and study a real umbrella when you can. Keep drawing, share your finished work, and explore more step-by-step sketching guides to build your confidence.

Zayden Halbrook is a travel enthusiast and gear researcher passionate about making every journey smoother and more enjoyable. With a keen eye for practical travel essentials and real-world tips, he helps readers choose the right gear and travel smarter. When he’s not testing travel kits or exploring new destinations, Zayden shares simple, reliable advice to make every trip stress-free.