Pack light, place heavy gear near your back, and keep essentials dry and easy to reach.
Learning how to pack a backpack for camping can make a long trail feel much easier. The right system protects your gear, keeps your load balanced, and helps you find what you need without emptying your entire pack. This guide shares tested packing methods, safety tips, and simple examples for building a comfortable camping pack.

Choose the Right Backpack and Check Its Fit
Before learning how to pack a backpack for camping, start with the backpack itself. A good pack should match your trip length, gear volume, and body size. A day hike may need 15 to 30 liters, while a weekend backpacking trip often needs 45 to 65 liters.
A larger pack is not always better. Extra space can tempt you to carry items you do not need. For most overnight trips, a well-fitted 50 to 60 liter pack works well when your shelter and sleeping bag are compact.
Fit matters more than brand. Adjust the pack in this order:
- Loosen all straps before putting on the pack.
- Place the hip belt over your hip bones, not around your waist.
- Tighten the hip belt until it feels firm but not painful.
- Pull the shoulder straps down and back.
- Adjust the load lifters so the top of the pack sits close to your upper back.
- Use the sternum strap to keep the shoulder straps stable.
- Walk around for several minutes and check for pressure points.
Your hip belt should carry most of the load. Your shoulders should guide the pack, not hold all its weight. If your shoulders hurt quickly, the pack may be too heavy, poorly adjusted, or both.
Make a Complete Camping Packing List
A packing list prevents two common problems: forgetting vital gear and bringing too much gear. Write your list before you load the backpack. Group items by function so you can check each system at a glance.
A basic camping checklist may include:
- Shelter: tent, stakes, poles, footprint, and repair items
- Sleep system: sleeping bag or quilt, sleeping pad, and pillow
- Cooking: stove, fuel, lighter, pot, mug, spoon, and food
- Water: bottles, reservoir, filter, or treatment tablets
- Clothing: base layers, insulation, rain gear, socks, and sleep clothes
- Navigation: map, compass, phone, and power bank
- Safety: first aid kit, headlamp, whistle, emergency blanket, and fire starter
- Hygiene: toilet paper, trowel, hand sanitizer, toothbrush, and small soap
- Personal items: permits, identification, medication, and sunscreen
- Waste care: trash bags and sealable food bags
Check the weather, trail length, water sources, and campsite rules before you pack. A dry summer trip needs different clothing from a cold, wet trip. A route with reliable water may need less water storage than a dry desert trail.
Separate “must have” items from “nice to have” items. A small book may be enjoyable, but it should not replace rain gear or a first aid kit.

Sort and Weigh Your Gear Before Loading
The best way to learn how to pack a backpack for camping is to organize everything on the floor first. Place your gear where you can see it. Then group items into categories such as sleep, shelter, cooking, clothing, and safety.
Use small, waterproof bags or stuff sacks for groups of items. Clear or bright bags make gear easier to identify. Avoid using too many tiny bags, though. They can add weight and create clutter.
Weigh your loaded pack if possible. A common planning target is to keep the pack around 20% of your body weight or less, though fitness, trail difficulty, and personal comfort vary. For a 160-pound hiker, that would be about 32 pounds. This is a general guide, not a medical rule.
Try to reduce weight in this order:
- Remove duplicate items.
- Replace heavy comfort items with lighter options.
- Carry only the amount of food you need.
- Reduce excess packaging.
- Use one item for more than one purpose.
- Avoid adding items “just in case” unless they support safety.
On one early overnight trip, I packed too many clothes because the forecast looked uncertain. Most of them stayed dry and unused. Since then, I pack one warm layer, one rain layer, and enough clean clothing for comfort and safety rather than a full change for every day.

Pack Heavy Items Close to Your Back
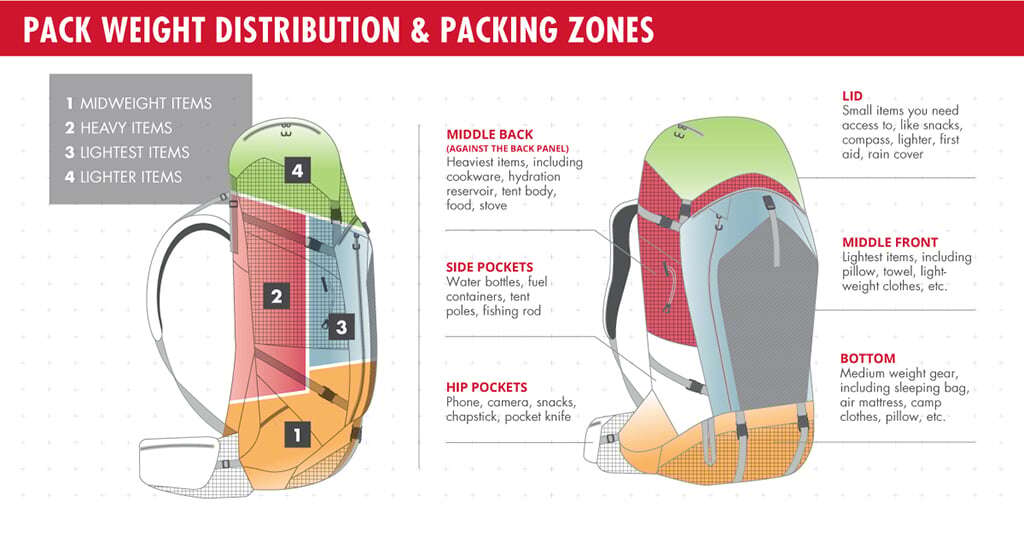
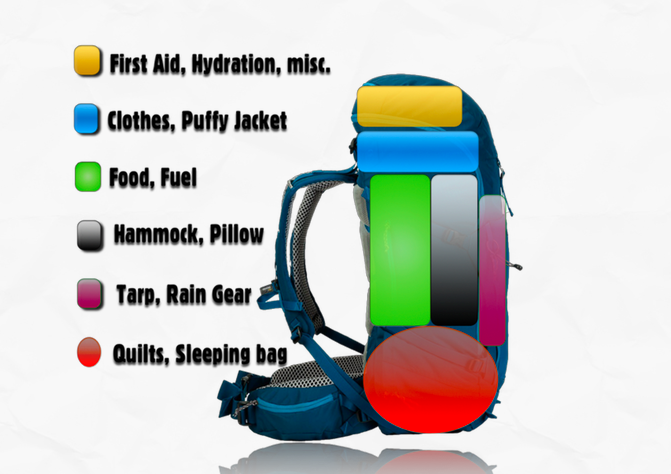
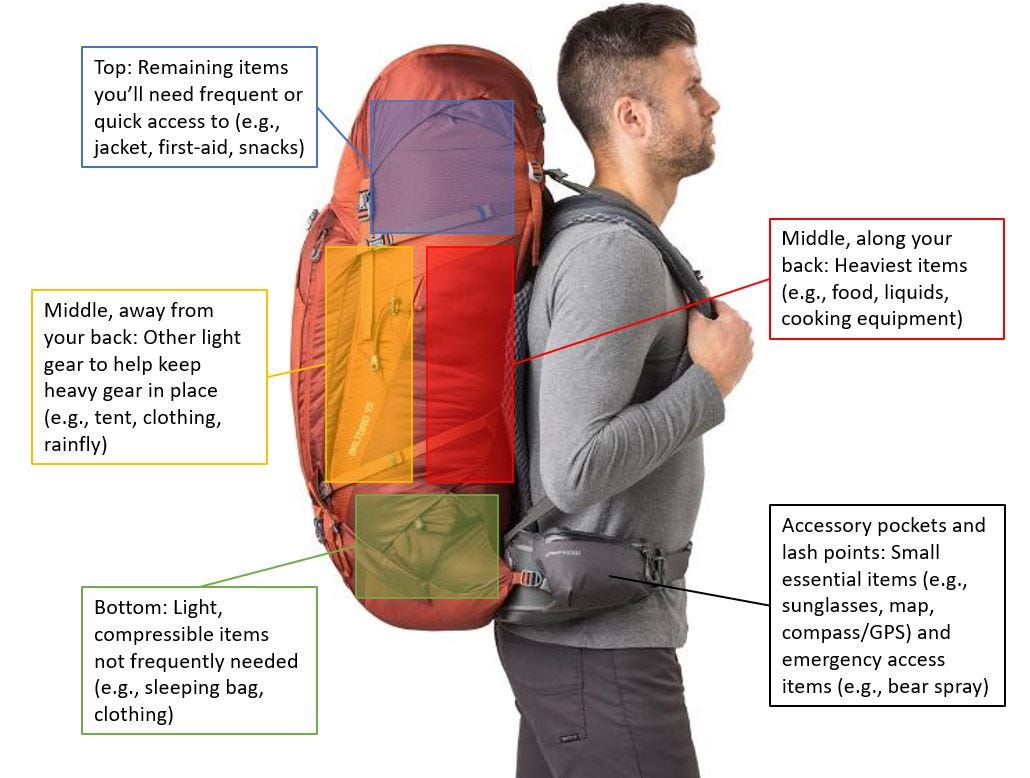
The key rule in how to pack a backpack for camping is simple: keep the heaviest items close to your spine and near the middle of the pack. This position keeps the center of gravity stable and reduces the feeling that the pack is pulling you backward.
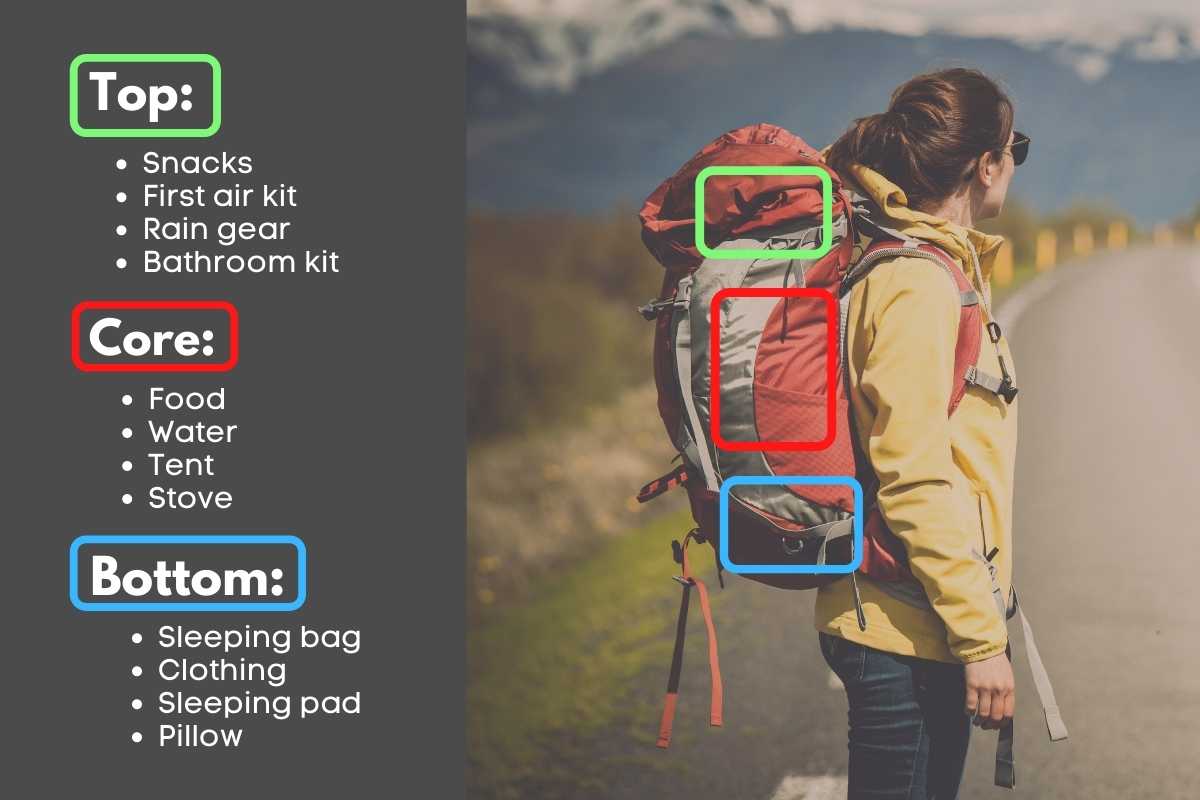
Place items in zones:
Bottom of the backpack
Use the bottom for soft, light items that you will not need during the day. Good choices include:
- Sleeping bag
- Sleeping clothes
- Camp shoes
- Extra socks
- Lightweight shelter fabric
Do not place hard cookware or heavy food at the bottom. These items can press into your back and make the pack uncomfortable.
Middle of the backpack
The middle is the main weight zone. Put dense items close to your back, such as:
- Food
- Stove and fuel
- Water reservoir
- Tent body
- Bear canister, when required
- Heavy repair or camera equipment
Keep hard items from poking your spine. Wrap them in clothing or place them inside a soft food bag.
Top of the backpack
The top should hold items you may need during the day. Pack rain gear, a warm layer, snacks, a map, sunglasses, and toilet paper here. These items should be available without unpacking the entire bag.
Outside pockets
Use outside pockets for small items that need quick access. Examples include water bottles, sunscreen, lip balm, a headlamp, trail snacks, and hand sanitizer.
Pack Your Sleeping Gear and Shelter
Many hikers ask how to pack a backpack for camping when the tent takes up most of the space. The answer is to divide the shelter into parts. Keep tent poles in a side pocket or along the inside edge of the pack. Store the tent body and rainfly in a waterproof bag inside the pack.
You can place the tent near the top if you expect rain or need to set up soon after reaching camp. On a dry trip, it can sit in the middle of the pack. The best location depends on access, weather, and the size of your shelter.
Pack your sleeping bag at the bottom because you usually do not need it until camp. Use a waterproof liner or a strong dry bag. A pack cover protects the outside, but it may not stop water from entering through seams or openings.
Your sleeping pad can go inside the pack, along the back panel, or outside the pack. An inflatable pad is often easier to protect inside. A foam pad can usually handle outside carry, but it may catch on branches.
Test the packed shelter at home. Make sure you can identify the tent poles, stakes, and rainfly quickly. A tired camper should not need to solve a puzzle in the dark.

Protect Food, Water, and Cooking Gear
Food is dense, so it can make the backpack feel heavy quickly. Pack meals in simple bags and remove bulky boxes before leaving home. Keep a small snack supply in an outside pocket for easy access.
Your cooking system may include a stove, fuel, pot, lighter, spoon, and cleaning cloth. Place the stove and pot together in a compact bag. Keep fuel upright when practical and follow the fuel maker’s safety instructions.
Never place a fuel canister beside food without protection. Keep it away from sharp objects, direct heat, and open flames. Do not carry liquid fuel in an unapproved container.
Water needs careful planning. Before the trip, find out how far you must travel between reliable water sources. Carry enough water for the route, weather, and your personal needs. Use a filter or treatment method that matches the likely water conditions.
A useful setup is:
- One bottle in each side pocket
- A water reservoir inside the pack for steady drinking
- A filter near the top for easy use
- A backup treatment method for emergencies
Keep wet water treatment gear in a separate bag after use. This helps protect clothing, food, and sleeping gear from leaks.
Organize Clothing for Changing Weather
Clothing should keep you warm, dry, and comfortable without filling the entire pack. Use layers instead of one large, heavy jacket. Layers let you adjust to changes in temperature and activity.
A practical clothing system includes:
- A moisture-wicking base layer
- A warm midlayer, such as fleece or light insulation
- A waterproof and breathable rain jacket
- Hiking pants or shorts suited to the forecast
- One dry sleep layer
- Extra socks
- A warm hat and gloves in cool conditions
Avoid cotton in cool or wet conditions. Cotton absorbs water and dries slowly, which can increase the risk of getting cold. Synthetic and wool layers usually manage moisture better.
Store your rain jacket near the top of the backpack. Sudden rain can arrive before you reach camp. Keep spare clothes in a waterproof liner or dry bag, even if the weather forecast looks clear.
Do not pack clothing based only on the daytime high. Temperatures can fall sharply at night, especially in exposed areas, near water, or at higher elevations. Check the forecast for the full route and expected campsite.
Keep Emergency and Personal Items Easy to Reach
Some items should never be buried under food or clothing. You may need them during a hike, not only at camp.
Keep these items in a top pocket or hip belt pocket:
- First aid supplies
- Headlamp
- Whistle
- Map and compass
- Phone
- Emergency contact details
- Sunscreen
- Inhaler or essential medication
- Snacks
- Water treatment tablets
Store medication in a waterproof bag. Keep a small first aid kit ready for blisters, cuts, sprains, and common trail problems. Your kit should reflect the trip. A remote route may require more supplies than a short trail near a road.
Navigation tools deserve special attention. A phone is useful, but batteries can fail and service may disappear. Carry a paper map and know how to use a compass. A downloaded map is helpful, but it should support—not replace—basic navigation skills.
Tell someone at home your route, campsite plan, and expected return time. This safety step costs nothing and can matter greatly during an emergency.

Use Waterproofing and Pack Protection
When deciding how to pack a backpack for camping, plan for rain even when the forecast looks favorable. Weather can change fast, and wet insulation loses much of its value.
A strong waterproof system uses more than one layer:
- Line the main compartment with a heavy-duty pack liner or waterproof liner.
- Put sleeping gear and spare clothes in separate dry bags.
- Store small items in resealable bags.
- Use a pack cover as an extra outer layer.
- Keep electronics in a waterproof pouch.
A pack cover helps protect the outside fabric, but water can still enter through the back panel, zippers, or open pockets. A liner protects the main compartment more reliably.
Keep wet gear separate from dry gear. After a rainstorm, place the wet tent in an outside pocket or separate bag if space allows. Once you reach camp, dry the shelter before storing it for the next trip.
Waterproofing also means protecting food from animals. Follow local food storage rules. In some areas, you may need a bear-resistant container or a specific hanging method. Never leave food, scented items, or trash loose at camp.
Balance the Load and Test It at Home
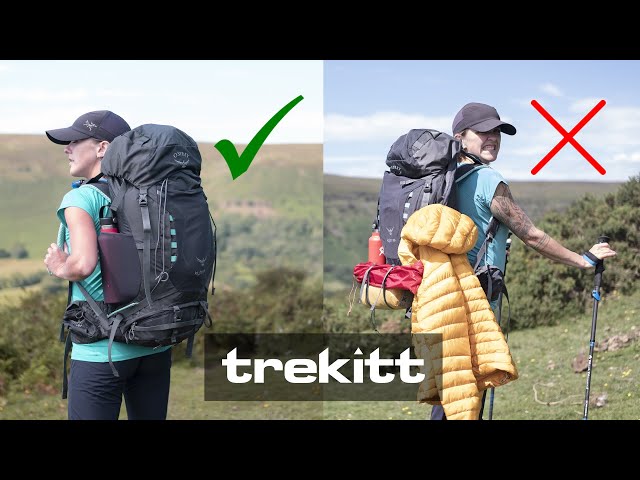
After you pack the backpack, lift it carefully and check its shape. The pack should stand upright without leaning far to one side. Adjust items if the load feels lopsided.
Walk around your home with the pack for 10 to 15 minutes. Then climb stairs or take a short walk outside. Notice pressure on your shoulders, hips, lower back, and feet.
Use these adjustments:
- If the pack pulls backward, move heavy gear closer to your spine.
- If your shoulders hurt, tighten or reposition the hip belt.
- If your hips hurt, loosen the belt slightly and check the pack size.
- If the pack sways, tighten the sternum strap and load lifters.
- If your back feels pressure, move hard objects away from the back panel.
Try to pack the same way each time. A consistent system helps you find gear quickly. It also shows you which items never leave the pack and which items you can remove next time.
Do a final check before leaving:
- Are the water bottles secure?
- Is the fuel packed safely?
- Is the rain gear reachable?
- Are the straps tucked away from branches?
- Is the weight comfortable?
- Are permits, keys, and medication protected?
Common Packing Mistakes to Avoid
Even experienced hikers make packing mistakes. The goal is not perfect technique. The goal is to learn before a small mistake becomes a major problem.
Packing by size instead of weight
Large items are not always heavy. A bulky sleeping bag may weigh less than a small fuel bottle. Pack by weight and access, not just by shape.
Putting water in the wrong place
A full water reservoir placed far from your back can make the pack feel unstable. Keep water close to your spine when possible, and use side bottles for easy access.
Packing all useful items at the bottom
First aid supplies, rain gear, and snacks should not be buried. Put emergency and weather items where you can reach them quickly.
Carrying too many “backup” items
A spare lighter and basic repair tape make sense. Carrying several tools, extra cookware, or multiple heavy layers may not. Review every item and ask whether it solves a real problem.
Ignoring the weather
A sunny start does not promise a dry afternoon. Pack rain protection, warm clothing, and a safe water plan for the full trip.
Leaving loose items outside
Loose straps and dangling gear can catch on branches. They can also fall off without you noticing. Secure or remove every loose strap before starting.
A Simple Example for an Overnight Backpack
This example shows how to pack a backpack for camping on a one-night trip in mild weather. Adjust it for local conditions, personal needs, and trail rules.
Bottom compartment
- Sleeping bag
- Sleeping clothes
- Camp socks
- Small pillow
Middle compartment near the back
- Food bag
- Cooking pot and stove
- Water reservoir
- Tent body
- Insulated layer
Middle compartment away from the back
- Rainfly
- Extra clothing
- First aid kit in a waterproof pouch
- Small repair kit
Top compartment
- Rain jacket
- Warm hat
- Map
- Headlamp
- Snacks
- Sunscreen
Side pockets
- Water bottles
- Tent poles
- Trekking pole tips or small accessories
Hip belt pockets
- Phone
- Lip balm
- Quick snack
- Whistle
- Personal medication
This layout keeps dense gear near the back, sleeping items protected at the bottom, and important trail items within reach. It also leaves room to adjust the load if the weather changes.
Frequently Asked Questions About How to Pack a Backpack for Camping
What is the best way to pack a backpack for camping?
Place light items at the bottom, heavy items close to your back in the middle, and frequently used items near the top or in outside pockets. Keep your sleeping gear dry and your emergency items easy to reach.
How heavy should a camping backpack be?
A common guideline is to keep the loaded pack near 20% of your body weight or less. Your fitness, trip length, terrain, and medical needs may change that target, so comfort and safe movement matter most.
Should a tent go inside or outside a backpack?
A tent can go inside or outside, depending on its size, weather, and pack design. Keep poles secure, protect the tent from sharp objects, and store wet fabric separately from dry gear.
Where should water go in a backpack?
Place the main water reservoir close to your back and use side pockets for bottles. This arrangement keeps the weight stable and makes drinking easier during the hike.
How do I keep my backpack dry while camping?
Use a waterproof pack liner for the main compartment and dry bags for sleeping gear and spare clothing. A pack cover adds protection, but it should not be your only waterproof barrier.
What should I pack at the top of my backpack?
Pack rain gear, snacks, a warm layer, navigation tools, a headlamp, and other items you may need while hiking. Avoid placing heavy objects at the very top because they can make the pack feel unstable.
Should food go at the bottom of a camping backpack?
Food usually works best in the middle of the backpack, close to your back. This position supports better balance and keeps dense weight away from the bottom of the pack.
Conclusion
Knowing how to pack a backpack for camping makes every part of a trip smoother. Use a properly fitted pack, sort your gear, keep heavy items close to your back, protect sleeping equipment from water, and place essential items where you can reach them fast.
Pack your bag at home, test it with a short walk, and remove anything that does not serve a clear purpose. A balanced pack will not remove every challenge from the trail, but it can help you hike with more comfort and confidence. Try this system on your next trip, then share what worked best for you or explore more camping guides before you head outside.

Zayden Halbrook is a travel enthusiast and gear researcher passionate about making every journey smoother and more enjoyable. With a keen eye for practical travel essentials and real-world tips, he helps readers choose the right gear and travel smarter. When he’s not testing travel kits or exploring new destinations, Zayden shares simple, reliable advice to make every trip stress-free.