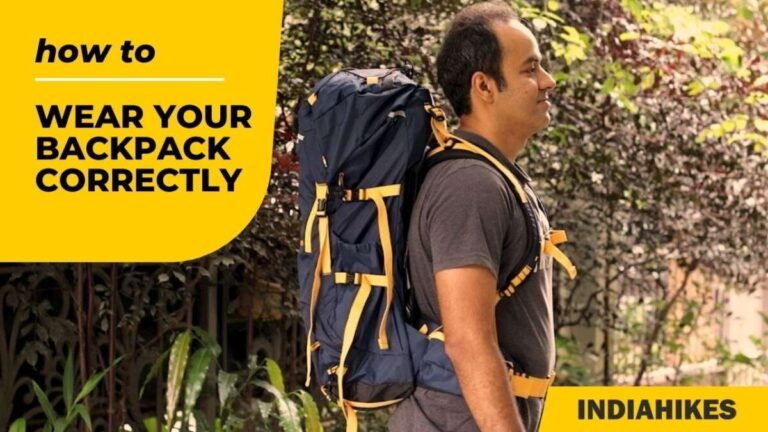

A well-fitted backpack rests close to your body, keeps weight balanced, and feels stable without causing pain.
Learning how to fit a backpack can make a long hike, daily commute, or school day far more comfortable. The right fit reduces pressure on your shoulders and lower back, improves balance, and helps you move with less effort. This guide explains each adjustment in simple steps, with practical tips for choosing the right backpack size, packing it well, and spotting fit problems early.
Why Backpack Fit Matters
A backpack is more than a bag with straps. It is a load-carrying system that works with your hips, back, and shoulders. When you fit a backpack correctly, the hip belt carries much of the weight while the shoulder straps keep the load close and steady.
A poor fit can create:
• Shoulder pain or numbness
• Lower back strain
• Neck tension
• Rubbing and hot spots
• Poor balance on uneven ground
• Faster fatigue during walking
A well-fitted backpack should feel like part of your body. It should not swing from side to side or pull you backward. The load should stay close to your spine, much like a well-packed suitcase sits securely in a car trunk.
For hiking backpacks, the hip belt often carries about 60% to 80% of the total load. The exact amount depends on the pack design, your body shape, and the weight inside. Daypacks and school bags may not transfer weight as effectively, but the same basic fitting principles still help.
Choose the Right Backpack Size
Before you learn how to fit a backpack, choose a pack that matches your torso length and intended use. Backpack size is usually listed in liters, but capacity alone does not determine comfort.
A 20-liter daypack may work for a commute or short walk. A 40-liter pack may suit an overnight trip. A 60-liter or larger backpack is often used for multi-day travel or backpacking. These are general ranges, not strict rules.
The most important measurement is your torso length. This is the distance from the top of your hip bones to the bony bump at the base of your neck.
To measure your torso:
- Stand straight and tilt your head forward.
- Find the prominent vertebra where your neck meets your upper back.
- Place your hands on your hips with your thumbs pointing toward your back.
- Imagine a line between the tops of your hip bones.
- Measure from the neck vertebra down to that line.
Many outdoor stores can measure your torso with a fitting tool. Some backpacks have adjustable suspension systems, while others come in fixed sizes. If your measurement falls between sizes, try both and compare how the hip belt and shoulder straps feel.
A backpack that is too long may place the hip belt too low. A pack that is too short may press the shoulder straps into your neck and leave the hip belt unable to support the load.
How to Fit a Backpack Step by Step
The best time to fit a backpack is when it contains a realistic load. A nearly empty pack can feel comfortable in a store but behave very differently on a trail.
Follow these steps for how to fit a backpack correctly.
1. Loosen every strap
Start with the hip belt, shoulder straps, load lifters, and sternum strap. Loosen them enough to put the pack on without pulling or twisting.
This gives you a clean starting point. Tightening only one strap while the others remain fixed can create a false fit.
2. Put on the backpack
Lift the backpack by its handle and place it gently on your back. Avoid swinging a heavy pack over one shoulder, since that motion can strain your back and shoulder.
Keep your back straight as you put the pack on. If the load is heavy, set the backpack on a raised surface first.
3. Position the hip belt
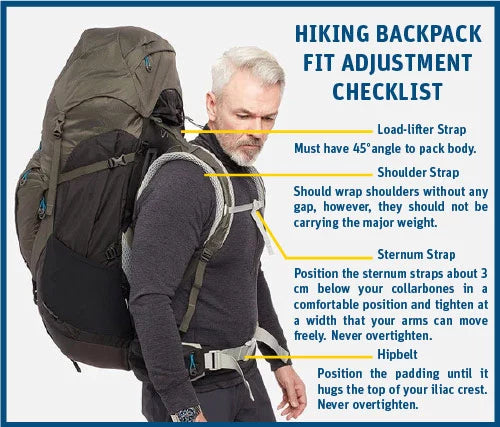
Place the center of the hip belt over your hip bones. The belt should sit above the widest part of your hips, not around your waist.
Buckle the hip belt and tighten it until it feels secure. It should hold the pack in place without cutting into your stomach or restricting your breathing.
The padded sections should rest comfortably on your hips. If the belt slides down, the backpack may be too long, too heavy, or poorly adjusted.
4. Tighten the shoulder straps
Pull the shoulder strap ends down and back. The straps should follow the shape of your shoulders and touch your body without creating hard pressure.
Your shoulders should not carry the full weight. You should be able to slip a finger under each strap, but there should not be a large gap between the straps and your upper back.
If the shoulder straps dig into your neck, raise or lower the backpack suspension if the model allows it. You may also need a different torso size.
5. Adjust the load lifters
Load lifter straps run from the top of the shoulder straps to the upper part of the backpack. Pull them gently toward the front of your body.
These straps bring the top of the pack closer to your back. They should usually form an angle of about 45 degrees, though the best angle varies by pack and body shape.
Do not over-tighten them. Too much tension can pull the shoulder straps upward and cause neck or shoulder pain.
6. Fasten the sternum strap
Connect the sternum strap across your chest. Place it at a comfortable height, usually a few inches below your collarbones.
Tighten it enough to stop the shoulder straps from sliding outward. It should not squeeze your chest or affect your breathing.
The sternum strap is for stability. It should not carry the weight of the pack.
7. Make small final adjustments
Walk around for a few minutes. Bend forward, climb stairs, and move your arms. Notice whether the pack shifts, rubs, or pulls.
Make one adjustment at a time. A small change to the hip belt may affect the shoulder straps, so avoid tightening everything at once.

How to Fit a Backpack for Hiking
Hiking backpacks need a more precise fit because you may carry them for hours over uneven ground. Start with a realistic load, including water, food, layers, and safety gear.
When you fit a backpack for hiking, keep the heaviest items close to your spine and between your shoulder blades. This placement keeps the pack’s center of gravity near your body and reduces backward pull.
Use this simple packing order:
• Place sleeping gear or light clothing at the bottom.
• Put dense items, such as food or cookware, near the middle of your back.
• Keep frequently used items near the top or in outer pockets.
• Store water close to your back when possible.
• Keep rain gear and emergency items easy to reach.
After packing, lift the backpack and repeat the fitting process. A pack that fits when empty may sit too low or pull away from your body when full.
On steep climbs, loosen the shoulder straps slightly if you need more freedom to breathe. On technical ground, keep the pack close and use the sternum strap to limit movement.
A useful field lesson is to adjust your pack before pain begins. If your shoulders feel sore after an hour, stop and refit the backpack. Waiting until the end of the day can turn a small adjustment problem into a painful injury.

How to Fit a Backpack for School, Work, and Travel
A school or work backpack may not have a padded hip belt. In that case, the shoulder straps must carry most of the load, so weight and organization become even more important.
To fit a backpack for daily use:
• Choose both shoulder straps instead of carrying the bag on one side.
• Keep the pack high on your back without pressing against your neck.
• Place books, laptops, and other heavy items close to your back.
• Remove items you do not need that day.
• Use a chest strap if the backpack has one.
• Select a bag with padded straps and a supportive back panel.
The American Academy of Pediatrics has advised keeping school backpacks light and using both shoulder straps. A commonly used safety guideline is to keep a child’s backpack near 10% to 15% of body weight, although comfort, age, strength, and walking distance also matter.
For travel, avoid placing all your heavy items at the bottom or far from your back. That arrangement can make the bag feel larger and less stable. Pack dense items in the center, tighten the compression straps, and test the backpack before leaving home.

How to Tell if Your Backpack Fits Correctly
A backpack fits well when it stays stable and lets you move naturally. You should not need to lean far forward to balance the load.
Use this checklist:
• The hip belt rests over the hip bones.
• The backpack sits close to your back.
• The shoulder straps touch your body without digging in.
• The top of the pack does not hit the back of your head.
• The sternum strap stabilizes the shoulder straps without squeezing your chest.
• The pack does not sway when you walk.
• Your hands and arms can move freely.
• You do not feel numbness, tingling, or sharp pain.
Red marks can occur with any backpack, especially after a long walk. However, deep marks, numbness, or lasting pain suggest that the pack needs adjustment or that the design does not suit your body.
Your body shape also matters. A backpack that fits one person may feel wrong on another person with the same torso length. Chest width, hip shape, shoulder slope, and clothing layers all affect the fit.

Common Backpack Fitting Mistakes
Many backpack problems come from small errors. Correcting them can improve comfort without buying a new bag.
Wearing the hip belt too low
A low belt shifts weight onto your shoulders and may cause the pack to pull backward. Move it up so the padded belt rests over your hip bones.
Tightening the shoulder straps first
This can make the pack feel secure for a moment, but it prevents the hip belt from doing its job. Always position and tighten the hip belt before adjusting the shoulder straps.
Over-tightening every strap
A backpack should feel secure, not compressed. Excess tension can cause poor circulation, stiff movement, and neck pain.