How To Make A Bag Out Of Wrapping Paper
Have you ever looked at a pile of leftover wrapping paper and thought, “What a waste”? Most people use wrapping paper once and then throw it away. But did you know you can turn that same paper into a beautiful, useful bag?
Making a bag from wrapping paper is simple, fun, and saves money. You can use these bags for gifts, parties, or even to organize small items at home.
I remember the first time I tried this. I was at a birthday party and realized I had forgotten to buy a gift bag. With only a few sheets of wrapping paper and some tape, I made a bag that looked just as good as anything from the store.
That quick solution not only saved the day but also made the gift feel more personal.
In this guide, you’ll learn every step you need to make your own bag out of wrapping paper. I’ll share all the tips, tricks, and common mistakes people make. By the end, you’ll be able to create custom bags that look professional and last longer than you’d expect.
Let’s get started!
Why Make A Bag Out Of Wrapping Paper?
Making bags from wrapping paper is more than a craft project. Here are some real benefits:
- Saves Money: Store-bought bags can be expensive, especially for special events. Making your own costs less.
- Eco-Friendly: Reusing wrapping paper reduces waste and helps the planet.
- Customizable: You can choose any color or pattern you want.
- Quick Solution: If you forget to buy a bag, you can make one in minutes.
- Personal Touch: Handmade bags always feel more thoughtful.
I’ve used homemade bags for birthdays, holidays, and even for small thank-you gifts at work. People always notice and ask how I made them.
What You’ll Need
Before you start, gather these supplies:
- Wrapping paper (any pattern or color)
- Scissors
- Clear tape or double-sided tape
- Glue (optional, for extra strength)
- Ruler
- Pencil
- Hole punch (for handles)
- Ribbon, twine, or string (for handles)
- Cardboard (optional, for base support)
- Decorations (stickers, tags, etc., if desired)
Choosing the right paper is important. Thicker wrapping paper makes a stronger bag, but even thin paper works if you add a cardboard base. Try to avoid paper that tears easily.
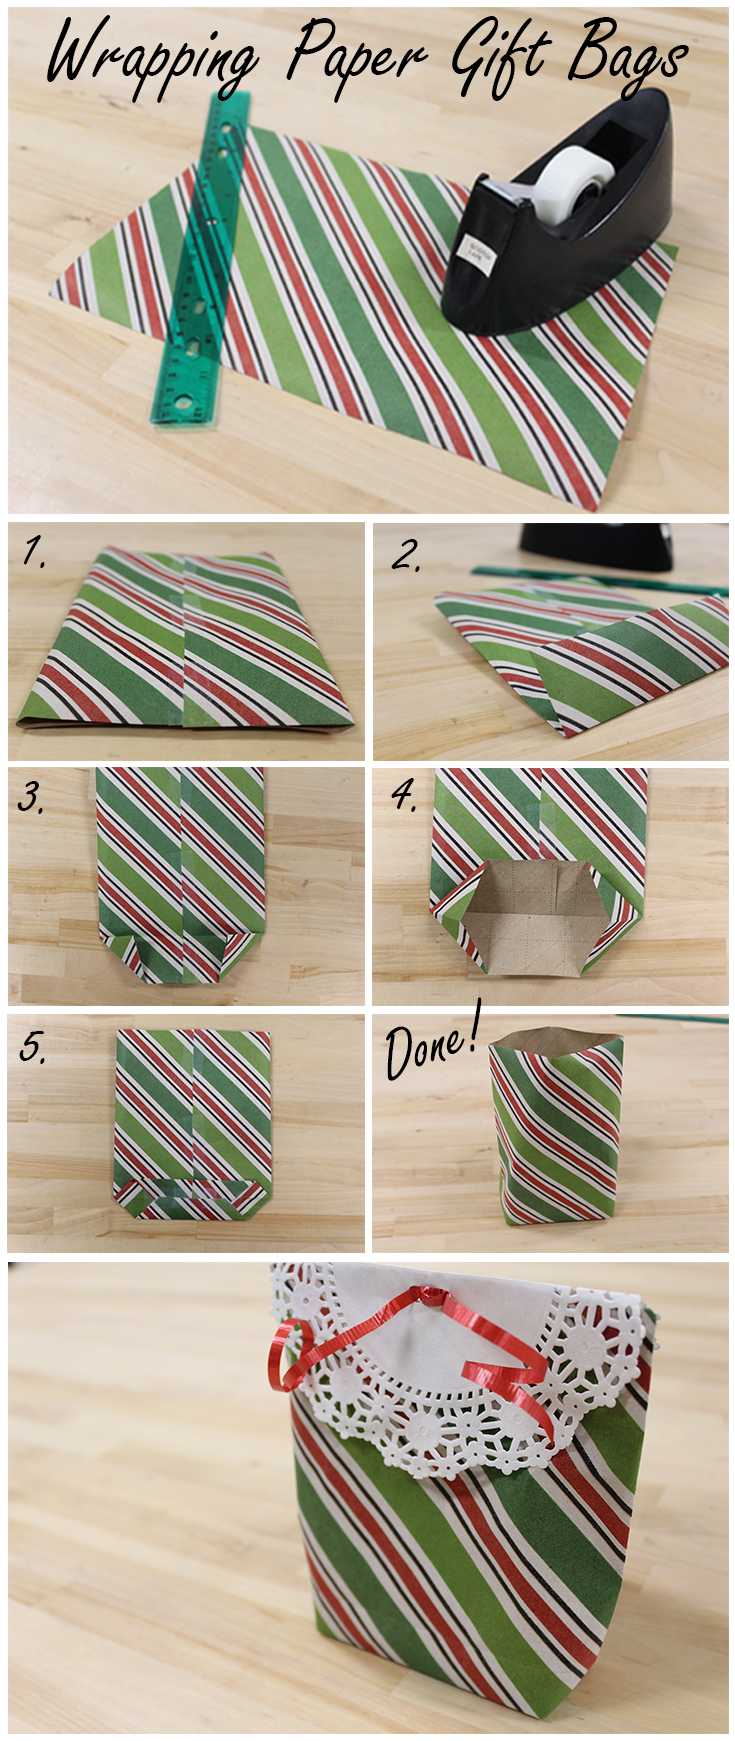
Credit: effinghamlibrary.org
Planning Your Bag: Size And Shape
Think about what you want to put inside the bag. Planning your bag size helps avoid mistakes later. Here’s a simple way to measure:
- Place the gift or item on the wrapping paper.
- Make sure you have enough paper to wrap around the item with a little extra for folding.
- Leave space at the top for the opening and at the bottom for a strong base.
Here’s a quick comparison of common bag sizes:
| Bag Size | Width (inches) | Height (inches) | Depth (inches) | Best For |
|---|---|---|---|---|
| Small | 5 | 7 | 3 | Jewelry, gift cards |
| Medium | 8 | 10 | 4 | Books, candles |
| Large | 12 | 15 | 5 | Clothes, toys |
If you’re not sure, start with a medium size. You can adjust as you get better.
Step-by-step Guide: Making Your Bag
Let’s get into the details. Follow these steps for a sturdy, neat-looking bag:
1. Cut The Wrapping Paper
Lay your wrapping paper flat, with the patterned side down. Measure the paper based on your planned bag size. Add about 2 inches to the width for overlap, and about 3 inches extra to the height for folding and the base.
For example, to make a medium bag (8 x 10 x 4 inches), cut a piece about 20 inches wide and 14 inches tall.
Tip: Use a ruler for straight lines, and cut slowly to avoid tearing.
2. Fold The Sides
Place the paper with the long side facing you. Fold the left and right edges toward the center, overlapping them by about 1 inch. Tape or glue the seam closed.
Expert Insight: Double-sided tape looks neater because you won’t see any tape on the outside.
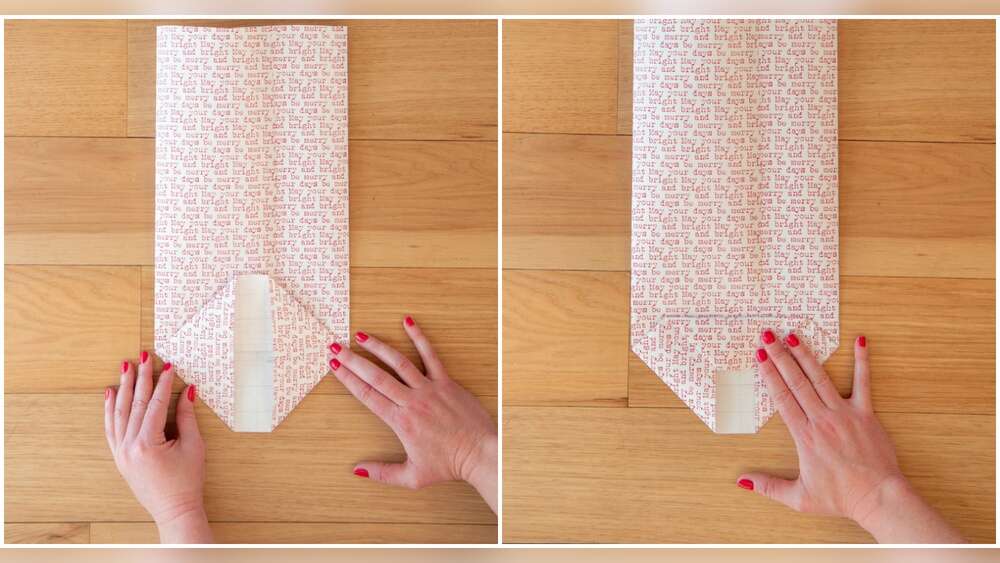
3. Create The Base
Take the bottom edge and fold it up about 4 inches (or the depth of your bag plus 1 inch). Press the fold flat.
Open this folded part to make a rectangle—push the corners in to create triangle shapes on each side. The base should now look like an open envelope.
Fold the top and bottom edges of this base toward the center until they meet. Tape or glue them in place.
Personal Experience: I once rushed this step and forgot to secure the base well. The bag looked fine but tore when I put something inside. Always tape the inside of the base for extra strength.
4. Shape The Sides
Turn the bag upright. Now, fold each side of the bag inward to make a crease, about 1 inch from each edge. This creates the “gusset” and helps the bag open and stand up.
Open the bag gently and press the sides flat. Don’t worry if the creases are not perfect—practice makes it easier.
5. Reinforce The Bag (optional, But Wise)
For heavier gifts, cut a piece of cardboard to fit the bottom of the bag and place it inside. This helps the bag hold its shape and prevents sagging.
You can also add a strip of cardboard to the top inside edge for extra support if you plan to add handles.
6. Make And Attach Handles
Use a hole punch to make two holes near the top of each side. Thread ribbon, twine, or string through the holes to make handles. Tie knots inside to keep them from slipping out.
Here’s a quick look at handle material options:
| Material | Look | Strength | Best Use |
|---|---|---|---|
| Ribbon | Elegant | Medium | Light gifts |
| Twine | Rustic | Strong | Heavier gifts |
| Yarn | Soft | Medium | Medium gifts |
| Paper string | Eco-friendly | Light | Small, eco bags |
If you don’t want handles, simply fold the top edge over for a clean finish.
7. Decorate Your Bag
This is your chance to get creative! Add stickers, draw designs with markers, or attach a gift tag. You can even glue on small decorations like paper flowers or buttons.
Non-Obvious Tip: If your wrapping paper is very busy, keep decorations simple. For solid colors, bold decorations stand out.
Common Mistakes And How To Avoid Them
Even experienced crafters make mistakes. Here are some things to watch out for:
- Paper Tears Easily: Use tape and handle the paper gently. If it tears, patch it from the inside.
- Bag Won’t Stand Up: Check the base—make sure it’s flat and secure. Add cardboard for help.
- Handles Pull Out: Reinforce the holes with tape before punching, or tie large knots.
- Bag is Too Small: Always measure your item before cutting paper.
- Crooked Folds: Go slow and use a ruler. Practice helps!
- Tape Shows: Use clear or double-sided tape for a neater look.
One time, I made a batch of bags for a craft fair. I used thin paper and forgot the cardboard base. Several bags sagged under weight, and I learned that a little reinforcement goes a long way.
Creative Ideas For Wrapping Paper Bags
Once you master the basics, you can try advanced styles:
- Gift Bags with Windows: Cut a small window in one side and cover it with clear plastic for a peek inside.
- Themed Party Bags: Use holiday or birthday paper and add matching tags.
- Mini Organizer Bags: Make tiny versions for storing jewelry, hair ties, or office supplies.
- Reusable Bags: Use thicker paper and reinforce all edges for bags you can use again.
You can even let kids decorate their own bags for parties or crafts. It’s a great way to use leftover paper and spark creativity.
When To Use A Wrapping Paper Bag
Homemade bags are perfect for many occasions:
- Birthdays: Match the paper to the party theme.
- Holidays: Make bags for Christmas, Hanukkah, or New Year’s.
- Weddings: Use elegant paper for a classy look.
- Thank-You Gifts: Small bags for teachers, coworkers, or friends.
- Party Favors: Easy to make in large numbers.
Remember, not all gifts fit in a paper bag. Avoid using these bags for very heavy or wet items, since wrapping paper is not waterproof.
How To Store And Reuse Wrapping Paper Bags
If you want to keep your bags for later, here’s how:
- Store Flat: Gently press the bag flat and stack with others.
- Keep in a Dry Place: Moisture can weaken the paper.
- Repair Small Tears: Use tape on the inside to fix any damage.
- Label for Size: If you make many bags, write the size on the bottom for quick reference.
Reusing bags is easy—just remove or cover old decorations.
Credit: look-what-i-made.com
Wrapping Paper Bag Vs. Store-bought Bag
Is it worth making your own? Here’s a quick comparison:
| Feature | Wrapping Paper Bag | Store-Bought Bag |
|---|---|---|
| Cost | Low (uses leftover paper) | Medium to high |
| Time to Make | 5-15 minutes | Instant (just buy) |
| Customization | High | Limited to store designs |
| Eco-Friendliness | Very high | Depends on material |
| Strength | Medium (with reinforcement) | High |
| Fun Factor | Very fun! | Not applicable |
Making your own bag wins in creativity and cost. For heavy gifts, you might still want a store-bought bag.
Advanced Tips For Long-lasting Bags
If you want your bag to last longer or hold heavier items, try these tricks:
- Laminate the Paper: Use clear contact paper before folding to make it water-resistant.
- Double Up: Use two layers of wrapping paper for extra strength.
- Sew the Seams: If you have a sewing machine, stitch the edges before taping.
- Edge Tape: Add decorative washi tape to all the edges for both style and support.
- Use Gift Tissue Inside: Add tissue paper to cushion the gift and protect the bag.
These steps take more time, but the results are impressive.
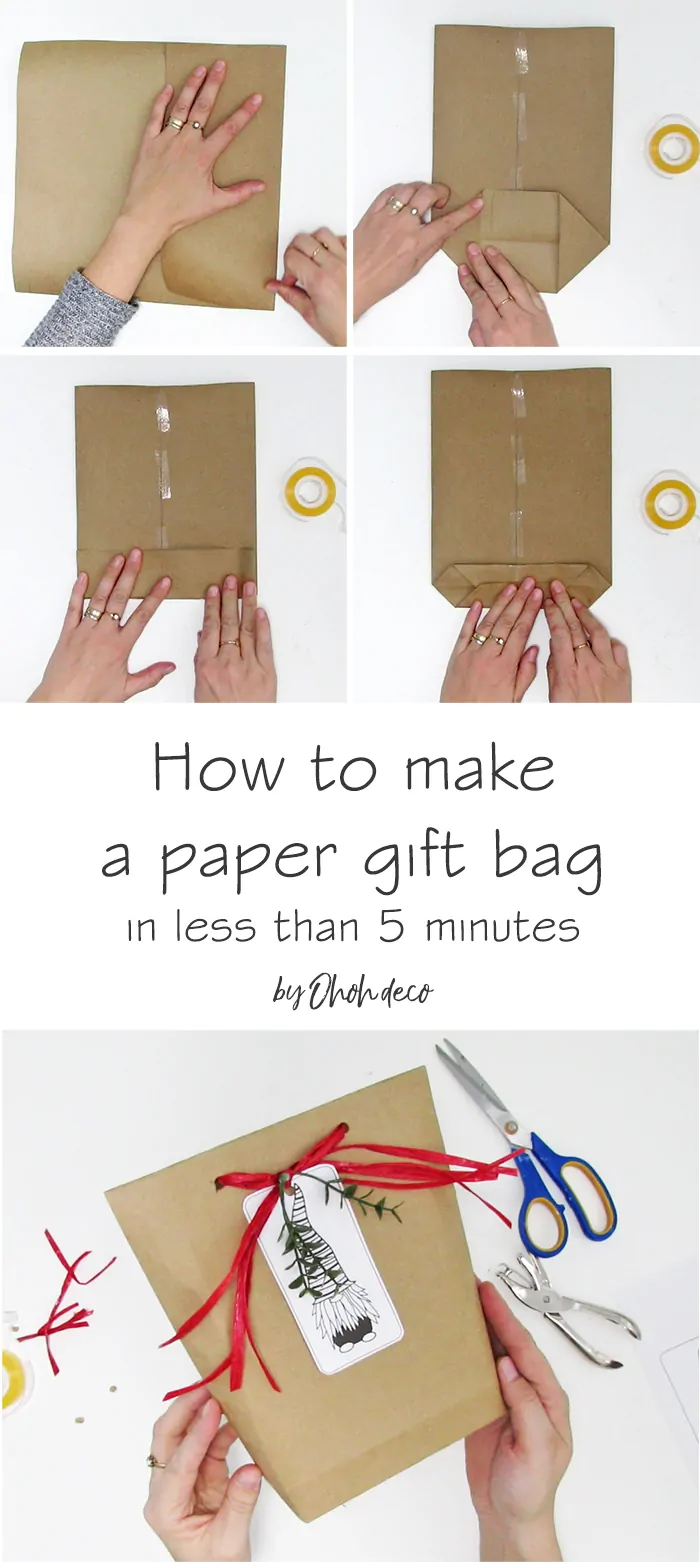
Credit: www.ohohdeco.com
Frequently Asked Questions
How Strong Are Wrapping Paper Bags?
Wrapping paper bags are strong enough for light to medium gifts, like books, clothes, or small boxes. For heavier gifts, add a cardboard base and reinforce the seams with extra tape or glue. Avoid using them for very heavy or sharp items.
Can I Reuse Wrapping Paper Bags?
Yes! If you open the bag carefully, you can use it again. Just store it flat in a dry place. If the bag gets a small tear, repair it from the inside with tape. You can also decorate over old designs to give it a new look.
What Kind Of Wrapping Paper Is Best?
Thicker, high-quality wrapping paper works best. It’s less likely to tear and holds its shape better. Avoid very thin or metallic papers—they can be hard to fold and tear easily. If you only have thin paper, add a cardboard base for strength.
How Do I Make Handles That Don’t Break?
Reinforce the holes before you punch them by placing a piece of clear tape over the area. Use strong materials like twine or ribbon for the handles. Tie large knots inside the bag so the handles don’t pull through.
Where Can I Find More Creative Ideas?
You can find more ideas on craft websites and video tutorials. For inspiration and tips, check out this WikiHow guide with helpful photos and examples.
Making a bag out of wrapping paper is a simple skill that brings joy to both the maker and the receiver. It’s creative, practical, and surprisingly easy to master. The next time you have leftover paper, don’t toss it—turn it into a beautiful bag and make your gift stand out.
With practice, you’ll find your own favorite methods and styles. Happy crafting!

Zayden Halbrook is a travel enthusiast and gear researcher passionate about making every journey smoother and more enjoyable. With a keen eye for practical travel essentials and real-world tips, he helps readers choose the right gear and travel smarter. When he’s not testing travel kits or exploring new destinations, Zayden shares simple, reliable advice to make every trip stress-free.