If you have ever struggled with making a gift bag look elegant, you are not alone. I remember my first time trying to wrap a birthday present quickly. I threw a gift into a bag, crumpled some tissue paper, and hoped for the best. It looked messy, and my friend noticed! Since then, I have learned that tissue paper is more than decoration—it makes your gift feel special before it’s even opened. Today, I want to share everything I have learned about how to put tissue paper in a gift bag, so your next present stands out for all the right reasons.
Why Tissue Paper Matters In Gift Presentation
Some people wonder if tissue paper is just for looks. But it does more than add color. Tissue paper hides your present, keeps it safe, and builds excitement. When someone pulls out crisp, colorful paper, they know you cared about the details. In fact, a study by the Paper and Packaging Board found that packaging presentation can boost the perceived value of a gift by up to 45%. That’s a big effect from something so simple!
If you use tissue paper well, your gift can look as beautiful as any you see in a shop window. This small step makes your present feel thoughtful and complete.
Choosing The Right Tissue Paper
Picking the right tissue paper is the first step. Not all tissue paper is the same. Here are some things you should consider:
Color And Pattern
Think about the occasion. For birthdays, bright colors work well. For weddings, white, silver, or gold look classy. For holidays, choose reds and greens or blues and silvers, depending on the celebration. If your bag has a strong pattern, pick a solid tissue paper. If your bag is plain, you can use bold or patterned tissue paper to add interest.
Quality And Thickness
Thin tissue paper tears easily. I have made the mistake of buying a cheap pack, only to have it rip as I arranged it. Try to find premium tissue paper—it holds its shape better and looks richer.
Quantity
Most gift bags need at least 3 to 5 sheets. If your gift is heavy or oddly shaped, you might need more to cover it and give it support.
Special Effects
There are also tissue papers with glitter, metallic shine, or even a crinkle texture. These add an extra touch for special occasions.
| Type | Best For | Pros | Cons |
|---|---|---|---|
| Standard Tissue | Everyday gifts | Easy to find, affordable | Can tear easily |
| Metallic/Glitter | Festive events | Eye-catching, elegant | May shed glitter, more expensive |
| Patterned | Themed gifts | Fun, matches occasion | Can clash with patterned bags |
| Premium/Thick | Heavy gifts | Durable, holds shape | Costs more |

Credit: www.youtube.com
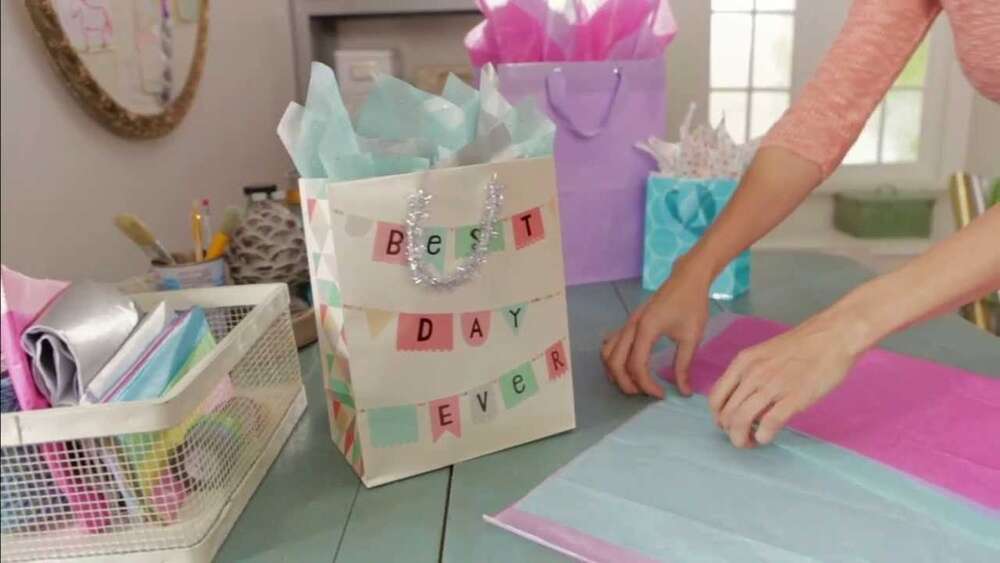
Step-by-step: How To Put Tissue Paper In A Gift Bag
Let’s go step by step. I will guide you through the best way to make your gift look polished. I have used these methods for birthdays, weddings, and even office parties, and they work every time.
1. Prepare Your Materials
You need:
- A clean gift bag (free of tears or stains)
- 3 to 5 sheets of tissue paper (more for bigger or oddly shaped gifts)
- The gift itself
- Optional: Ribbon, card, or small decoration for extra flair
Make sure your tissue paper is wrinkle-free. If it’s not, you can iron it with a cool iron or lay it flat under some books for a few hours.
2. Line The Bottom
Start by placing one or two sheets of tissue paper in the bottom of the bag. This creates a cushion. Fold the sheets to fit the size of the bag, or let the edges stick out for a fuller look.
3. Wrap The Gift (optional But Professional)
For fragile or delicate gifts, I like to wrap the item in tissue paper first. Lay a sheet flat, place the gift in the middle, and fold the paper around it. This adds protection and keeps the surprise.
4. Place The Gift In The Bag
Set your wrapped or unwrapped gift in the middle of the bag, right on top of the bottom layer of tissue.
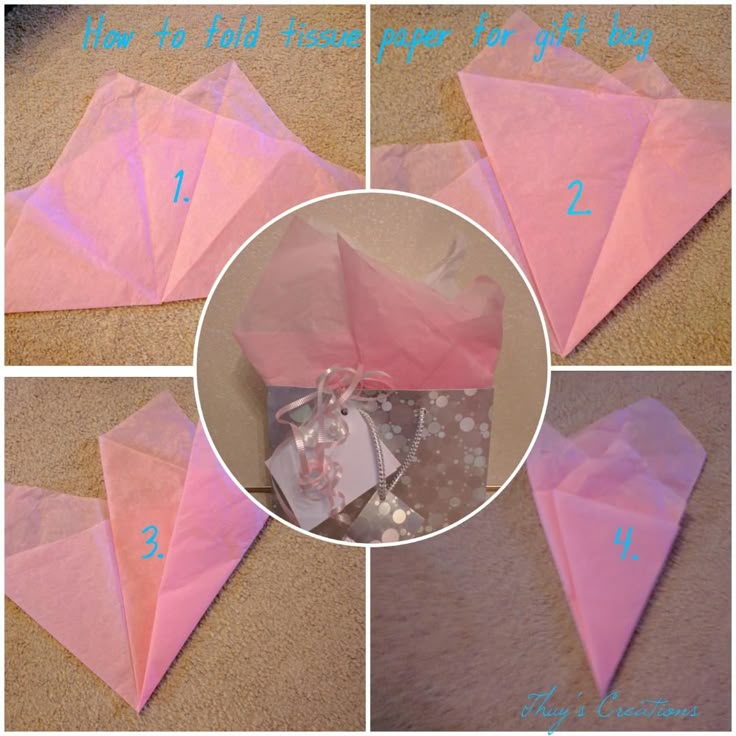
5. Add Side And Top Layers
Take another sheet of tissue paper. Pinch it in the center, lift it up so the corners hang down, and fluff out the ends. Place it in the bag with the pinched end down, so the fluffy ends stick up.
Repeat with 2–4 more sheets, arranging them around the gift. The paper should stick out the top, covering the gift and making the bag look full.
Here is a simple way to picture it:
| Step | Description | Pro Tip |
|---|---|---|
| 1. Line Bottom | Lay sheets flat at the bottom of the bag | Add color contrast here for depth |
| 2. Wrap Gift | Wrap gift in tissue for protection | Use two sheets for extra padding |
| 3. Add Fluffy Layers | Pinch center, insert fluffy side up | Alternate colors for a designer look |
6. Adjust And Fluff
Gently pull and separate the tissue paper so it fills all spaces. The paper should stand up, covering the gift from all sides. Step back and look at your work—if any part looks thin or flat, add another sheet and fluff again.
7. Add Finishing Touches
You can tie a ribbon around the bag’s handles, attach a small card, or add a sticker. These final touches make your gift bag look store-bought, but with a personal touch.
Advanced Techniques For Special Occasions
Once you are comfortable with the basics, you can try some creative methods to make your gift bag even more impressive. I have used these tricks for weddings and high-end events.
Color Blocking
Use two or three colors of tissue paper and layer them for a bold effect. For example, use gold and white for a wedding or red and green for Christmas. Pinch and layer each color separately, then arrange them so they alternate around the bag.
Fan Fold
Fold a sheet of tissue paper back and forth, like an accordion. Pinch it in the center, then place it in the bag so the fan shape sticks out. This works well for flat bags or when you want a clean, modern look.
The “explosion” Look
Use more sheets than usual, at least 6–8, and let them burst out from the top of the bag. The more sheets, the fuller the effect.
The Hidden Surprise
If your gift is small, hide it in the center of the tissue paper and create layers above and below. The receiver will have to dig through the paper, building excitement.
Themed Decorations
Add themed stickers, confetti, or small ornaments between the tissue layers. For example, for a baby shower, tuck in a few tiny pacifiers or for a graduation, add a mini diploma.
Common Mistakes To Avoid
Even with good instructions, it is easy to make small mistakes. Here are the ones I see most often:
- Using too little tissue paper: The bag looks empty, and the gift is visible.
- Not matching colors: Bright green tissue in a red bag can clash unless it’s for a holiday.
- Forgetting to fluff: If you don’t spread out the paper, it looks flat and rushed.
- Overfilling the bag: Too much tissue can make the bag hard to carry or close.
- Using wrinkled or torn paper: This looks messy and unplanned.
- Hiding the card: If you add a card, make sure it is easy to see and not buried.
I once gave a gift with only one sheet of tissue, thinking it was enough. The present peeked out, and it looked like I had forgotten to finish wrapping. Since then, I always use at least three sheets and check the bag from every angle.
How To Choose The Right Bag For Your Tissue Paper
The right bag can make your tissue paper work even better. Here are things to keep in mind:
Bag Size
Pick a bag that fits your gift plus extra space for tissue paper. If the bag is too small, the tissue will not fluff out. If it’s too large, the gift will rattle and the tissue won’t fill the space.
Bag Strength
For heavy or sharp-edged gifts, use a bag with strong handles and thick paper. This lets you use more tissue paper for padding.
Bag Color And Style
Match the bag to the tissue paper for a coordinated look. For example, a plain white bag works with any color tissue, while a patterned bag pairs best with solid tissue.
When To Skip Tissue Paper
Sometimes, tissue paper is not the best choice. For example:
- For very large or oddly shaped gifts, it may not cover the present well.
- For food gifts, use food-safe wrapping.
- For eco-friendly gifts, reusable cloth wraps or brown paper might be better.
But for most gifts, tissue paper is still the easiest way to add style.
Eco-friendly Tips For Using Tissue Paper
Many people worry about waste, and it’s a good question. Here are easy ways to use tissue paper without hurting the planet:
- Reuse tissue paper: Save unwrinkled sheets and use them again.
- Recycle: Most tissue paper is recyclable (except glitter or metallic types).
- Buy recycled tissue: Some brands sell paper made from recycled material.
- Use less: If your bag is small, you don’t need a lot of paper.
- Compost: Plain, non-dyed tissue can often be composted.
If you want to learn more, the US EPA Recycle guide has good advice about recycling paper products.
How To Store Tissue Paper
Good storage keeps your tissue paper neat for the next gift. Here’s what works for me:
- Lay sheets flat in a drawer or on a shelf. Don’t fold if you can avoid it.
- If you have extra rolls, keep them in a plastic bag to stop dust.
- Store by color, so you can find what you need quickly.
- For travel, roll tissue paper gently and use a rubber band.
How To Fix Common Tissue Paper Problems
Sometimes, things go wrong. Here’s how to handle the most common problems:
Wrinkled Paper
Lay the sheet flat and press it under heavy books overnight. For quick fixes, use a warm (not hot) iron with a cloth on top.
Torn Edges
Cut or tear off the ripped part. Use the rest for smaller gifts or as extra padding at the bottom of a bag.
Crushed Bags
If your bag gets squashed, fill it with crumpled newspaper and let it sit for a few hours. This helps the bag regain its shape.
Credit: www.shunhehandtruck.com
Examples: Tissue Paper For Different Occasions
To give you a real-world sense, here’s how I might use tissue paper for three common events:
Birthday
- Bag: Bright, solid color
- Tissue: Three sheets—yellow, blue, and orange
- Finish: Fan fold one sheet, fluff the others
Baby Shower
- Bag: Soft pastel
- Tissue: Four sheets—two white, two patterned with baby motifs
- Finish: Hide a small rattle between layers
Graduation
- Bag: School colors
- Tissue: Two sheets each of school color and gold
- Finish: Tie a ribbon in the school’s color to the handle
Quick Reference: Tissue Paper Sheet Guide
Here’s a fast way to know how many sheets you need:
| Bag Size | Gift Size | Sheets Needed |
|---|---|---|
| Small | Jewelry, gift cards | 2-3 |
| Medium | Books, mugs | 3-5 |
| Large | Clothes, toys | 5-8 |
Personal Touch: My Favorite Tissue Paper Trick
Over the years, I have found that alternating two colors gives the most polished look. For example, I might use silver and light blue for a winter gift. I pinch and fluff each sheet, then arrange them so the colors mix naturally. People often ask if I bought the bag from a boutique! This small detail has made my gifts stand out at many parties.
Why Good Presentation Matters
Science supports what we all feel—good presentation makes gifts more memorable. According to a 2022 consumer survey, 67% of people said that the way a gift is wrapped changes how they feel about it. Clean, colorful tissue paper signals that you put in extra effort.
It’s not just about looks. Thoughtful wrapping shows respect and care. It turns a simple present into something special, showing the receiver that they matter.

Credit: noblepack.com
Frequently Asked Questions
How Many Sheets Of Tissue Paper Do I Need For A Standard Gift Bag?
For most medium-sized bags, 3 to 5 sheets are enough. If your gift is large or you want a fuller look, use more sheets. For small bags, 2–3 sheets will usually do.
Can I Reuse Tissue Paper?
Yes! If the paper is not ripped or stained, you can save and reuse it. Just smooth out the wrinkles and store it flat. This is eco-friendly and saves money.
What If I Run Out Of Tissue Paper?
If you don’t have tissue paper, you can use plain white paper, colored napkins, or even fabric scraps. For a quick fix, crumple up clean newsprint or use shredded paper.
Is Tissue Paper Recyclable?
Most plain tissue paper is recyclable, but avoid recycling metallic or glittery types. Check your local recycling rules. If in doubt, compost plain, undyed paper.
How Do I Keep Tissue Paper From Sinking Into The Bag?
Make sure you use enough sheets and fluff them well. Pinch the center of each sheet before placing it in the bag. This helps the paper stand up and cover the gift.
A beautiful gift bag with well-placed tissue paper is more than just a wrapper—it’s a sign of thoughtfulness. With these tips and a little practice, you can make your gifts look as special as the moment you give them.

Zayden Halbrook is a travel enthusiast and gear researcher passionate about making every journey smoother and more enjoyable. With a keen eye for practical travel essentials and real-world tips, he helps readers choose the right gear and travel smarter. When he’s not testing travel kits or exploring new destinations, Zayden shares simple, reliable advice to make every trip stress-free.