Sewing your own hammock is an exciting and rewarding project. You get a comfortable place to relax, and you also learn valuable sewing and DIY skills. When you make a hammock with your own hands, you control every detail—size, color, fabric, and strength. This means you can create something that fits your personal style and needs. I still remember the first hammock I sewed: it looked simple, but it became my favorite spot for reading outside. In this guide, I’ll share everything I learned from that experience and show you every step you need to follow to sew a hammock that is safe, strong, and comfortable.
Why Sew Your Own Hammock?
Making a hammock by yourself is more than just a fun weekend project. You can save money, use high-quality materials, and make sure the hammock fits exactly where you want to hang it. Many store-bought hammocks are not strong enough or are made with rough materials.
When you choose your own fabric, you can pick something soft and durable. You’ll also have the chance to add pockets, change the length, or select your favorite color.
Another big advantage is safety. If you know how your hammock is built, you can trust it to hold your weight and last for years. During one camping trip, my store-bought hammock ripped at the seam. That experience made me realize how important it is to have a hammock you can trust.
After learning to sew my own, I never worried about that again.
Planning Your Hammock
Before you start sewing, a good plan will help you avoid mistakes and save time. Let’s look at what you need to think about.
Decide Where You Will Hang Your Hammock
First, think about the space where you’ll use your hammock. Is it indoors or outdoors? How much room do you have between the two hanging points? Measure the distance. Most hammocks need at least 10 to 15 feet of space. If you plan to use it outside, make sure there are two strong trees or posts.
Choose The Right Size
Hammocks come in many sizes. A single-person hammock is usually 50-60 inches wide and 8-10 feet long. If you want a double hammock, go for 70-80 inches wide and 10-14 feet long. It’s better to make the hammock a little longer than too short. A longer hammock is usually more comfortable.
Pick Your Hammock Style
There are different styles of hammocks. The two most popular are:
- Gathered-end hammocks (no spreader bars): These are simple, strong, and easy to sew. The ends are gathered together and attached to ropes.
- Spreader bar hammocks: These have a wooden bar at each end to keep the fabric open. They look nice, but they are harder to sew and less stable.
For beginners, I recommend the gathered-end style. It’s comfortable, safe, and fast to make.
Choosing Materials
The right materials are the key to a safe hammock. Don’t choose fabric just because it looks nice—think about strength, comfort, and weather resistance.
Fabric Selection
Choose a fabric that is strong, lightweight, and breathable. Some good options:
- Nylon taffeta: Used in many camping hammocks. Strong, lightweight, and dries fast.
- Polyester: Resists stretching and UV rays.
- Cotton canvas: Soft and comfortable but not good in rain.
Avoid thin, stretchy, or weak fabrics. For most adults, the fabric should hold at least 400 pounds.
Comparison Of Common Hammock Fabrics
| Fabric Type | Strength | Weight | Weather Resistance | Comfort |
|---|---|---|---|---|
| Nylon Taffeta | High | Light | Excellent | Good |
| Polyester | High | Medium | Very Good | Good |
| Cotton Canvas | Medium | Heavy | Poor | Excellent |
Thread
Use 100% polyester thread. It’s strong and doesn’t rot in wet weather. Cotton thread is not strong enough and can break or stretch.
Suspension System
A safe suspension system is vital. You will need:
- Webbing straps (at least 1-inch wide, rated for 1000 lbs or more)
- Carabiners or strong climbing hooks
- Rope (7/64″ Amsteel or 1/4″ polyester rope are good choices)
Never use regular hardware store rope or thin straps. They can break or cut into trees.
Tools And Supplies
Gather everything before you start:
- Sewing machine (with heavy needle, size 14/16)
- Scissors
- Measuring tape
- Pins or clips
- Lighter (for sealing rope/fabric ends)
- Marking chalk or fabric marker
Having all your tools ready makes sewing much smoother. I once forgot my heavy-duty needle and broke two regular needles before I realized my mistake.
Preparing The Fabric
Take your time with this part—it sets up the whole project.
Cut The Fabric
Lay your fabric flat. Measure and cut it to your chosen length and width. For a single-person hammock, cut a piece 60 inches by 10 feet. For a double, use 80 inches by 11-13 feet. Always add 2 extra inches to each side for hems.
Seal The Edges
Synthetic fabrics like nylon or polyester can fray. Use a lighter to gently melt the raw edges. Don’t hold the flame in one place for too long. For cotton, folding and hemming the edge is enough.
Mark The Attachment Points
Mark the short ends of your fabric (the width) at the exact center. This helps you keep everything even when you gather the ends.
Sewing The Hammock Body
Now you are ready to sew! Even if you’re new to sewing, you can do this with patience.
Hem The Edges
Fold each long edge (the sides) over by 1/2 inch, then fold again for a double hem. Pin it in place. Sew along the edge using a straight stitch. This double fold keeps the edges from fraying and makes them stronger.
Repeat for the short ends (the width). This step takes time, but it makes your hammock last longer.
Reinforce The Ends
The ends of the hammock hold all your weight, so they must be very strong.
- Fold each short end over by 1 inch, then again by 1 inch (double fold).
- Sew two or three lines across the fold, about 1/4 inch apart.
- Use a zigzag stitch for extra strength if your sewing machine has that option.
This reinforced channel is where you’ll put your rope later.
Example: Why Reinforcement Matters
The first time I made a hammock, I only sewed one line across the end. After a month, the seam started to come apart. Adding two or three lines made a huge difference—my current hammock has held up for two years with no issues.
Gathering The Hammock Ends
With the sewing finished, you need to gather each end so you can attach your suspension.
Method 1: Rope Channel
- Take a strong rope (like Amsteel or polyester).
- Thread it through the channel you made at each end.
- Pull the rope tight to gather the fabric.
- Tie a secure knot, like a double figure-eight or overhand knot.
Method 2: Whipped End
- Gather the end of the fabric like you’re making a ponytail.
- Wrap strong cord around the gathered end 10-15 times, tightly.
- Tie off the cord with a secure knot.
- Attach your suspension rope above the whipping.
Both methods work well. The rope channel is easier for beginners, but the whipped end can be a little lighter and less bulky.
Making The Suspension System
A hammock is only as good as its suspension. Here’s how to make yours safe and simple.
Webbing Straps
Cut two lengths of webbing, each 8-12 feet long. These go around your trees or posts. Webbing is better than rope because it doesn’t damage tree bark.
Carabiners
Get two strong carabiners, rated for at least 1000 pounds. These make it easy to clip your hammock up and take it down.
Attaching Everything
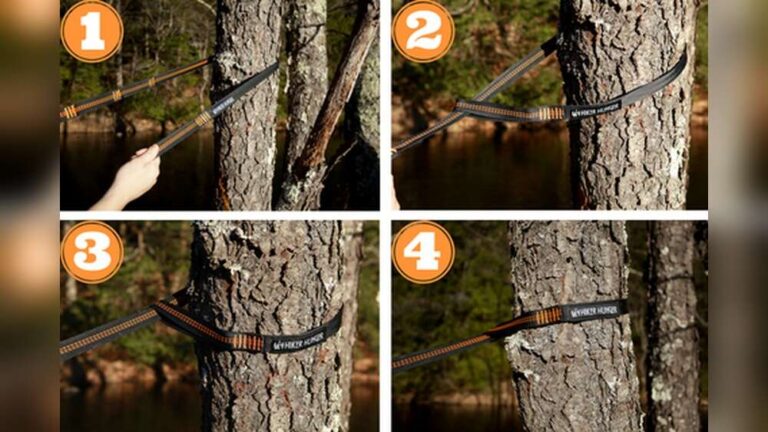
- Wrap the webbing around your anchor (tree or post).
- Clip the carabiner through the loop in the webbing and the gathered end of the hammock.
- Adjust the height so your hammock hangs about 18 inches off the ground when you sit in it.
Comparison Of Suspension Components
| Component | Strength | Ease of Use | Tree-Friendly |
|---|---|---|---|
| Webbing Straps | Very High | Easy | Yes |
| Rope | Varies | Medium | No |
| Carabiners | High | Very Easy | Depends |
Testing Your Hammock
Testing is an important step. Don’t skip it! It’s safer to check your hammock before you put your full weight in it.
How To Test
- Hang your hammock low—no more than 18 inches above soft ground.
- Press down on the middle with your hands to check strength.
- Sit down slowly. Listen for any stitches popping or fabric tearing.
- Lie down gently the first time. If everything holds, your hammock is ready!
Common Problems And How To Fix Them
- Seams coming apart: Add extra lines of stitching.
- Fabric stretching too much: Choose a less stretchy fabric next time.
- Hammock sags too low: Adjust the suspension height.
If you hear any weird noises or see the fabric pulling apart, get out and check your sewing. A well-made hammock should hold strong and feel safe.

Credit: www.youtube.com
Optional Add-ons And Upgrades
Once you have the basic hammock, you can make it even better. Here are some ideas:
Bug Net
If you use your hammock outside, bugs can be a problem. You can sew a simple bug net using no-see-um mesh and a zipper. This keeps mosquitoes and flies out.
Ridgeline
A ridgeline is a thin cord that runs from one end of the hammock to the other. It helps keep the hammock at the perfect curve every time you hang it. Tie it above the hammock body.
Pockets
Sew a small pocket onto the inside or outside. It’s great for holding your phone, book, or a snack.
Underquilt
For cold nights, an underquilt hangs under your hammock to keep you warm. You can sew one from an old sleeping bag or buy one ready-made.
These upgrades make your hammock more comfortable and practical. I added a small pocket to mine, and now I never lose my phone while relaxing outside.
Safety Tips For Using Your Hammock
Safety is always important, especially if you sew your own gear. Here are key tips:
- Check your hammock before each use. Look at all seams, straps, and carabiners.
- Hang it at a safe height. No higher than you are willing to fall.
- Never overload your hammock. Know the weight limit of your fabric and suspension.
- Use wide straps on trees. This protects both the tree and your hammock.
- Avoid sharp objects in the hammock. Even strong fabric can tear.
Following these tips will help your hammock last longer and keep you safe.
Caring For Your Hammock
To keep your hammock in good shape, regular care is important.
- Clean your hammock with mild soap and cold water. Don’t use bleach.
- Dry it completely before storing, especially if it gets wet.
- Store in a dry place to avoid mold or mildew.
- Check for damage after each trip.
If you take care of your hammock, it can last for many years of relaxing afternoons.
Troubleshooting Common Hammock Problems
Sometimes, things don’t go as planned. Here’s how to solve the most common issues.
Hammock Feels Tight Or Uncomfortable
Try hanging the hammock with a deeper curve. A ridgeline helps with this, but you can also adjust the suspension.
Fabric Rips Or Seams Fail
This usually means the fabric or thread was not strong enough, or the sewing was not reinforced. Use heavy-duty thread and double-stitch all stress points.
Hammock Twists Too Much
This can happen if the ends are not gathered evenly. Make sure both ends are centered and the suspension is even.
Hammock Sags Too Low
Raise the suspension or shorten the distance between hanging points.

Credit: theultimatehang.com
Cost Comparison: Diy Vs Store-bought Hammocks
Is it really cheaper to sew your own hammock? Here’s a quick look:
| Item | DIY Hammock Cost | Store-Bought Cost |
|---|---|---|
| Fabric (nylon, 4 yards) | $20 | – |
| Thread | $4 | – |
| Webbing Straps | $12 | – |
| Carabiners (pair) | $10 | – |
| Total | $46 | $60–$120 |
As you can see, sewing your own hammock can save you money, especially if you already have some of the supplies at home. Plus, you get a custom product.
Where To Learn More
If you want to dive deeper, check the Hammock Wikipedia page for more history, styles, and hammock uses. You’ll also find details on advanced hammock setups and safety.

Credit: www.youtube.com
Frequently Asked Questions
How Much Weight Can A Homemade Hammock Hold?
It depends on the fabric, thread, and suspension system you use. Most DIY hammocks, when made with strong nylon and good webbing, can safely hold 300–400 pounds. Always check your materials’ ratings.
What Is The Best Fabric For A Hammock?
Nylon taffeta is the best all-around choice. It is strong, light, and dries quickly. Polyester is also good, especially for outdoor use, because it resists sun damage.
Can I Sew A Hammock Without A Sewing Machine?
Yes, but it will take much longer. Hand-sew with a strong needle and heavy-duty thread, and use small, tight stitches. Be sure to double-stitch all stress points for safety.
How Do I Wash My Hammock?
Remove the suspension parts and wash the fabric by hand with mild soap and cold water. Rinse well, then hang to air dry. Never use bleach or machine dry.
Is It Safe To Hang A Hammock Indoors?
Yes, as long as you mount the anchors into strong wall studs or ceiling joists. Never hang from drywall or weak supports. Always test with care the first time you use it.
Making your own hammock is a skill that stays with you. Whether you use it in your backyard, on camping trips, or even indoors, you’ll always have a comfortable place to relax. With care and attention to detail, you can create a hammock that will give you years of enjoyment and pride.

Zayden Halbrook is a travel enthusiast and gear researcher passionate about making every journey smoother and more enjoyable. With a keen eye for practical travel essentials and real-world tips, he helps readers choose the right gear and travel smarter. When he’s not testing travel kits or exploring new destinations, Zayden shares simple, reliable advice to make every trip stress-free.