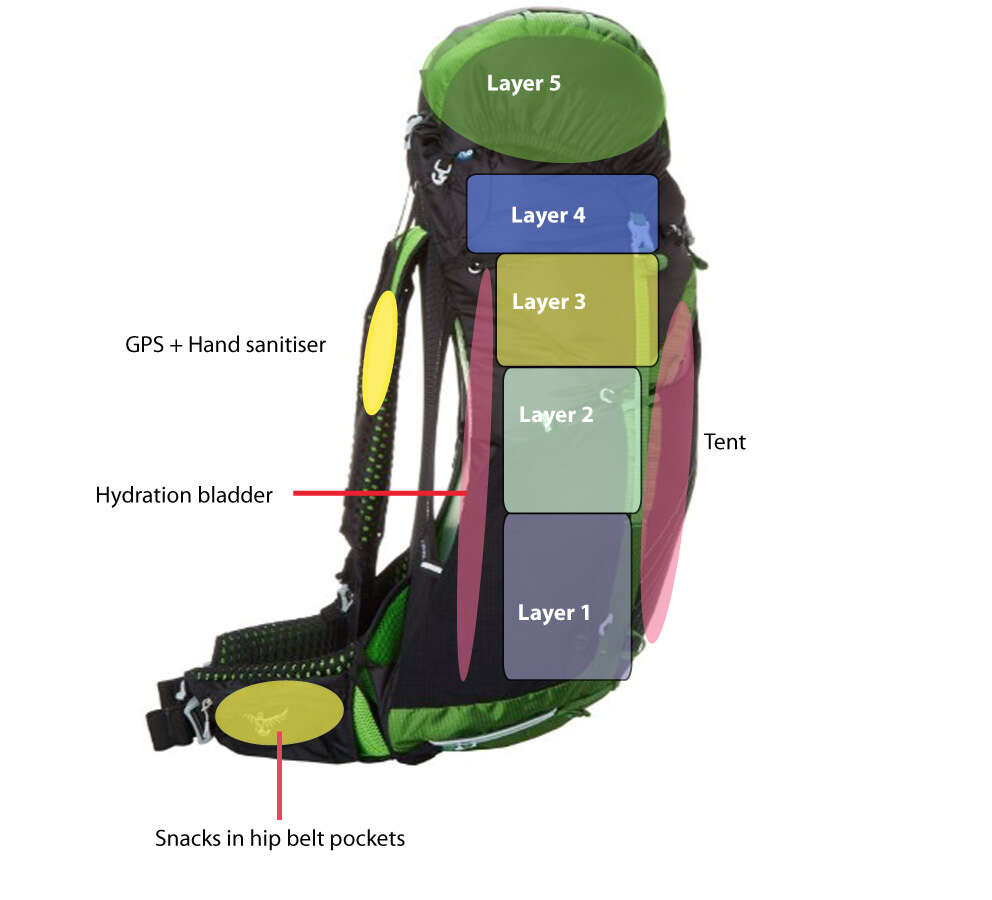
Pack heavy gear low and close to your spine for balance and comfort.
I’ve spent years guiding treks and testing packs across varied trails, so I know what works. This article explains how to pack a trekking backpack step by step. Read on for proven methods, real mistakes I’ve fixed, and practical checklists to make your next trip lighter, safer, and more comfortable.

Packing essentials and core principles
Packing well starts with a few simple rules. These rules guide every choice you make when learning how to pack a trekking backpack. Keep weight close to your back, spread heavy items near the middle-low spine, and keep frequently used items accessible.
Key principles to remember:
- Stability matters more than neatness. A stable pack saves energy.
- Weight distribution beats carrying less weight unevenly.
- Accessibility prevents stopping every five minutes.
I once carried a tent too high and felt my center of gravity shift on steep switchbacks. After lowering it, the hike became much easier. These small changes are the heart of how to pack a trekking backpack.
Choose the right backpack
Choosing the right pack makes packing easier and safer. Match pack volume to trip length and type. For multiday treks, 45–65 liters fits most solo hikers. For winter or group trips, choose larger capacity.
Fit is critical:
- Try packs with a loaded weight similar to your expected load.
- Adjust the hip belt so most weight sits on hips.
- Ensure shoulder straps and torso length are comfortable.
I recommend visiting a proper outdoor store and testing packs on a treadmill or with weight in them. Proper fit is the first step in how to pack a trekking backpack.

Packing order: where to place items
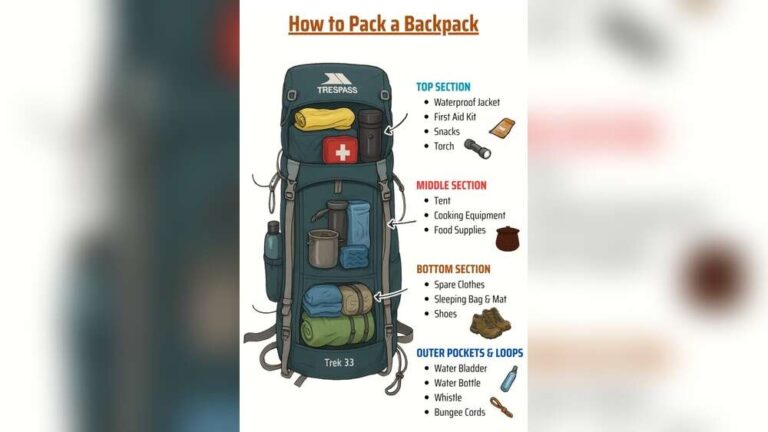
A consistent packing order creates balance and easy access. Use the following layout as a baseline for how to pack a trekking backpack.
Core packing order from bottom to top:
- Bottom: sleeping bag or compressible sleeping kit.
- Middle (against spine): heavy, dense items like fuel, food for multi-day, and stove.
- Upper middle: lighter bulky items such as clothing and fleece.
- Top/outer: rain jacket, snacks, map, first-aid, and items you need quickly.
Place fragile items in the center and waterproof items in dry bags. This layout keeps the heaviest weight centered and low — vital for trail control and comfort.
Organizing gear and using pockets
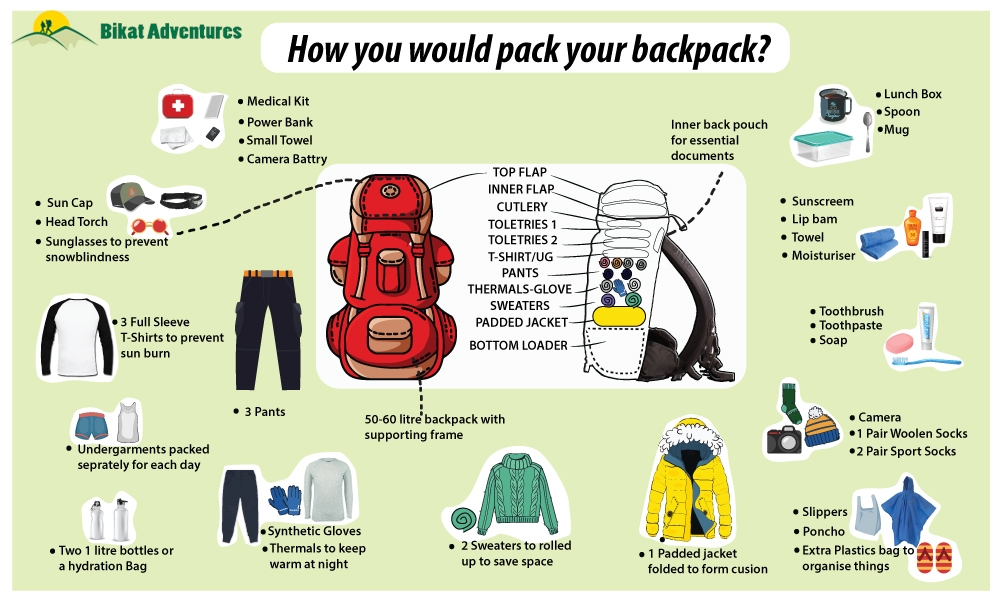
Good organization reduces time and helps maintain balance. Use pack compartments and small organizers to separate items.
Organizing tips:
- Use 2–3 stuff sacks: sleeping system, clothes, and shelter. This saves time and keeps shape.
- Use a small daypack or hip-belt pockets for snacks, phone, and map.
- Keep a waterproof bag for electronics and documents.
I learned to mark stuff sack contents with a small label. It cuts search time and keeps you moving. Thoughtful organization is a core part of how to pack a trekking backpack.
Clothing, sleeping, and shelter packing
Clothing choices and how you stow them affect warmth and weight. Pack layers and use smart compression.
Clothing and sleeping tips:
- Roll shirts and base layers to save space and reduce wrinkles.
- Keep a dry layer separated for camp changes.
- Stuff your sleeping bag into a compression sack and place it at the bottom, unless you need quick access for midday naps.
I used to pack wet clothes with dry ones. That mistake cost me in damp gear and morale. Keep wet and dry items separated to avoid that. Follow these methods when learning how to pack a trekking backpack.

Food, cooking, and hydration
Food is heavy and needs planning. How you pack it affects both safety and weight balance.
Food and cooking tips:
- Divide food into daily packs for easy access and to track portions.
- Store cooking fuel and stove near the center or bottom for stability.
- Place water close to the top or in side pockets for easy refill while on the move.
On long trips I pre-pack breakfasts and lunches into zip sacks. It saves time and keeps me focused on the trail. Managing food and hydration is essential when learning how to pack a trekking backpack.

Balance, compression, and fit on the trail
A well-packed bag only works if adjusted correctly. Fine-tune straps and use compression to lock cargo.
Fit and balance steps:
- Tighten hip belt snugly; most weight should rest on hips.
- Use load lifters to bring the top of the pack closer to your shoulders.
- Use compression straps to pull items toward the pack’s frame and reduce bounce.
I once hiked with loose straps and ended up with sore shoulders. Tightening the straps and compressing the load solved the problem immediately. Balance is the practical result of smart packing and fit.

Common mistakes and packing tips
Avoid these common errors to make packing efficient and safe.
Mistakes to avoid:
- Overpacking clothes "just in case." Plan outfits and layer wisely.
- Storing heavy items high in the pack. This throws off balance.
- Not waterproofing electronics and documents. Use dry bags or liners.
Extra practical tips:
- Weigh items at home to spot avoidable load.
- Repack after the first day to remove items you didn’t use.
- Keep a lightweight repair kit accessible for quick fixes.
From my field experience, the best hikes are those where I refined my pack after the first day. That update often reduced weight and improved comfort — a vital lesson in how to pack a trekking backpack.
Packing checklist and day-before routine
A checklist prevents last-minute stress and forgotten essentials. Use this simple list the night before departure.
Core checklist:
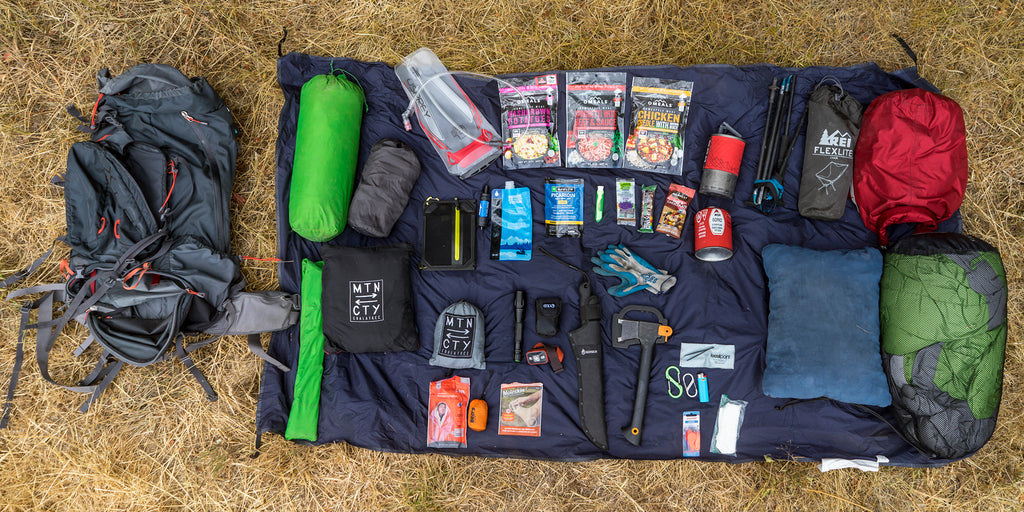
- Pack: sleeping bag, tent or shelter, sleeping pad.
- Clothing: base layers, insulating mid-layer, rain shell.
- Cooking: stove, fuel, lightweight cookware.
- Food: meals, snacks, day rations.
- Navigation and safety: map, compass, headlamp, first-aid.
- Hydration: water bottles or bladder, purification method.
- Personal: toiletries, sunscreen, insect repellent, repair kit.
Do a quick test walk with the packed bag around the block. It reveals fit issues and items you can remove. This routine is a practical finishing touch when preparing how to pack a trekking backpack.
Frequently Asked Questions of how to pack a trekking backpack
How should heavy gear be positioned in a trekking pack?
Place heavy gear close to the spine and around the middle to lower section of the pack. This keeps your center of gravity stable and reduces strain on shoulders.
Is it better to use a sleep system at the bottom or outside the pack?
Store the sleeping bag at the bottom inside a compression sack unless you need quick access, then place it in an outside pocket. Keeping it inside helps maintain pack balance.
How do I waterproof my backpack contents?
Use a pack liner or heavy-duty trash bag as a liner and place electronics in separate dry sacks. Small waterproof cases or zip bags work well for phones and documents.
What items should be kept in hip-belt pockets?
Keep snacks, a small first-aid kit, a map, and your phone in hip-belt pockets for quick access. These allow you to reach essentials without removing the pack.
How often should I repack during a multi-day trek?
Re-evaluate and repack after the first day and then only if balance or access becomes an issue. Removing unused items after the first day often improves comfort.
Conclusion
Packing a trekking backpack well saves energy, reduces injury risk, and improves enjoyment on trail. Use the core principles: heavy items low and close to the spine, smart organization, and proper fit. Test your pack, trim unnecessary items after day one, and keep essential gear accessible.
Take action this week: lay out your gear, follow the checklist, and do a short trial hike with a fully loaded pack. Share your experience or questions below, and subscribe for more practical trekking tips.

Zayden Halbrook is a travel enthusiast and gear researcher passionate about making every journey smoother and more enjoyable. With a keen eye for practical travel essentials and real-world tips, he helps readers choose the right gear and travel smarter. When he’s not testing travel kits or exploring new destinations, Zayden shares simple, reliable advice to make every trip stress-free.