Rinse, scrub, sanitize, and fully dry every part of your water backpack after each use.
A clean water backpack keeps your drink fresh, prevents mold, and helps the bladder, tube, and bite valve last longer. After years of outdoor use and testing different cleaning methods, I have found that a simple routine works best: empty the pack, wash every part, rinse it well, and dry it completely. This guide explains how to clean a water backpack safely, remove odors, and prevent hard-to-reach buildup.
Why Cleaning a Water Backpack Matters
A water backpack, also called a hydration pack, carries water in a soft bladder connected to a drinking tube. Warm water, saliva, sugar, and dirt can collect inside the system. If the pack stays damp, mold and bacteria may grow.
Cleaning your water backpack helps:
• Keep water tasting fresh
• Reduce bad smells
• Prevent mold and slimy buildup
• Protect the drinking tube and bite valve
• Extend the life of the bladder
• Lower the risk of stomach upset from dirty gear
Plain water is easier to manage than sports drinks. Drinks with sugar, flavor, or electrolytes leave a sticky film. That film can feed odor and mold if you do not rinse the bladder soon after use.
A clean pack also performs better. A blocked bite valve can reduce water flow when you need it most, such as during a long hike, bike ride, or race.
What You Need to Clean a Water Backpack
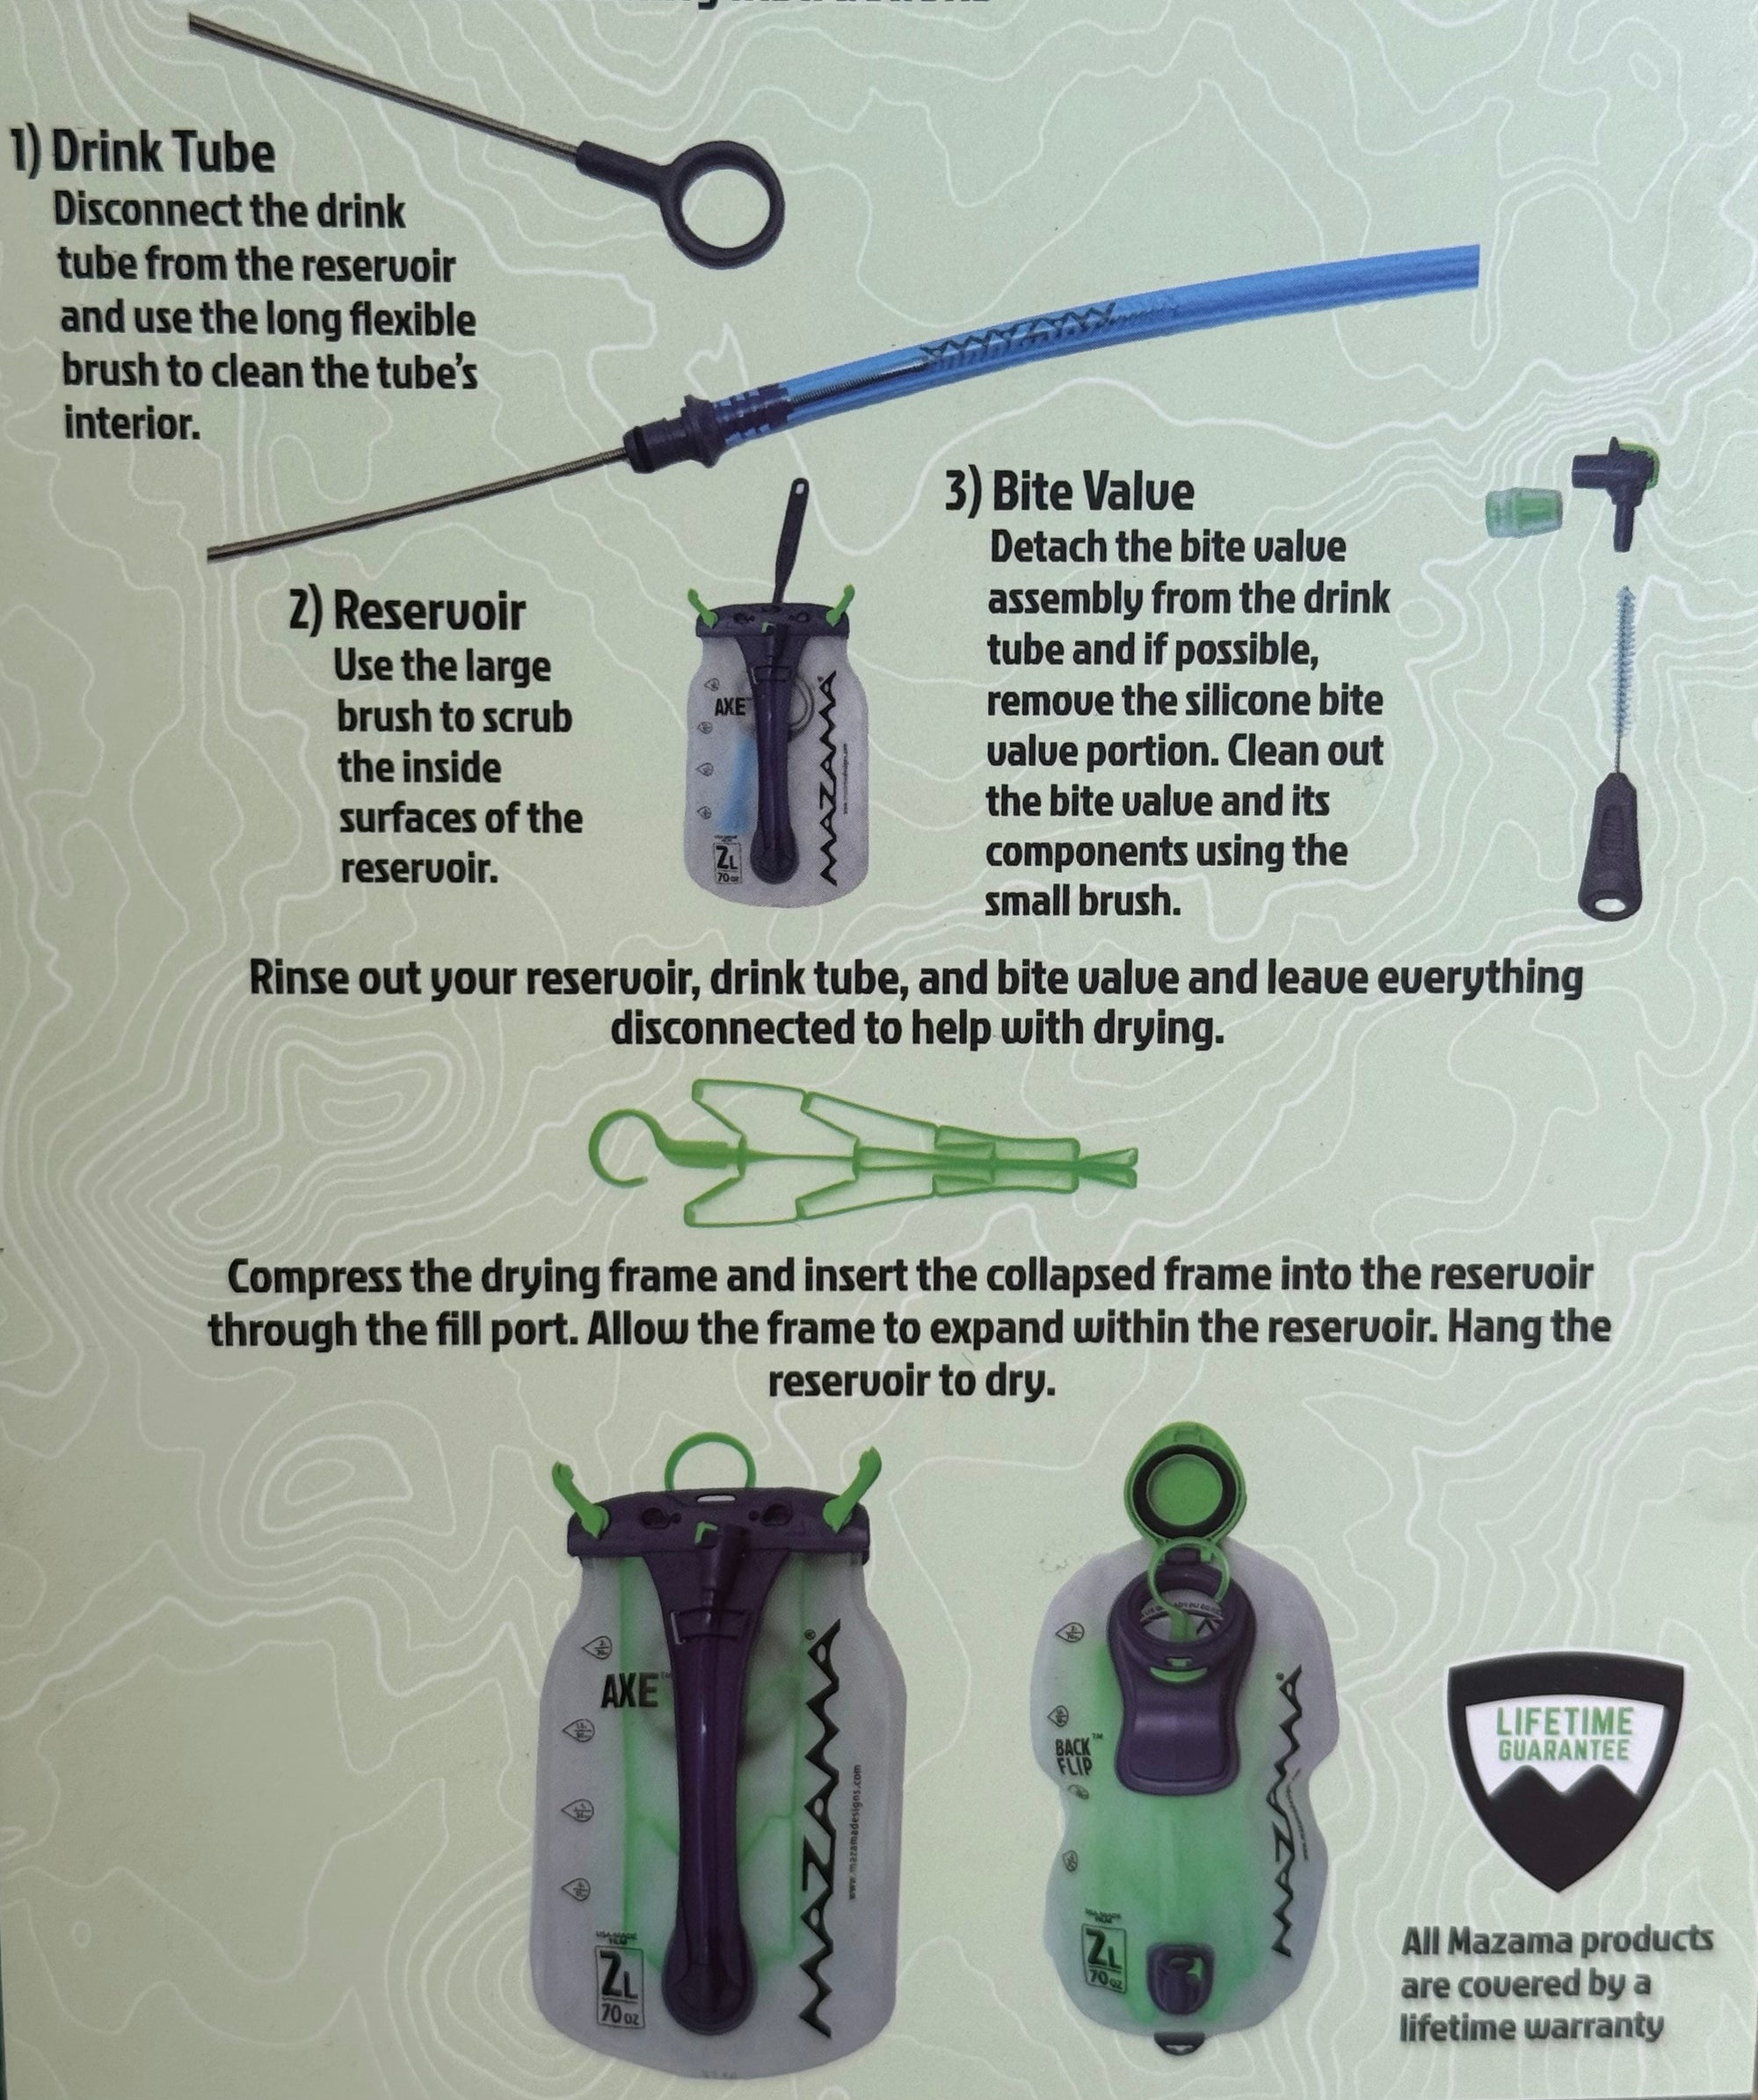
You do not need special equipment for routine cleaning. Gather these items before you start:
• Warm water
• Mild, unscented dish soap
• A soft bottle brush
• A thin tube brush or cleaning wire
• A small valve brush or cotton swab
• A clean towel
• A drying rack, hanger, or hydration bladder dryer
• Baking soda for mild odors
• An approved hydration-system cleaning tablet for deep cleaning
Avoid strong bleach, scented cleaners, and abrasive scrubbers unless the manufacturer gives clear instructions. These products may damage the bladder or leave an unsafe taste.
Read the care label first. Some hydration bladders are dishwasher-safe, while others can warp from heat. The brand’s cleaning instructions should always guide your final choice.

How to Clean a Water Backpack Step by Step
The best way to clean a water backpack is to take the system apart. This lets water and soap reach every surface.
1. Empty the bladder
Pour out all leftover water as soon as possible. Do not leave water sitting in the bladder overnight, especially in a warm car or a sunny campsite.
Open the wide mouth or slide seal. Turn the bladder upside down and drain it fully. If the bladder has a quick-release tube, disconnect it so trapped water can escape.
2. Separate the parts
Remove the parts that are designed to come apart:
• Bladder cap or slider
• Drinking tube
• Bite valve
• Valve cover
• Quick-connect fitting
• Tube clip, if removable
Do not force a part that does not detach. A broken fitting can cause leaks and may make the bladder unsafe to use.
3. Wash the bladder
Add warm water and a small amount of mild dish soap to the bladder. Close the opening and shake it for about 30 seconds.
Use a soft bottle brush to clean the inside. Pay close attention to the corners, seams, cap, and area around the opening. These spots often hold residue.
Drain the soapy water. Fill the bladder with clean water, shake it, and drain it several times. Keep rinsing until there are no bubbles or soap smells.
4. Clean the drinking tube
Run warm, soapy water through the tube. A tube brush works well because it scrubs the inner wall where slime can hide.
If you do not have a tube brush, fill the tube with soapy water, hold both ends closed, and shake it. Then flush the tube with clean water several times.
The tube is often the part people miss when they clean a water backpack. It can look clear from the outside while still holding residue inside.
5. Wash the bite valve
Remove the bite valve if the design allows it. Wash it with warm, soapy water and use a small brush or cotton swab around the slit.
Rinse the valve from both directions. Squeeze or open it while rinsing so clean water moves through the inner channel.
Do not use a sharp object to widen the valve slit. A damaged valve may leak or drip inside your pack.
6. Rinse every part
Rinsing is just as important as washing. Soap left inside the bladder can affect the taste of your water and may irritate your stomach.
Rinse the bladder, tube, cap, and valve with clean water. If you still smell soap, rinse again. Clean water should flow freely through the tube before you put the system back together.
7. Dry the system completely
Drying is the most important step in preventing mold. Shake out excess water, then leave every part open in a well-ventilated area.
Keep the bladder open with a clean towel, spoon, or drying frame. Hang the tube so air can move through it. Place the bite valve and cap where they can dry on all sides.
Never store a damp water backpack in a closed pocket. It is like putting a wet towel in a drawer. The trapped moisture creates the perfect setting for odor and mold.

How to Deep Clean a Water Backpack
Routine washing is enough for regular use. A deep clean helps when the bladder smells bad, feels slippery, or has visible residue.
Start by filling the bladder with warm water. Add an approved hydration cleaning tablet and follow the product directions. Let the solution sit for the stated time, then flush it through the tube and bite valve.
After soaking, scrub the bladder and tube. Pay attention to the seams and folds. Drain the solution and rinse the entire system several times.
You can also use a simple baking soda solution for mild odors:
- Add two to three tablespoons of baking soda to about one quart of warm water.
- Pour the mixture into the bladder.
- Flush some of it through the tube.
- Let it sit for several hours or overnight.
- Rinse the system until no powder or odor remains.
- Dry all parts fully.
Baking soda can reduce odor, but it may not remove heavy mold. If mold remains after careful cleaning, replace the bladder or contact the manufacturer. A porous or damaged bladder may not be possible to sanitize fully.
Do not mix bleach with vinegar, ammonia, or other cleaners. Dangerous fumes can form. If you choose a bleach solution, use it only when the manufacturer permits it and follow the exact dilution and contact time on the product label.

How to Remove Mold From a Water Backpack
Small dark spots, a musty smell, or a slippery surface may indicate mold or biofilm. Stop using the water backpack until you clean it.
First, take apart the entire system. Wash each part with warm water and mild soap. Scrub the bladder, tube, cap, and bite valve as far as the design allows.
Next, use a hydration-safe cleaning tablet or the manufacturer’s recommended sanitizer. Follow the label closely. More cleaner is not better, and a stronger mixture may damage the material.
Rinse the system many times. If you see black spots, cracks, deep staining, or a lasting smell, replacement is usually the safer choice. It is difficult to verify that every hidden area is free from contamination.
A common mistake is cleaning only the visible mold. Mold can remain inside the tube, valve, or folds. The entire system needs attention.

How to Clean a Water Backpack After Sports Drinks
Sports drinks and flavored water need extra care. Sugar and minerals can leave a film that plain water does not remove.
Clean the bladder as soon as possible after use:
• Empty the drink completely
• Rinse the bladder with warm water
• Flush the tube and bite valve
• Wash all parts with mild soap
• Rinse until the water runs clear
• Dry the system with every opening exposed
If a sticky film remains, soak the bladder in warm water with a hydration cleaning tablet. Scrub gently with a soft brush.
Avoid storing sports drinks in the bladder for long periods. Even a few hours in heat can create a strong odor and make later cleaning harder.

How Often Should You Clean a Water Backpack?
Clean your water backpack after every use. This is especially important after using sports drinks, powdered mixes, or flavored water.
A basic schedule looks like this:
• After every use: Empty, rinse, and dry the bladder, tube, and valve.
• After each sports drink: Wash the full system with mild soap.
• Every one to two weeks during frequent use: Perform a deeper cleaning.
• Before storing for the season: Wash, sanitize if needed, and dry completely.
• Before the next trip: Inspect for odor, mold, cracks, and leaks.
Hot weather requires more care. A backpack used on a summer trail can become warm enough for residue and microbes to grow quickly.
I have found that cleaning right after a hike takes only a few minutes. Waiting until the next day often turns a simple rinse into a full odor-removal job.

How to Dry and Store a Water Backpack
Good storage keeps your water backpack clean between trips. After washing, separate the parts and leave the bladder wide open.
Use one of these methods:
• Hang the bladder upside down with the opening facing down.
• Place it over a clean drying rack.
• Insert a dedicated bladder dryer to keep the sides apart.
• Hang the tube vertically so water can drain out.
• Leave the bite valve and cap in an open, dry area.
Do not dry the bladder in direct, intense sunlight for long periods. Ultraviolet light and heat may weaken some plastics and seals.
Store the dry bladder in a cool place. If your freezer is clean and the manufacturer allows it, freezing may help reduce odor between uses, but it does not replace proper washing and drying.
Keep the backpack itself clean too. Wipe the inside of the hydration pocket and remove dirt from the outer fabric. A leaking bladder can soak the pack and create hidden damp areas.

Common Mistakes to Avoid
Even careful users can miss a few small details. Avoid these problems when you clean a water backpack:
• Closing the bladder while it is still wet
• Washing the bladder but ignoring the tube
• Leaving sports drink residue inside
• Using boiling water without checking the care label
• Scrubbing with a rough sponge
• Using scented soap that changes the water taste
• Storing the bite valve while it is damp
• Forcing removable parts apart
• Using mixed cleaning chemicals
• Keeping a bladder with deep cracks or persistent mold
The biggest lesson is simple: clean the whole system, not just the part you can see. The tube and bite valve often need more attention than the main bladder.

When to Replace a Water Backpack Bladder
Cleaning cannot fix every problem. Replace the bladder if it has a leak, deep scratches, cracks, or permanent mold.
You should also consider replacement when:
• The plastic has become sticky or brittle
• The bladder still smells after deep cleaning
• The tube has discoloration that will not wash away
• The bite valve leaks after proper assembly
• The cap no longer seals
• The material has a strong chemical taste
Check the warranty before buying a replacement. Some manufacturers sell new tubes, valves, caps, and bladders separately. Replacing one small part may cost less than buying a full hydration pack.
If you cannot confirm that a visibly moldy or damaged bladder is clean, do not use it for drinking water. The cost of a new bladder is small compared with the risk of continuing to use contaminated gear.
Safety Tips for Clean Drinking Water
A clean water backpack does not make unsafe water safe. Fill it only with drinking water from a trusted source or water treated with a suitable method.
Keep these points in mind:
• Do not share the bite valve without cleaning it.
• Keep the bladder away from raw food and dirty gear.
• Wash your hands before filling the system.
• Inspect the cap and valve before each trip.
• Treat backcountry water with an approved filter, purifier, or chemical method.
• Follow local guidance during advisories or suspected contamination.
Public health guidance supports regular cleaning and complete drying of reusable drink containers. However, no home cleaning method can guarantee removal of every contaminant from damaged or heavily moldy plastic. When in doubt, replace the affected part.
Frequently Asked Questions About How to Clean a Water Backpack
Can I put my water backpack in the dishwasher?
Some hydration bladders and parts are dishwasher-safe, but many are not. Check the manufacturer’s care instructions before using a dishwasher, and keep soft plastic parts away from high heat unless the label approves it.
How do I clean a water backpack that smells bad?
Wash the bladder, tube, and bite valve with warm water and mild soap. For a lasting odor, use baking soda or an approved hydration cleaning tablet, then rinse well and dry the system completely.
Can I use bleach to clean a water backpack?
Bleach should be used only if the manufacturer permits it and provides a safe dilution. Never mix bleach with vinegar, ammonia, or other cleaners, and rinse the system thoroughly after sanitizing.
How do I clean the tube on a water backpack?
Disconnect the tube and flush warm, soapy water through it. Scrub the inside with a thin tube brush, then rinse until the water is clear and hang the tube so it can dry fully.
How do I prevent mold in a water backpack?
Empty and rinse the bladder after every use. Keep the bladder open, dry all parts separately, and never store the hydration pack while moisture remains inside.
How often should I clean a water backpack?
Rinse and dry it after every use. Wash it with mild soap after sports drinks or flavored mixes, and deep clean it every one to two weeks when you use it often.
Is it safe to use a water backpack with black spots?
No, you should stop using it until the spots are removed and the system is fully cleaned. If the spots remain, the plastic is damaged, or the odor continues, replace the bladder or affected parts.
Conclusion
Learning how to clean a water backpack is simple when you follow the same order every time: empty it, take it apart, wash each piece, rinse it well, and dry it completely. Give extra care to the tube, bite valve, seams, and areas that hold sports drink residue.
A few minutes of care after each trip can prevent mold, odors, leaks, and early replacement. Make this cleaning routine part of packing up after every hike or ride, and your hydration system will stay fresher and more dependable. Share your best cleaning tip or explore more gear-care guides for safer, easier outdoor adventures.

Zayden Halbrook is a travel enthusiast and gear researcher passionate about making every journey smoother and more enjoyable. With a keen eye for practical travel essentials and real-world tips, he helps readers choose the right gear and travel smarter. When he’s not testing travel kits or exploring new destinations, Zayden shares simple, reliable advice to make every trip stress-free.