Packing a backpacking pack can make or break your trip. If you do it right, your load will feel lighter, your gear will stay safe, and you’ll be ready for anything the trail brings. I’ve spent years backpacking in different places, from the humid forests of the Pacific Northwest to dry mountain trails in Colorado.
I’ve learned the hard way—blisters, sore shoulders, and even soaked gear from bad rain. Packing well is not just about comfort; it’s about safety and enjoyment.
This guide will walk you through everything you need to know to pack your backpacking pack. I’ll share expert tips, real experiences, and simple steps. By the end, you’ll know how to pack smart, avoid rookie mistakes, and head out with confidence.
Understanding Backpack Types And Choosing The Right One
Before you pack, you need to pick the right backpack. Backpacks come in different shapes and sizes. Picking the wrong one can turn your adventure into a struggle.
Key Backpack Types
- Internal frame packs: These have a frame hidden inside. They hold weight close to your body and help with balance. They’re best for rough trails and most backpackers use them.
- External frame packs: The frame is on the outside. They’re good for carrying heavy, odd-shaped loads. They feel more open and are better for easy trails.
- Frameless packs: Very light and flexible. Good for ultra-light hikers who carry less gear.
Picking The Right Size
Backpack sizes are measured in liters. Here’s a simple comparison:
| Pack Size (Liters) | Trip Length | Best For |
|---|---|---|
| 30-50L | 1-3 nights | Short trips, minimal gear |
| 50-70L | 3-5 nights | Average backpackers |
| 70L+ | 5+ nights | Long trips, winter gear |
A beginner usually does well with a 50-60L pack. Make sure to try packs on with weight in the store. Adjust the shoulder straps and hip belt. The hip belt should sit on your hip bones and carry most of the weight.
My Experience Choosing A Pack
On my first trip, I used a borrowed pack that was too big. It sagged, and my shoulders ached after two miles. The next time, I visited a gear store, tried on several packs, and found one that fit just right.
The difference was huge—I could walk all day without pain.
Organizing Your Gear Before Packing
Don’t just toss everything into your pack. Lay out all your gear first. This helps you see what you really need and what you can leave behind.
Main Gear Groups
- Shelter: Tent, tarp, or bivy sack
- Sleeping gear: Sleeping bag, pad, pillow
- Clothing: Layers for warmth, rain gear, socks, hat
- Cooking gear: Stove, fuel, pot, utensils, food
- Water system: Bottles or bladder, filter or treatment
- Essentials: First aid, map, compass, headlamp, knife, fire starter
- Personal items: Toothbrush, sunscreen, bug spray, toilet paper
Check each item. Does it serve a real purpose? If you’re not sure, imagine using it. If you can’t, leave it.
Weigh Your Gear
Use a small scale and write down each item’s weight. This helps you cut extra ounces. Many hikers are surprised at how much small items add up. For example, three pairs of socks may seem fine at home, but on the trail, two pairs are enough.
Pack Items In Groups
Put gear into stuff sacks or zip bags. Group by use: sleeping gear in one, kitchen in another. This keeps things organized and dry.

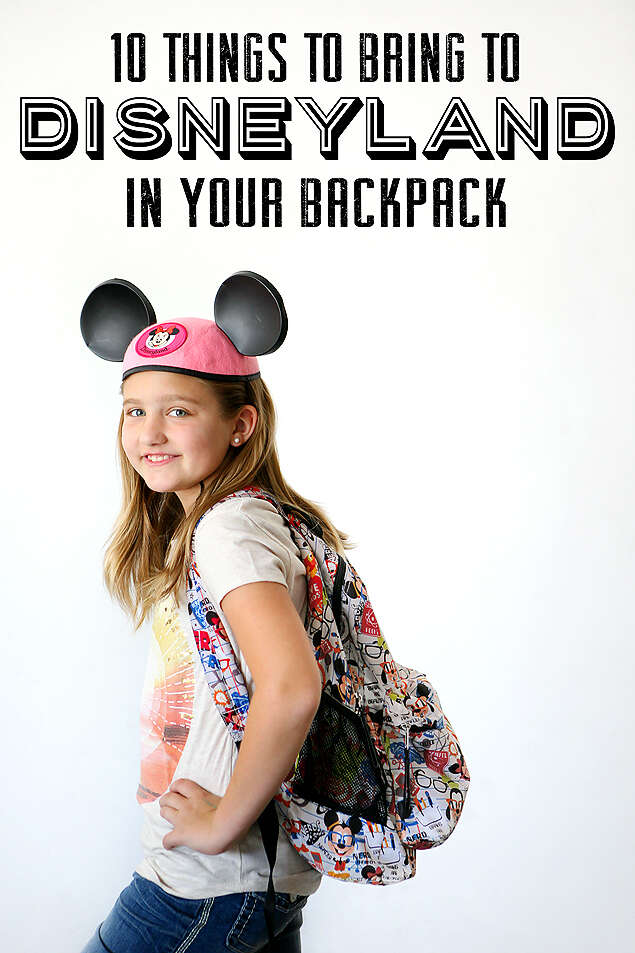
Credit: stogagirlssoccer.com
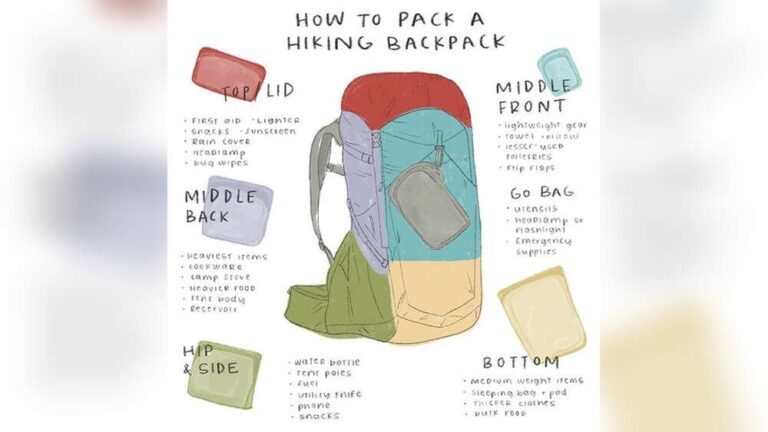
The Golden Rules Of Packing A Backpack
Packing your backpack is more than just filling empty space. There are rules to follow if you want to hike comfortably and safely.
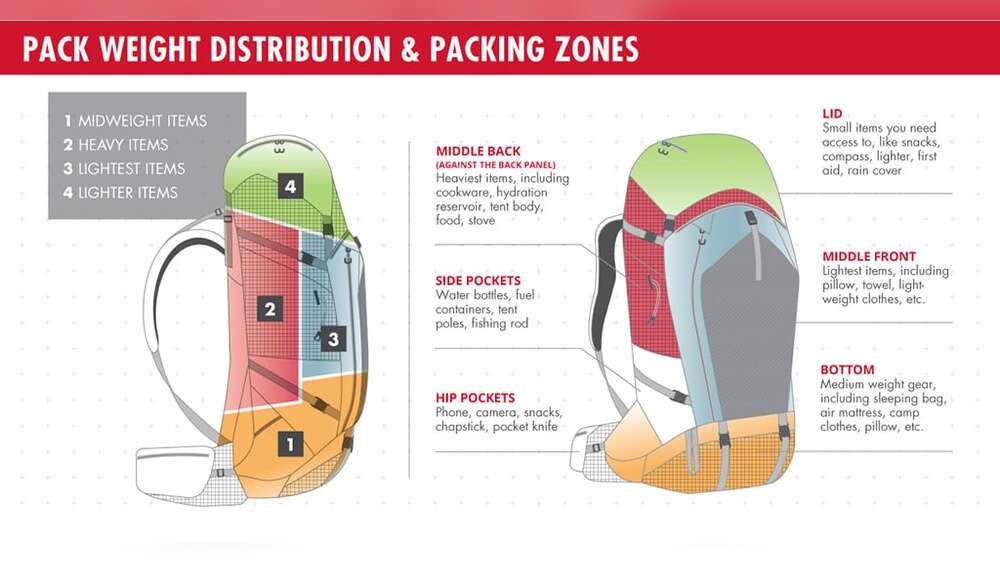
Rule 1: Keep Heavy Items Close To Your Back
Heavy items should be packed near your center of gravity—middle of your back, just above your hips. This keeps you balanced and saves your back and shoulders.
- Put food, stove, and water here.
- Never put heavy items at the bottom or top of your pack.
Rule 2: Light And Bulky Items Go At The Bottom
Sleeping bag, sleeping pad, and puffy jackets are light but take up space. Stuff them at the bottom of your pack.
- They create a cushion for your back.
- They act as a base for heavier gear.
Rule 3: Frequently Used Items Go On Top Or In Pockets
You’ll want easy access to:
- Rain jacket
- First aid kit
- Snacks
- Map and compass
- Headlamp
Put these at the top of your pack or in outside pockets.
Rule 4: Keep Small Essentials Handy
Put sunscreen, bug spray, and toilet paper in side pockets or hip belt pockets. You shouldn’t need to unpack to reach these.
Rule 5: Balance Left And Right
Pack gear evenly. If one side is heavy, your back will hurt, and you’ll feel off-balance. Double check before you zip up.
Step-by-step Guide To Packing Your Backpack
Let’s walk through how to pack, step by step.
- Lay everything out. Make sure you have all your gear. Double-check your checklist.
- Pack the bottom first. Put your sleeping bag in, then your sleeping pad and pillow. This creates a soft base.
- Add middle-weight items. Put your clothes and shelter (tent) next. Use stuff sacks to keep things tight.
- Pack heavy gear close to your back. Water, stove, and food go in the center, near your spine. If you’re carrying fuel, make sure it’s upright and sealed.
- Fill the top with light but bulky gear. Extra layers, rain jacket, and first aid kit go here.
- Use outside pockets for small items. Snacks, map, and other quick-access things.
- Attach gear outside if needed. Trekking poles, sleeping pad (if too big), or crampons can go on the outside. Keep it tight so nothing swings.
Example Packing Order
| Pack Zone | Items | Why Here? |
|---|---|---|
| Bottom | Sleeping bag, pad | Light, not needed until camp |
| Middle (close to back) | Food, stove, water | Heavy, helps balance |
| Top | Jacket, first aid, snacks | Easy to grab quickly |
| Pockets/Outside | Map, sunscreen, poles | Quick access |
Compress And Tighten
When your pack is full, pull the compression straps tight. This keeps the load stable and close to your body.
Keeping Your Gear Dry And Safe
Rain can ruin a trip fast. Wet clothes and sleeping bags are dangerous. Use these tips to keep things dry:
- Pack liner: Use a trash bag or special liner inside your pack. This is a cheap, light way to keep everything dry.
- Dry bags: Put your sleeping bag, clothes, and electronics in dry bags. Even if your pack gets soaked, these stay dry.
- Rain cover: Most packs come with a cover. If not, buy one. It helps in heavy rain but is not foolproof.
- Plastic bags: For small items like your phone or matches.
I once got caught in a surprise storm near Mount Rainier. I hadn’t lined my pack and everything got wet. My sleeping bag was soaked and I shivered all night. Now I never hike without a pack liner and dry bags.
Loading And Wearing Your Pack Correctly
How you lift and wear your pack is just as important as how you pack it.
Lifting Your Pack
- Place your pack on the ground, straps facing up.
- Grab the haul loop (the small strap on top).
- Lift the pack to your knee.
- Slip one arm through a strap, swing it onto your back, then the other arm.
- Buckle the hip belt first, then tighten shoulder straps, chest strap, and load lifters.
Adjusting Fit
- Hip belt: Should sit on your hips, not your waist. This carries 60-80% of the weight.
- Shoulder straps: Snug, but not too tight. Shouldn’t pinch your shoulders.
- Load lifter straps: Pull these to bring the top of the pack closer to your body.
- Sternum strap: Across your chest. This keeps shoulder straps in place.
Walk around, make sure nothing pokes your back, and adjust as needed.
Posture
Stand straight, don’t hunch. Take short breaks to readjust. If you feel hot spots or pain, stop and repack if needed.

Credit: scoutlife.org
Packing For Different Weather And Environments
Not all trips are the same. You need to adjust your packing for different conditions.
Wet Weather
- Bring extra dry bags.
- Pack an extra pair of socks.
- Bring a pack cover and rain jacket.
Cold Weather
- Pack extra layers.
- Use a four-season sleeping bag.
- Bring a closed-cell foam pad under your inflatable pad for warmth.
Hot, Dry Weather
- Carry more water. Use a hydration bladder for easy sipping.
- Wear light, breathable clothes.
- Bring sun protection: Hat, sunscreen, sunglasses.
High Altitude Or Snow
- Bring microspikes or crampons.
- Carry a shovel and avalanche gear if needed.
- Bring more high-calorie food.
Common Packing Mistakes And How To Avoid Them
Many beginners make the same mistakes. Here are the biggest ones—and how you can avoid them.
- Overpacking: Bringing too much gear is the most common mistake. Ask yourself if you used the item on your last trip. If not, leave it.
- Poor organization: Throwing things in randomly leads to lost items and wasted time. Use stuff sacks and group gear.
- Bad weight distribution: Heavy items far from your back can cause back pain and falls.
- No rain protection: Even if the forecast is clear, always line your pack.
- Ignoring fit: Not adjusting your pack leads to sore shoulders and hips.
- Loose gear outside: Items swinging outside your pack can catch on branches or fall off.
- Not testing your pack: Practice at home. Walk with your full pack before your trip.
- Forgetting essentials: Make a checklist and double-check before you leave.
Expert Tips For A Comfortable Backpacking Trip
After years on the trail, I’ve learned a few tricks that can make a big difference.
- Pack multi-use items: A bandana can be a towel, sun shield, or pot holder.
- Keep a small snack bag handy: You’ll eat more often than you think.
- Use a sit pad: A small foam pad for breaks keeps your pants dry and you comfortable.
- Practice packing at home: Time yourself and see what works best.
- Trim extra straps: Unused straps can get in the way. Cut or tape them down.
- Carry a repair kit: Duct tape, needle, and thread fix most problems.
One trip, I forgot a repair kit. My pack strap broke on day two. I had to use shoelaces to tie it together. Now I never hike without duct tape and a needle.
The Importance Of A Packing System
Having a system means you always know where things are. This helps in emergencies and saves time.
- Always pack items in the same place.
- Teach your hiking partners your system.
- At camp, unpack only what you need.
If you need your first aid kit, you’ll find it fast. If it rains, you’ll know exactly where your rain jacket is.
Lightweight Vs. Traditional Packing
Some backpackers go ultra-light. Others bring more comfort items. Here’s a quick look at the differences:
| Style | Main Focus | Pros | Cons |
|---|---|---|---|
| Ultra-light | Minimal weight | Fast, less effort, more miles | Less comfort, less safety margin |
| Traditional | Comfort, more gear | More comfort, more options | Heavier, slower, more effort |
If you’re new, start with a traditional style. As you gain experience, you can cut weight and go lighter.
Packing For Group Vs. Solo Trips
Packing changes when you hike in a group.
- Group: Share gear like stoves, tents, and water filters. Divide weight evenly.
- Solo: Carry everything yourself. Prioritize light, multi-use items.
Talk with your group before the trip. Make a gear plan. This avoids bringing too many stoves or forgetting the tent poles.

Credit: www.stasherbag.com
Preparing Your Pack For Travel
If you’re flying or using public transport, protect your pack.
- Remove or secure loose straps.
- Use a pack cover or duffel bag for travel.
- Put fragile items (like a stove or fuel) in the center.
- Carry valuables and documents in a small bag with you.
Some airports may not allow fuel or matches. Check airline rules before you travel.
Practicing Leave No Trace
Backpacking is not just about you. It’s about nature, too. Follow Leave No Trace principles:
- Pack out all trash, even small pieces.
- Don’t leave food scraps or wrappers.
- Use biodegradable soap and wash away from water sources.
- Camp on durable surfaces.
This keeps trails wild for everyone.
Frequently Asked Questions
How Much Weight Should My Backpacking Pack Weigh?
Most experts suggest your packed backpack should be no more than 20-25% of your body weight. For example, if you weigh 150 lbs, your pack should not exceed 30-37 lbs. Lighter is better, especially for beginners.
How Do I Keep My Sleeping Bag Dry While Backpacking?
Put your sleeping bag in a waterproof dry bag. Also, use a pack liner inside your backpack. Even if your pack gets wet, your sleeping bag will stay dry and safe.
What Should I Do If My Pack Feels Uncomfortable While Hiking?
First, stop and adjust your straps. Make sure most weight is on your hips. If you still feel pain, repack heavy items closer to your back. Sometimes, a small shift makes a big difference.
Should I Bring A Rain Cover For My Backpack Even If The Forecast Is Clear?
Yes, always bring a rain cover. Weather can change fast in the mountains. A cover adds little weight and can save your gear from getting soaked.
Where Can I Find More Packing Tips And Gear Reviews?
You can find more detailed advice and gear reviews on REI’s Expert Advice. They have up-to-date info and checklists for all types of backpacking trips.
Packing a backpacking pack is a skill you’ll improve every trip. Start simple, pack only what you need, and focus on comfort and safety. With practice, you’ll find your own best system. Your back—and your adventure—will thank you. Safe trails!

Zayden Halbrook is a travel enthusiast and gear researcher passionate about making every journey smoother and more enjoyable. With a keen eye for practical travel essentials and real-world tips, he helps readers choose the right gear and travel smarter. When he’s not testing travel kits or exploring new destinations, Zayden shares simple, reliable advice to make every trip stress-free.