Packing a backpack sounds simple, but many travelers and hikers get it wrong. If you want a comfortable trip and to avoid sore shoulders or a messy bag, you need to pack your backpack the right way. I’ve learned this from years of hiking, city breaks, and long bus rides—sometimes sweating and digging for that one thing I should have placed on top.
This guide will show you step by step how to pack your backpack so everything stays organized, balanced, and easy to reach. Whether you’re going on a weekend hike, traveling across countries, or prepping for school, these tips will help you pack smarter and travel easier.
Why Proper Backpack Packing Matters
Packing a backpack isn’t just about fitting everything inside. The way you pack affects how much you can carry, your comfort, and even your safety. A poorly packed bag can cause back pain, make you lose time searching for items, or even throw off your balance on rough trails.
I once packed my rain jacket at the very bottom of my bag during a mountain hike. When a sudden storm hit, I had to unpack everything in the rain just to get to it. After that, I learned to always keep weather gear at the top or in an outside pocket. This small mistake taught me that item placement can make or break your trip.
Choosing The Right Backpack
Before you even start packing, you need the right backpack for your trip. The type of bag you choose affects what you can bring and how comfortable you’ll be.
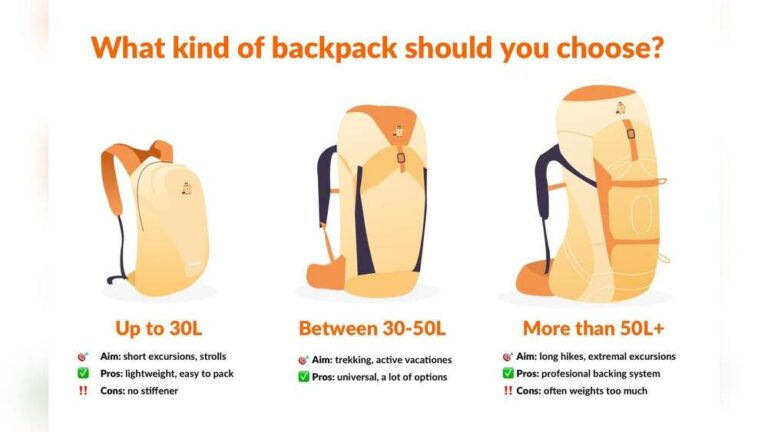
Size And Fit
- Daypacks (15-35 liters): Great for short hikes or daily use.
- Weekend packs (35-50 liters): Enough for two to three days.
- Multi-day packs (50-70+ liters): For longer trips or backpacking adventures.
Make sure the backpack fits your torso length and has adjustable straps. Try it on with some weight to see if it feels right.
Features To Look For
- Padded shoulder straps and hip belts help spread the weight.
- Water-resistant materials keep your gear dry.
- Multiple compartments help organize your items.
- Ventilated back panels reduce sweating.
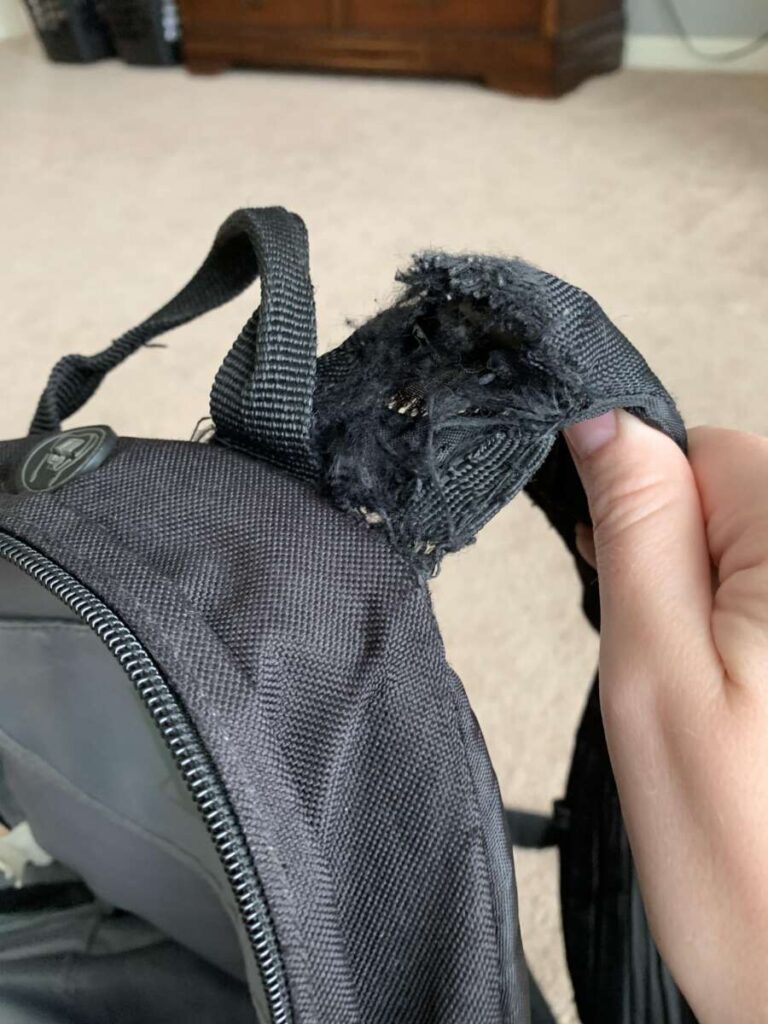
Cheap backpacks with poor support can make even a light load feel heavy. Invest in quality, especially if you plan to walk long distances.
Plan What To Pack: Essentials First
Packing starts before you put anything in your bag. Make a list of what you really need. Too many times, people pack “just in case” items that never get used but add weight.
Basic Packing List
- Clothing (weather-appropriate, lightweight)
- Sleeping gear (for overnight trips)
- Food and snacks
- Water bottle or hydration system
- First aid kit
- Navigation tools (map, compass, GPS)
- Rain gear
- Personal items (toiletries, ID, money)
- Electronics (phone, charger, power bank)
Ask yourself: “Will I use this every day?” If not, leave it at home.
Leave Room For Surprises
Even if you plan well, you may pick up souvenirs or food on your trip. Don’t pack your backpack to the absolute limit. Leave 10-20% of space free for new items or changes.
Organizing Your Gear
Now that you know what to bring, it’s time to organize. Group similar items together. Use packing cubes or zip-top bags for clothes, electronics, and toiletries. This saves time and keeps things tidy.
Packing cubes make a huge difference. On a trip to Japan, I used them for the first time. Finding socks or a T-shirt was quick and stress-free. No more digging through a messy bag!
Grouping Tips
- Clothes together in one cube or bag
- Toiletries in a small pouch
- Electronics and chargers in another pouch
- Food in a separate bag (to avoid smells)
Label bags or use different colors to tell them apart at a glance.
The Golden Rule: Heavy Items Close To Your Back
Balance is everything. The heaviest items should sit close to your spine and between your shoulder blades. This helps keep you upright and prevents back pain.
How To Place Heavy Items
- Put heavy gear (like a tent or food) in the middle of the bag, pressed against your back.
- Medium-weight items go around the heavy core.
- Light items (like a sleeping bag or jacket) go at the bottom or top.
This method keeps the load steady and easy to carry.
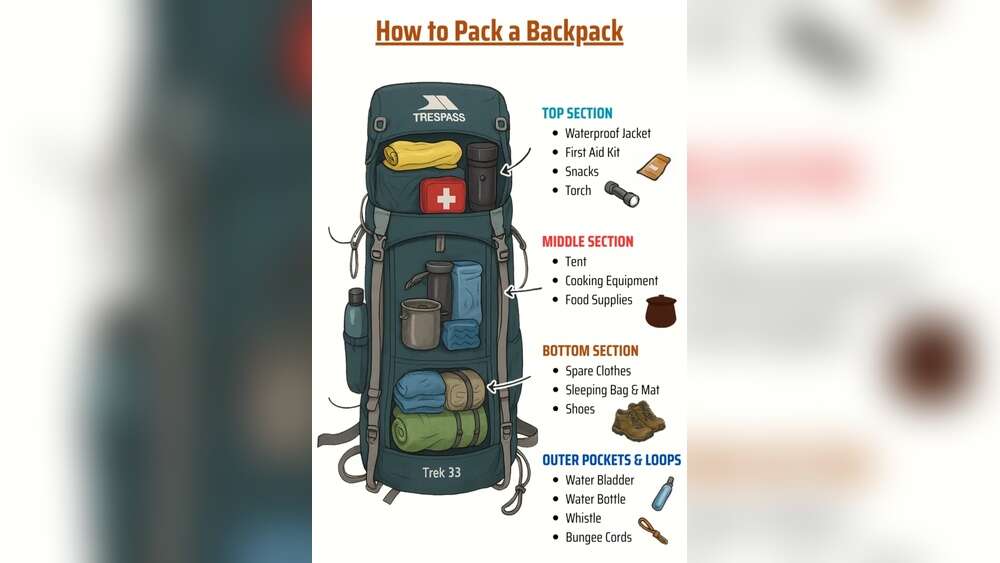
Packing Order: Bottom To Top
Let’s break down where each item should go in your backpack for best comfort and access.
Bottom Of The Backpack
This is for things you won’t need until camp or the end of the day.
- Sleeping bag
- Sleeping pad
- Camp shoes
- Nightwear
These items are bulky but light, so they act as a soft base.
Middle Section
Place your heaviest, densest items here.
- Food bags
- Cooking gear
- Water reservoir
- Tent body
Keep these items close to your back for balance.
Top Of The Backpack
Here you want things you might need during the day.
- Rain jacket
- First aid kit
- Snacks
- Maps or guidebooks
You can grab these quickly without unpacking everything.
Outside Pockets
Small and frequently used items go in outside pockets.
- Sunscreen
- Lip balm
- Sunglasses
- Water bottle
- Multi-tool
Outside mesh pockets are great for wet items, too.
Lid Compartment
If your backpack has a top lid, use it for quick-access items.
- Headlamp
- Passport
- Cash
- Phone
Compression And Stability
A well-packed bag is tight, not floppy. Use compression straps to tighten the load. This prevents items from shifting and keeps your balance steady.
Compression Tips
- Pull the straps evenly on both sides.
- Don’t over-compress; this can damage zippers.
- Fill all the space, so nothing rattles.
If you notice the bag swaying as you walk, stop and tighten the straps.
Waterproofing Your Gear
Rain can ruin a trip if your gear gets soaked. Even “water-resistant” backpacks can leak in heavy rain.
How To Stay Dry
- Use a rain cover for your backpack.
- Line the inside with a trash bag or dry sack.
- Pack clothes in zip-top bags or waterproof pouches.
On a trip to Scotland, I got caught in a downpour. Thanks to my trash bag liner, everything stayed dry—even when the outside was dripping wet.
Packing For Comfort And Health
Carrying a heavy backpack the wrong way can cause pain or injury. Make sure the weight is spread evenly.
Adjust The Straps
- Shoulder straps: Tight, but not cutting in
- Hip belt: Carries most of the weight
- Sternum strap: Keeps shoulder straps from sliding
After packing, put the backpack on and adjust all straps. Walk a few steps and see how it feels. If you feel pressure points or the bag pulls you backward, repack and adjust.
Keep Weight Down
Experts recommend your backpack should be no more than 20% of your body weight for hiking. For example, if you weigh 150 lbs, your pack should be 30 lbs or less.
Special Packing Tips For Different Activities
Packing isn’t one-size-fits-all. Adjust your packing style based on your trip.
Hiking And Camping
- Focus on lightweight gear.
- Prioritize hydration (easy access to water).
- Take only what you’ll use every day.
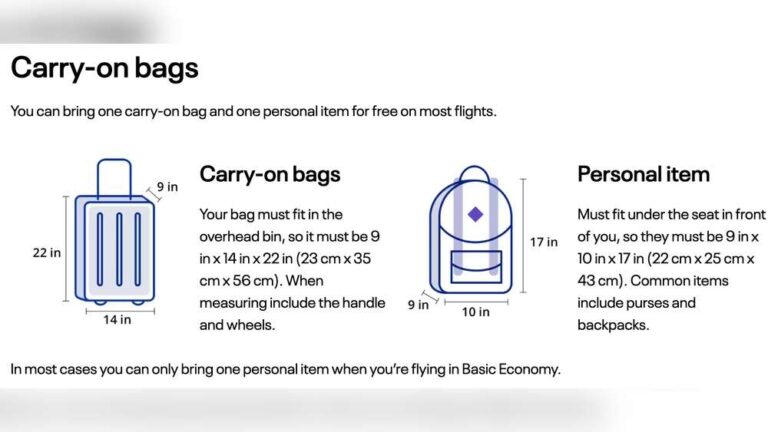
Airplane Travel
- Check airline size and weight rules.
- Pack liquids in a clear, zip-top bag for security checks.
- Place valuables and documents in outside pockets for quick access.
School Or Work
- Put laptop in a padded sleeve close to your back.
- Keep pens, chargers, and keys in small pockets.
- Use a lunch container to prevent spills.
City Travel
- Hide valuables deep inside the bag.
- Use locks on zippers for extra safety.
- Keep a reusable shopping bag for groceries or souvenirs.
Packing Mistakes To Avoid
Many people make the same errors when packing a backpack. Here are some to avoid:
- Overpacking: Only take what you need. Heavy bags tire you out.
- Ignoring weight distribution: Putting heavy items on top or outside makes the bag feel unstable.
- No waterproofing: One rainstorm can ruin your gear.
- Loose straps: Unstable loads move around and cause blisters.
- Hard objects against your back: Keep sharp or hard things away from your spine.
On a weekend trip, I once stuffed all my clothes in the outside pocket, making my backpack sag and swing. My shoulders hurt after just an hour. After that, I always put heavy items near my back and use outside pockets only for small, light things.
Quick Comparison: Backpack Features
Choosing the right backpack can be confusing. Here’s a quick look at common features:
| Feature | Basic Backpack | Travel Backpack | Hiking Backpack |
|---|---|---|---|
| Capacity | 10-25L | 30-45L | 40-70L |
| Padded Hip Belt | No | Sometimes | Yes |
| Frame | No | Light | Internal/External |
| Best For | School/Day trips | Travel/Commute | Camping/Hiking |

Credit: cascadedesigns.com
Packing Order Example: Three-day Hike
For a three-day hiking trip, here’s how to pack:
- Bottom: Sleeping bag, sleeping pad, camp shoes
- Middle (close to back): Food, tent, cooking kit
- Sides: Water bottles, stove fuel
- Top: Rain jacket, snacks, first aid kit
- Outside pockets: Map, sunscreen, hat
This order keeps your load balanced and essentials at hand.
Table: Weight Distribution In A Backpack
Keeping the right balance prevents pain and keeps you moving comfortably.
| Pack Area | Type of Item | Percentage of Total Weight |
|---|---|---|
| Bottom | Sleeping bag, pad | 15% |
| Middle (close to back) | Food, tent, water | 50% |
| Top | Rain gear, snacks | 15% |
| Outside pockets | Small accessories | 5% |
| Sides | Water bottles, fuel | 15% |
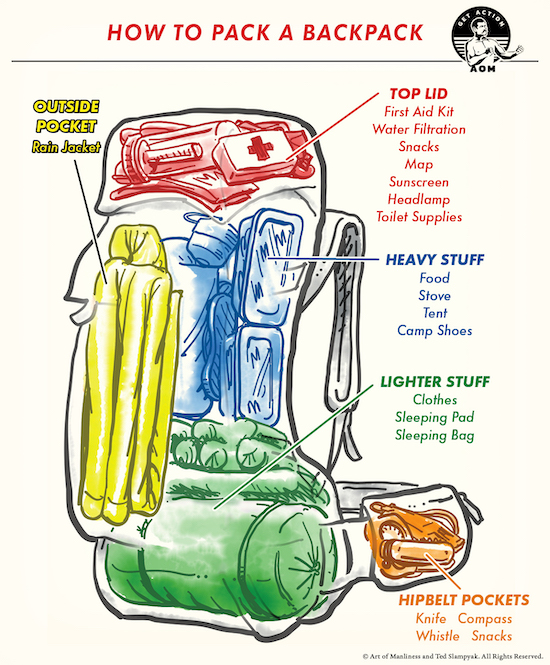
Credit: www.artofmanliness.com
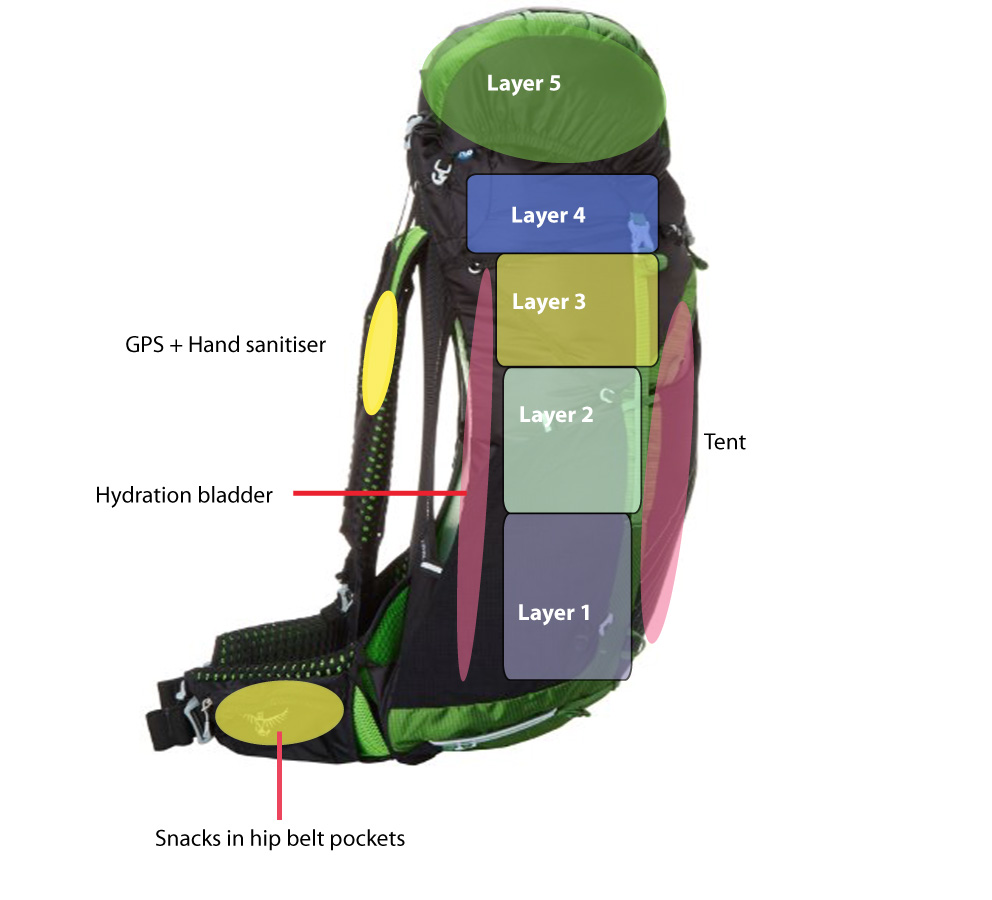
Advanced Packing Tips
Use Dead Space
Stuff socks or underwear inside shoes to save space. Roll T-shirts and underwear to fit into small gaps.
Layer For Access
Pack items you’ll need first on top. If you’ll reach camp in the evening, put your sleeping gear at the bottom.
Checklists Save Time
Make a checklist before every trip. Review it after your trip—cross out what you didn’t use and add items you wished you had.
Test Your Load
Before leaving, walk around with your packed bag for 10–15 minutes. Adjust weight if needed. If it feels too heavy, remove non-essentials.
Security
Traveling in cities or on public transport? Use small locks or cable ties to secure zippers. Carry a copy of important documents in a hidden pocket.
Table: Backpack Packing Order For Different Activities
Here’s a quick overview of how to adjust packing for different trips.
| Activity | Bottom | Middle | Top | Pockets |
|---|---|---|---|---|
| Hiking | Sleeping bag, pad | Food, tent, water | Rain gear, snacks | Map, sunscreen |
| Travel | Shoes, laundry | Clothes, electronics | Toiletries, jacket | Passport, wallet |
| School | Lunch box | Books, laptop | Pencil case | Keys, phone |
Packing For Different Weather
Hot Weather
- Pack light, breathable clothing.
- Keep a hat and sunscreen on top.
- Use an outside pocket for water.
Cold Weather
- Bring extra layers and gloves.
- Use dry bags for clothes.
- Pack a thermos with hot drinks.
Rainy Weather
- Use a rain cover.
- Keep rain gear on top.
- Double-bag electronics.
When To Repack
Sometimes you need to adjust your pack during your trip. If you notice pain, or if the bag feels off-balance, stop and repack. Even small changes help.
On a long trek in Peru, I found my pack was pulling to one side. I took five minutes to shift my water bottle and tent poles. The rest of the hike felt much easier—proof that small adjustments can make a big difference.
Credit: australianhiker.com.au
Eco-friendly Packing
Leave no trace. Use reusable water bottles and bags. Pack out all your trash. Choose biodegradable soap and avoid single-use plastics. A little planning makes your trip better for you and the planet.
Final Tips For Packing Success
- Practice packing before your trip.
- Bring only what you need.
- Keep heavy items close to your back.
- Use packing cubes or bags for organization.
- Adjust straps for comfort.
- Stay flexible—be ready to repack if needed.
Packing well takes practice, but every trip gets easier. When everything has a place, you can focus on enjoying your journey—not just surviving it.
For more packing strategies and backpack tips, check the REI Co-op Expert Advice page.
Frequently Asked Questions
How Do I Know If My Backpack Is Too Heavy?
If your backpack is more than 20% of your body weight, it’s probably too heavy. Try lifting it—if you struggle to pick it up or wear it for more than 10 minutes, remove some items.
Can I Use The Same Packing Method For School And Hiking?
The main ideas—like putting heavy items near your back and organizing with pouches—work for both. But you may need to adjust based on what you’re carrying, like laptops for school or sleeping bags for camping.
What Should I Do If It Starts Raining And My Pack Is Not Waterproof?
Quickly cover your bag with a rain cover or put your gear inside a big plastic bag or dry sack. Move electronics and important items to waterproof pouches if you have them.
Are Packing Cubes Really Necessary?
They’re not required, but packing cubes keep things tidy and help you find items fast. You can also use zip-top bags or stuff sacks if you want to save money.
How Often Should I Repack My Backpack During A Trip?
Repack if you notice discomfort, if the pack feels unbalanced, or if you need to access different items during the day. On long trips, a quick repack each morning saves time later.
Packing a backpack well is a skill anyone can learn. With a bit of practice and the tips above, you’ll be ready for any adventure—big or small. Safe travels!

Zayden Halbrook is a travel enthusiast and gear researcher passionate about making every journey smoother and more enjoyable. With a keen eye for practical travel essentials and real-world tips, he helps readers choose the right gear and travel smarter. When he’s not testing travel kits or exploring new destinations, Zayden shares simple, reliable advice to make every trip stress-free.